MK V 3D printed helmet

Status
Not open for further replies.

ptrinidad

New Member
I had resized the MoeSizzlac model I had found on thingiverse and resized it to my head. I Gorilla glued all the parts together and I need suggestions on how to fill the seams and holes. Thank You!
 

Attachments

  • IMG_7895.jpg
    IMG_7895.jpg
    49.2 KB · Views: 195
  • IMG_7896.jpg
    IMG_7896.jpg
    67.4 KB · Views: 203
I had resized the MoeSizzlac model I had found on thingiverse and resized it to my head. I Gorilla glued all the parts together and I need suggestions on how to fill the seams and holes. Thank You!

If you are in the US or know a place who sells it you can use a car body filler called Bondo. Some versions you need to mix the stuff but others can come pre-mixed. Some people also use wooder filler and plasterboard filler. I used a mix of super glue, wood filler and body filler for my helmets. All have there own advantages. To help with really big gaps or small missing bits you can mix baby powder in with the superglue
 
I had resized the MoeSizzlac model I had found on thingiverse and resized it to my head. I Gorilla glued all the parts together and I need suggestions on how to fill the seams and holes. Thank You!
Primer/filler spray paint is pretty useful. personal I use a combo of primer/filler and Bondo. I've also heard mixed responses to XTC-3D, which is a printable coating for 3d prints that can then be sanded once it hardens, but it's also a bit expensive.
 
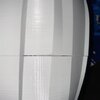
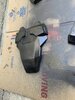
What I do is coat the entire inside/backside of my 3D print in Resin. I use smooth cast 65D. Then I coat my entire piece in XTC-3D. After a layer or two I prime it with filler primer and this removes the bulk of my print lines. I may do a small layer of bondo for larger gaps or seams.
 

Attachments

  • C3EC405B-52C5-4EFE-A638-F1802EC57E89.jpeg
    C3EC405B-52C5-4EFE-A638-F1802EC57E89.jpeg
    335.3 KB · Views: 204
  • 700FE365-5613-4758-BCCD-FC5185ED51A0.jpeg
    700FE365-5613-4758-BCCD-FC5185ED51A0.jpeg
    2.4 MB · Views: 210
  • 833F5938-4E4D-4F4C-AF3D-6E2A878A5A66.jpeg
    833F5938-4E4D-4F4C-AF3D-6E2A878A5A66.jpeg
    2.8 MB · Views: 214
  • 6F2EDE77-BC7B-494E-BBCC-CD77EA08228A.jpeg
    6F2EDE77-BC7B-494E-BBCC-CD77EA08228A.jpeg
    634 KB · Views: 202
  • 82D6A79C-C12C-4281-92AE-D250982EC88B.jpeg
    82D6A79C-C12C-4281-92AE-D250982EC88B.jpeg
    2.6 MB · Views: 203
  • 391EB990-942A-452E-808E-8207AD28D1C3.jpeg
    391EB990-942A-452E-808E-8207AD28D1C3.jpeg
    2 MB · Views: 206
Thank you for all your advice. When I start to smooth down my print after I've added my filler, what sandpaper grit should I use?
 
Thank you for all your advice. When I start to smooth down my print after I've added my filler, what sandpaper grit should I use?
This really depends on how pronounced your print lines are. For me, I’m able to use 200,400,600
 
Status
Not open for further replies.
Back
Top