My first build- Halo 4 MkVI foam

Status
Not open for further replies.

Kenneth Morgan

New Member
Hey Every one,
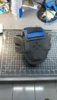
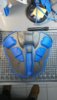
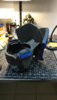
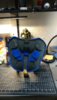
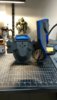
Started working on my first build. Been all over this site looking at everyone's builds and instructions on how to do it. Been watching videos too. So I've started to build the bicep and shoulder pieces. I read somewhere those are the easiest to do and good practice. So that's why I started there. My first bicep piece came out ok. After looking at it I wanted it to look more like the pictures I'm going by. So I redid it. Like it better. Same for the shoulder piece. The first picture is my first attempt of the bicep. The second is the second of the bicep. The third is the shoulder that I completed. I am still working on redoing it. Would like to know how the shoulder piece is attached to the bicep. There are no real clear ways to do that. I am pretty sure it different for everyone. Will keep posting as I go along.

If you have any advice or suggestions please respond. They will be appreciated.

Thanks, Ken
 

Attachments

  • bicept 1.jpg
    bicept 1.jpg
    91.7 KB · Views: 284
  • bicept2a.jpg
    bicept2a.jpg
    94.8 KB · Views: 282
  • shoulder1a.jpg
    shoulder1a.jpg
    99 KB · Views: 300
Wow. That is really looking good, man.

As for attaching the shoulder to the bicep, there's a small "arm" of sorts that protrudes between the two. I'm not sure what file you're using, but it should be there. I'll try to get you a picture here in a bit if that'll help.
 
Have a Question about the helmet. Has anyone used a motorcycle helmet and grafted the foam pieces to it? Or is it just better to build it completely out of foam. I know I'm not there yet, was just wondering.

Thanks, Ken
 
Thanks Sean. Been looking at yours and that looks awesome. you mentioned shoe goo before. I am putting my armor together with contact cement. should I use the shoe goo all over to help reinforce it. It looks good the way you have done yours.
 
Thanks Sean. Been looking at yours and that looks awesome. you mentioned shoe goo before. I am putting my armor together with contact cement. should I use the shoe goo all over to help reinforce it. It looks good the way you have done yours.

I use shoe goo on the inside surfaces where no one will see it, and I'm especially careful to apply it where I know there will be a lot of wear and abuse. It comes in a red sticky tube, and I'd strongly advise proper PPE like respirator and nitrile gloves, then squeeze out the desired amount and push it around where you want it and leave it to settle for a day or two. ExCeLLuR8 introduced me to the concept. I'll tag him in to expound further.
 
I use shoe goo on the inside surfaces where no one will see it, and I'm especially careful to apply it where I know there will be a lot of wear and abuse. It comes in a red sticky tube, and I'd strongly advise proper PPE like respirator and nitrile gloves, then squeeze out the desired amount and push it around where you want it and leave it to settle for a day or two. ExCeLLuR8 introduced me to the concept. I'll tag him in to expound further.
Yup Sean pretty much covered it. I swear by shoe goo, it's incredibly strong and permanent. I coat the entire inside of all my armor and go heavier on seams to help support them. The reason I coat the entire inside is because the cured surface of shoe goo really helps all that heat formed foam hold its shape and prevents it from wanting to "grow" back out on you. I've also found that it's cured surface heat forms well with a lot of heat. Say you have to adjust the look of a heat formed piece, using leather gloves, get the cured goo hot, form and hold the shape during cooling, it will hold that shape permanently. Once you get decent with using shoe goo, you can actually get it to cure in a nice smooth surface that when using your floor mat pattern, it resembles carbon fiber in a way (smooth with patern embedded). I also used the shoe goo to set in my 1/2 rubber boot soles on my build and they are crazy strong. It does get expensive using it the way I do, so just backing seams also works fine as well. PPE and ventilation definitely needed, but highly suggest it you won't be disappointed with its strength. Your build looks absolutely fantastic so far, amazing foam work!
 
Yup Sean pretty much covered it. I swear by shoe goo, it's incredibly strong and permanent. I coat the entire inside of all my armor and go heavier on seams to help support them. The reason I coat the entire inside is because the cured surface of shoe goo really helps all that heat formed foam hold its shape and prevents it from wanting to "grow" back out on you. I've also found that it's cured surface heat forms well with a lot of heat. Say you have to adjust the look of a heat formed piece, using leather gloves, get the cured goo hot, form and hold the shape during cooling, it will hold that shape permanently. Once you get decent with using shoe goo, you can actually get it to cure in a nice smooth surface that when using your floor mat pattern, it resembles carbon fiber in a way (smooth with patern embedded). I also used the shoe goo to set in my 1/2 rubber boot soles on my build and they are crazy strong. It does get expensive using it the way I do, so just backing seams also works fine as well. PPE and ventilation definitely needed, but highly suggest it you won't be disappointed with its strength. Your build looks absolutely fantastic so far, amazing foam work!
Thanks to you and Sean for the info. Thanks for the complement too. I finished the assembly of both bicep/shoulder pieces. I haven't used the kwik seal or plastidip them yet. Trying to decide if I should do that or start the forearms now. Again thanks for your help and advice.
 
Thanks to you and Sean for the info. Thanks for the complement too. I finished the assembly of both bicep/shoulder pieces. I haven't used the kwik seal or plastidip them yet. Trying to decide if I should do that or start the forearms now. Again thanks for your help and advice.
Me personally I wait till the very end to rubber coat. You never know if you will make changed as the project evolves. I've gone back and made detail improvements. I consider quik seal and rubber coating phase 2 of my build outs. Also, check out rustoleum leak seal rubber coat, it's far stronger than plastidip and does not wrinkle or peel. TurboCharizard got me turned to it, it's far better quality.
 
Me personally I wait till the very end to rubber coat. You never know if you will make changed as the project evolves. I've gone back and made detail improvements. I consider quik seal and rubber coating phase 2 of my build outs. Also, check out rustoleum leak seal rubber coat, it's far stronger than plastidip and does not wrinkle or peel. TurboCharizard got me turned to it, it's far better quality.
The not peeling part is huge. If a part rips off by some run of bad luck you don't lose a section of your surrounding paint job as well.

Being able to sand the surface is the real strength of the material though. That could just be my bias/addiction to sanding everything.
 
The not peeling part is huge. If a part rips off by some run of bad luck you don't lose a section of your surrounding paint job as well.

Being able to sand the surface is the real strength of the material though. That could just be my bias/addiction to sanding everything.
Absolutely! The sandability of it plays a major part in my finishing steps. Can get such clean work with it
 
Status
Not open for further replies.
Back
Top