- Member DIN
- S091
This was my first ever attempt at pepakura I started back in March 2010. The helmet file is from Dungbeetle. Any way, It sat in my garage until October 2010 when I decided to finish it for my 8 year old nephew.
I started out by applying two coats of resin to the outside to stiffen it somewhat. Next I applied to good coats of Rondo to the inside to harden everything up. After that was done, I used my Dremel to sand down the seams and make the surface more even. I then applied body filler in sections. It is easy to get overwhelmed if you just coat the entire thing. You can also lose proportions this way I think.
Followed by a ton of sanding, more filler, and more sanding. Next I used spot putty to fill in pin holes and small imperfections, sanded those areas and then used masking tape and reference photos to lay out the detail lines for the face plate and around the helmet. Using a fine sharpie I traced the lines and removed the tape. Next I used a couple of different needle files to carve the detail lines in the helmet.
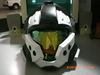
I then shot the whole thing with several coats of high build eurothane primer to give it a good base to work on. Next... the color. I used two coats each of Krylon burgandy red, Rustoleum Metallic Gold, and Rustoleum crystal clear I got at Walmart.
After it had sat for a day or two, I put foam padding on the inside, painted the black accents in the cheeks and the mouth area which you can see in the video
http://s814.photobucket.com/albums/zz62/vshore100/?action=view¤t=Video0009.mp4
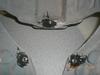
, and glued in some mirror lenses I took out of a three dollar pair of sun glasses I also found at Walmart. I didn't want to go with lighted eyes and such for a helmet being worn by an eight year old. He needed to be able to see when running around pretending to be Iron Man. I also made the helmet stand you see in the photos using plywood, a cut down two by four, and flat black paint. I hope you guys enjoy and please leave feedback, it is very much appreciated!


I started out by applying two coats of resin to the outside to stiffen it somewhat. Next I applied to good coats of Rondo to the inside to harden everything up. After that was done, I used my Dremel to sand down the seams and make the surface more even. I then applied body filler in sections. It is easy to get overwhelmed if you just coat the entire thing. You can also lose proportions this way I think.
Followed by a ton of sanding, more filler, and more sanding. Next I used spot putty to fill in pin holes and small imperfections, sanded those areas and then used masking tape and reference photos to lay out the detail lines for the face plate and around the helmet. Using a fine sharpie I traced the lines and removed the tape. Next I used a couple of different needle files to carve the detail lines in the helmet.
I then shot the whole thing with several coats of high build eurothane primer to give it a good base to work on. Next... the color. I used two coats each of Krylon burgandy red, Rustoleum Metallic Gold, and Rustoleum crystal clear I got at Walmart.
After it had sat for a day or two, I put foam padding on the inside, painted the black accents in the cheeks and the mouth area which you can see in the video
http://s814.photobucket.com/albums/zz62/vshore100/?action=view¤t=Video0009.mp4
, and glued in some mirror lenses I took out of a three dollar pair of sun glasses I also found at Walmart. I didn't want to go with lighted eyes and such for a helmet being worn by an eight year old. He needed to be able to see when running around pretending to be Iron Man. I also made the helmet stand you see in the photos using plywood, a cut down two by four, and flat black paint. I hope you guys enjoy and please leave feedback, it is very much appreciated!
Attachments
-
 photos011.jpg59.5 KB · Views: 361
 -
 photos005.jpg36.7 KB · Views: 367
 -
 Photo0212.jpg14 KB · Views: 351
 -
 Photo0216.jpg14 KB · Views: 355
 -
 Photo0220.jpg14 KB · Views: 393
 -
 Photo0222.jpg14 KB · Views: 378
 -
 Photo0223.jpg14 KB · Views: 345
 -
 Photo0224.jpg14 KB · Views: 351
 -
 Photo0225.jpg14 KB · Views: 365
 -
 Photo0231.jpg14 KB · Views: 366
 -
 Photo0227.jpg14 KB · Views: 358
 -
 Photo0230.jpg14 KB · Views: 366
 -
 Photo0233.jpg14 KB · Views: 341
 -
 Photo0236.jpg14 KB · Views: 368
