NEMES1S's build. including second build 3d printed

Status
Not open for further replies.
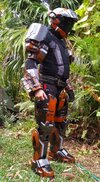
i got the attachment to hold the raspberry pi done. i did some weird frankenstein stuff to the original model so that i could slide the power bank in from the back and have it secure inside. and melted some brass threaded inserts into the pi case and the attachment so i could run bolts through to hold it on.

278019830_1597581737277747_8072361977724873300_n.jpg278020075_651661392570022_6481698238369007898_n.jpg278082665_308116328128506_4024785061167822834_n.jpg


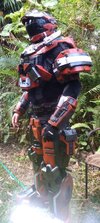
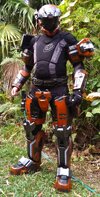
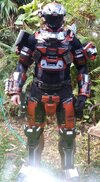
i was thinking about doing a rail gun, but have decided to just go with the magnum so i can just attach it to the thigh

278090692_393188195718623_6957928864900617154_n.jpg278203686_961229931243119_374660097507771272_n.jpg

also printed out attachment points for the webbing and welded them in, i'm still a bit reserved on using pla for these. i'm hoping they hold the weight and dont detach.

277969060_368773758501767_3154159375841101365_n.jpg278009620_3102659256641628_5302596213846026653_n.jpg
 
lately i have felt like ive been slipping behind schedule, normally i just get things done when they are done. but i have a con coming up so need to get it done. this has now caused me to rush through some stuff. i haven't been cleaning up the join lines as much as i normally would and have opted for for more basic paint scheme and cutting other corners.

I have painted up most of the remaining pieces, and got in some weathering.

i tried spraying a bit of red and black around the edges of the orange to try pull off a 2 tone effect at different angles, but i ended up haveing to do more coats of orange to get the tone right to match the other pieces and mostly covered it up.
278643877_1179559955917265_8456699349670348808_n.jpg278982840_529572538757478_7196101066966114703_n.jpg

278575178_1294350451053829_7139894954781151719_n.jpg
278491886_682470532972538_4269713057331083155_n.jpg278390243_367634158763871_7063257862440736132_n.jpg

278413013_579380699854248_6770295735929998605_n.jpg

278454941_1096208274269921_2308212553337593189_n.jpg

i got the magnum painted up, initially i did not like how it turned out. i've been using a combination of a darker rougher metallic from a rattle can and a fine lighter metallic from the air brush. i sprayed them onn too thick and too thin so i couldn't get them to contrast well. it is more obvious is in the thigh attachment pic above. but after i got the clear coat on it has grown on my more. i still might add a different color in somewhere else to break up the metallic more, maybe some more red or a gray.

278403174_696755441472671_1472595548726575654_n.jpg278656528_310676904368818_2576348983927050528_n.jpg
 

Attachments

  • 278953602_1438652299911272_7304541218604918763_n.jpg
    278953602_1438652299911272_7304541218604918763_n.jpg
    451.3 KB · Views: 101
did a test fit of the upper parts, and while it looked good it's all pretty tight when the chest is put on over the top of the under suit and the strapping, the range of movement is bad due to the biceps hitting on the side gaskets. i cant even reach up to put my helmet on. i'm also concerned about this when i glue on the attachments to the chest i may need to either cut them out completely or im looking and reprinting them a lot thinner, since i like the contrast between the orange and the black.

278606468_761591735008908_158138670366459587_n (1).jpg278605827_510810910538623_5206321740478638970_na (1).jpg278484213_275519911436982_8914194191186283060_n (1).jpg278685084_482453226908237_4197101538624053205_n (1).jpg

new edit had a busy day, welded the straps into the thighs and the shins and managed a partial suit up.

279006823_10159918019280218_1315804541813946228_n1.jpg
 
Last edited:
I scaled down one side of the arm gaskets and done preliminary test, while not looking as good and fitting as good i have seen an increase in mobility and i should be able to reach up to take my helmet on and off. the biceps could have been a little smaller but is way too late to re print them. I've also been messing around taking padding out of my under suit around my shoulders to make the chest sit lower and not hit on my helmet when i turn my head. still finding the balance between clearance and supporting the weight of the chest so it doesn't dig into my shoulders and cause fatigue.

278669552_563637844958635_751913467137876343_n.jpg278674043_3105979566328856_9094621961416360954_n.jpg278902779_1015188619435712_5331463379510433105_n.jpg277967989_393714768942141_6557163990778748021_n.jpg278579029_5642890085727504_2104352095540671662_n.jpg
 
Taped the computer wrist attachment on, same to say it came out heavier than i had anticipated. I got a power bank half the size i wanted to save on weight. the wrist attachment probably weighs twice the wrist armor. it looks amazing but i'm having second thoughts about using it. i'm somewhere between ive come to far and worked too hard not to use i, and this is going to fatigue my arm real quickly.

279151055_844052929844436_1416390693237476311_n.jpg279158171_774739197243540_952793245455211506_n.jpg
 
started finalising some of the pieces. and making some hard decisions. after looking into just making the tac pad detachable so i can take it off when it gets too heavy, ive decided to put it on the back burner for now and get the rest of the costume finished first. at this point i'm looking at going with out the side gaskets and the tac pad, as the movability currently out weighs the extra better looks.

glued the collar breacher and assault attachments to the chest, and glued badges onto the collar. i hand painted the champion badge as i felt it would be too much trouble to mask and airbrush it. not as clean as it probably should be but i kind of like the rough look.
279195317_994350194525445_6890962493318451367_n.jpg279311038_1182673145816934_8949920083893145479_n.jpg279587375_412589193631781_5929090356412462582_n.jpg

glued the tac case on and attachments for the magnum
279449763_1003707267183819_5379061012754845606_n.jpg 279242539_1142554173202877_8123102545248735350_n.jpg279271675_535048961543996_7715560461058034166_n.jpg

a simple twist lock mechanism. i was a bit concerned about its ability to adhere to the painted pla but it so far so good.
279765837_297813752540732_9006691239736049390_n.jpg279744042_3277333082592548_7924159634700122175_n.jpg

also glued the sneakers into the boots and glued a high density foam for concrete joins onto the bottoms. the sound of pla clanking on t0eh ground was really making me shudder
279353154_514123410437079_3519762990762438975_n.jpg279134791_998179411090669_5022242572289384282_n.jpg
 
got the shot gun shells finished. i didn't sand them and the rack enough so the fitment was too tight and ended up snapping the racks, so they are all glued in now. went with a few different colors for different kinds of shots.

279645974_323973899850179_5511882832830976490_n.jpg279697104_370312448386343_3852873905015439085_n.jpg279761613_551360469709948_4818349159009107955_n.jpg

finished off the sheath and glued it to the chest. also decided to paint the handle of the knife in wood grain, i had a few stuff ups but the finish still turned out good.
280135402_322998919971676_395020759637066669_n.jpg279852970_706128780731026_5013276110523213732_n.jpg279887934_752279109270779_7684994490145919374_n.jpg

also added some foam into the helmet to conceal the led from being seen from the outside. it did block some of the view of the teeth but i think it was worth it for the overall look. i had been holding off on gluing the visor and attachment on the top to make sure the leds and other bits wouold stay on. in the end ive used double sided tape on the visor and glued the attachment on i should just be able to shimmy the visor out under the attachment if i need to and ill probably glue it in before i wear it out as i dont think the adhesive ont eh double sided tape will live long in the humidity where i live.

280219236_414877577067831_547395728251437312_n.jpg279750055_471582191320466_783257753935179682_n.jpg279738269_1115665315956303_1936939412845116912_n.jpg
 
whilst i've been doing try on have been hearing teeth crunching cracking noises that i haven't been able to track down. finally got it in some good light and discovered cracks on both sides next to where the joins are. i have melted in a fair bit of pla over them, but not touched the tops, so there is still hair line cracks through he top. i'm wondering if it was caused either by me squeezing the shoulder gaskets int eh first time and then now wearing it with out them. i'm not sure how to proceed from here. whether the extra welding will hold up, whether i should put tape or glue something else over the top or weld back in the smaller shoulder gaskets to try add extra stability.

279893408_1666371533699484_5349729562744310826_n.jpg279937510_431129145684584_4014810670715255635_n.jpg

when i got some hair line cracks on my integrity knight i was able to cover them up by glueing fabric over the top and making it look like an intentional part of the design. though i didnt have any concerns for it falling apart
z2.jpg
 
I went to put in the smaller gaskets and due to them being completely re scaled they didn't fit in as well, i though it would not be a problem. but i was wrong. ended up cracking the chest again. this is definitely a weak spot and is probably made worse by the direction of the build lines. welded it back together again.

282406584_2566979776768233_335165295049911043_n.jpg284056829_761937455137023_7797585697143628953_n.jpg

Im now on v3 of the gasket design, i have left the interior part the same scale so it will fit snug to the chest and only deformed the outer part to try give clearance for the biceps and shoulder bits. just waiting for more pla so i can print and test the new design.

in the mean time i have added some carbon to some of the peices
282061933_739464303914871_2555906837918707691_n.jpg282330515_379803050775311_947941163316713521_n.jpg283823375_742170166838537_2271035228196345367_n.jpg
 
it's been a rough few weeks trying to get this sorted. the gasket v3 was a bust totally ruined my range of movement. i decided to remove the under webbing and sew attachment points for the shoulders straight to the under suit. though this was not enough shedding of the mass under the chest and i cracked it again. i'm thinking of cutting it in half and trying to add in some extra length to try add extra clearance and stop it from cracking. though this is not a guarantee fix. im running out of time to finish this and now may have to run the costume with out the chest.

managed a "full suit up" for the first time
 

Attachments

  • 287730508_350818830493380_453751583101662127_n.jpg
    287730508_350818830493380_453751583101662127_n.jpg
    390.4 KB · Views: 68
  • 287879116_5346303378763329_3811883653684675764_n.jpg
    287879116_5346303378763329_3811883653684675764_n.jpg
    636.7 KB · Views: 74
  • 287901603_414708373877056_3247907995616225100_n.jpg
    287901603_414708373877056_3247907995616225100_n.jpg
    392.2 KB · Views: 68
  • 287924843_1058592218078914_42942136271382089_n.jpg
    287924843_1058592218078914_42942136271382089_n.jpg
    545.6 KB · Views: 68
  • 287962386_833947147570003_8996842394072931706_n.jpg
    287962386_833947147570003_8996842394072931706_n.jpg
    467.3 KB · Views: 77
It looks like the chest is just the print. You could try reinforcing it with fiberglass on the inside to prevent it from breaking so easily.
 
Honestly if you can repair your chest and keep it from breaking again, I think the suit looks fantastic even without the gasket! I would definitely go without the gasket rather than the entire chest if you can help it!
 
I'm thinking about cutting it apart with a hot knife and adding in approx 2.5cm extra around the shoulder area to add more clearance between the front and back. I think I have put on weight since the initial scaling causing it to be a little too small. If that fails I'll try the fibreglass
 
I had a long think about how to proceed, and decided fiberglassing it would be far faster than cutting it and adding extra in. Put in 2 layers of fiberglass woven cloth, hopefully will be nough. just have to wait for it to fully cure and then i can clean it up and try it on.

289035695_455165943278901_5681673213908787379_n.jpg289186340_5231320090278120_5638653475715444747_n.jpg
 
looks like the fiberglass should be strong enough to last for the few hours ill be wearing it (fingers crossed) i wouldn't mind adding a little more fiberglass but its too close to wear date now and i want to make sure all the fume from the resin have dissipated before i wear it.

i have dusted off the old machine gun, going to give it a respray and add a strap, so i can attach it to my belt when i need my hands free
291929414_2524807224316761_6340447182821169608_n.jpg
 
Status
Not open for further replies.
Back
Top