NEMES1S's build. including second build 3d printed

Status
Not open for further replies.
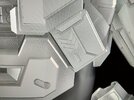
rigged up my led's and found they were woefully inadequate. the initial plan was to run 4x 5v leds on a 9v battery with resistors to lower it to 5v.
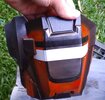
instead i stole the 12v led strip lights out of my predator bomb forearm and they seem to be bright enough. so i'll cut them into the individual 5cm strips put them in multiple spots and either power them from the 9v or track down the 8xaa battery pack from the forearm. thought the 9v is preferable as i can easily conceal it in the helmet, where as the battery pack would likely have to be mounted outside the helmet.

1.jpgDSC00910_zpsuabagzlu.jpgDSC00911_zpsinvokfux.jpg269880467_258751056359447_4076621653159348157_n.jpg269881288_309081757649444_8934375446093250912_n.jpg
 

Attachments

  • 269896311_498137605204945_4644532671656629368_n.jpg
    269896311_498137605204945_4644532671656629368_n.jpg
    81.3 KB · Views: 130
swapped over the 5v leds to 12v led strips, a lot more powerful. i've been messing around with a combination of top and bottom strips and looking at in different light conditions.

in day light the leds are about right
270945845_1754143408114626_5761214532293432592_n.jpg271047121_643702376821536_5372203725385936739_n.jpg271365541_470693368126944_2409773177478095937_n.jpg271063910_642162370564012_6392985787256942530_n.jpg

in low and dark they seem to bright. i have looked at running only the bottom strip and tried diffusing them with some 210gsm card stock but they still shine through and show the lights too much.

270350639_2070508359791101_7711591615120510833_n.jpg271192230_771689167083482_8714973535903843651_n.jpg271278098_254856256620008_147096855554799839_n.jpg

i'm trying to work out a clean look when the leds are concealed but still produce enough light to show the skull well. when i had htem hidden on teh inside bit of the helmet they weren't throwing enough light up. i have even tried attaching the bottom strip to the inside of the visor so it throws on to the skull but seeing the back of the strip through the visor was terrible. will have to mess around more to get the right look.

i also may need to wear a full mask under as you can see my eyes and nose when it is lit up
271482898_329099349085340_7046926142065820204_n.jpg
 
i think i found an acceptable diffuser for the leds. i sanded some scrap petg and then sprayed it with the nightshades, which has knocked the brightness level down to acceptable levels for persons looking into the helmet. i had hoped to get rid of being able to see each individual led but i think they are too far apart and it overall looks cleaner.

271374449_658577328836018_2138460922630570406_n.jpg271289208_475044357297549_5253600404356536153_n.jpg

got the first boot assembled, so i did a comparison of the old vs the new model
271271790_1111054296100399_8876778328895888390_n.jpg
 
I got back into sanding again after putting it off for some time. I got over it pretty quickly especially thinking about how much sanding I had ahead of me. So I went looking to make it easier and after not being able to get a suitable spot putty where I live I turned to 3d print resin

images (4).jpeg
Got myself some anycubic resin and so far very happy with how it performs. Can be layered on really thinly and built up, cures super quick in UV light and it's hardness is just right sands down well. Much better than fibreglass resin, and can be applied into tight spots where you wouldn't be able to get a filling blade into for filler. From the bits I've coated so far looks like it will speed up the clean up process a great deal
 
Helmet looks killer!! Possible to rig up one these headlamp bar thingies in there? Might be a bit easier to diffuse?https://www.amazon.com/dp/B091TWLRY...abc_5TQRE50ZYGQ7XGRAJC86?_encoding=UTF8&psc=1
not a bad idea. tbh i really should have got some of those flexible led strips they use in the ironman helmets for the eye lenses. but i just grabbed what they had at the local electrical shop so i didn't have to wait.

ledstrip.png

still plenty of time to change my mind though and order some
 
i'm starting to plan out how heavily to decorate the armour now. simply painting on the logos is no longer enough so they are going to be raised bits. i have done up a few to see what they look like.

271688881_446042503854589_191333164811289496_n.jpg271827968_303782525140367_4902978544812766668_n.jpg266765486_1161822167685416_1368220159141061084_n.jpg
i have a few more to do and i'll include my gamer tag again but i'm not sure whether to stick with just halo logo exluding the lion ont eh grenedier of course or go with some more ornate stuff like it did on my integrity knight

139789176_10158959454865218_2518697773866570300_n.jpg136970699_10158938723740218_4454531260059215714_n.jpg
 
got the unsc logo printed, i think i will leave it as is and wont clean it up any further.

272044977_507505070700606_7906226614882155949_n.jpg

had a few issues after scaling down to the size i want the details were too small for my nozzle to print even on ultras fine details. i sliced it up on a smaller nozzle and still couldn't get the details to print so have had mess around with it a fir bit to try get it to a pint it is print able.
272065705_643435043551609_5256697630727428578_n.jpg271953869_1008358139755358_2082849475991040201_n.jpg

also sized my gamer tag and some other bits
272121749_324037536312994_873209751803438646_n.jpg271918162_234839532161132_5975052140102542140_n.jpg
 
Wow, I'm surprised the printer captured so much detail!
i was sceptical at first, but i'm pretty happy with how it turned out. and that was on a 0.4mm nozzle i could have gone down to a 0.2mm nozzle but i cant find where it put it. i might have to get another one for finer detail stuff. hopefully the others come out just as well. i printed that flat on the bed too i normally print them standing up so the top of the model is on its side.

like this. this is the only orientation i could get the oni logo to seem like it would print. see how it goes

272198254_440969717772667_7467878210252725597_n.jpg
Wow, I'm surprised the printer captured so much detail!
 
i was sceptical at first, but i'm pretty happy with how it turned out. and that was on a 0.4mm nozzle i could have gone down to a 0.2mm nozzle but i cant find where it put it. i might have to get another one for finer detail stuff. hopefully the others come out just as well. i printed that flat on the bed too i normally print them standing up so the top of the model is on its side.

like this. this is the only orientation i could get the oni logo to seem like it would print. see how it goes

View attachment 313452
Hmm, don't think you're gonna have a fun time with those spikes. I can even see support between them so it'd be extremely difficult to remove those without breaking the spikes. Have you tried printing it flat but also enabling the "thin walls" option?
 
Hmm, don't think you're gonna have a fun time with those spikes. I can even see support between them so it'd be extremely difficult to remove those without breaking the spikes. Have you tried printing it flat but also enabling the "thin walls" option?
even with the thin walls option it still doesn't print the spike entirely and does this weird partial missing circular bit. i don't know if this is some glitch in the model ( i ran it through 3d builder to make sure there was not errors) i think i have just reached the limit of my 0.4mm nozzle.

272237282_700654997597762_3759980018796052011_n.jpg272302616_945211346387309_2869113786990960552_n.jpg

when i slice it with 0.2mm nozzle it looks fine.
271910549_917029912340021_3288954276604847161_n.jpg

so i have a few options, can either test it with the 0.4 nozzle or get a new .2 or edit the model and manually extrude the spikes so they are thicker, which i really don't feel like doing. i might put off printing it and wait for a new .2 nozzle. and then i'll be set for more detailed work. i have a spare 0.8 one that i have been tempted to use to try get the prints done faster and in fewer pieces. i just sliced up the thigh for printing and i'm looking at about 67 hours of printing. but i'm too scared i'll lose too much detail in them if i got larger. i've just been lumping it all out and regular quality and slower speeds to maintain quality.
 
even with the thin walls option it still doesn't print the spike entirely and does this weird partial missing circular bit. i don't know if this is some glitch in the model ( i ran it through 3d builder to make sure there was not errors) i think i have just reached the limit of my 0.4mm nozzle.

View attachment 313475View attachment 313476

when i slice it with 0.2mm nozzle it looks fine.
View attachment 313478

so i have a few options, can either test it with the 0.4 nozzle or get a new .2 or edit the model and manually extrude the spikes so they are thicker, which i really don't feel like doing. i might put off printing it and wait for a new .2 nozzle. and then i'll be set for more detailed work. i have a spare 0.8 one that i have been tempted to use to try get the prints done faster and in fewer pieces. i just sliced up the thigh for printing and i'm looking at about 67 hours of printing. but i'm too scared i'll lose too much detail in them if i got larger. i've just been lumping it all out and regular quality and slower speeds to maintain quality.
Also try enabling/disabling the option "Union Overlapping Volumes". That does some weird and annoying things sometimes. Though, in the end, it probably is just that it's too thin
 
progress on sanding/painting the printed parts has come to a halt due to the weather, so i have been messing around with and slicing up the remaining pieces to be printed while i wait for my new nozzles to come.

might swap out the lion for a legendary badge
272828929_985638012327704_5428723027435665894_n.jpg

i've gotten into engraving things, one of the problems with working on a build over a year is you come up with new ideas half way through.
engraved the knife with reach theme and noble team names and numbers. ended up engraving the sheath with the oni logo so i might swap out the one on the collar breacher for something else
273051583_267992522133738_3699124780927984643_n.jpg272746189_490798486012707_6367359460247045987_n.jpg272826024_495294925281456_6460548030432542603_n.jpg

scaled a h4 magnum down as the 1:1 size is way too big for my hands to even fit around and put a few logos on it

272777440_650170582916620_6463861866412304783_n.jpg

also added a mount on one side for a locking attachment to go on the thigh. though i'm still undecided on the weapon

272473755_324302102950738_6148636912263301797_n.jpg


next up i'll be working on the strapping systems to attach all the armor until the weather improves.
it's going to be a combination of harness and webbing. making changes from my last build as it was an absolute pain to get around in. i scaled the thigh to long on the last one and it kept pulling my pants down and dropping over the top of my knees. since i cant just put webbing in a glue it on with a rondo slush, i'm thinking of printing out some webbing attaching points out of pla and welding them on the inside of the parts with my soldering iron and 3d pen an then run teh webbing up to the harness to take the weight off the clothing and stop it from drooping down
 

Attachments

  • 272719816_307338888086132_2294895848535927642_n.jpg
    272719816_307338888086132_2294895848535927642_n.jpg
    114.3 KB · Views: 103
some where along the way of scaling the grenadier doesn't fit properly onto the bicep i haven't noticed until now, so i had to extrude the shoulder and create a spacer to mount it on.
273219795_248008507391915_6549391339710549982_n.jpg

also working on the forearm mounts, i'm looking to mount the tac pad on the side. As when i'm wearing it the side mount will likely be a lot easier to access and use the touch screen. And then i'll use the normal spot for the screen to mount a battery pack to run the raspberry pi.

273177168_620357605713626_6329261769074319279_n.jpg273590582_484565813075942_2766797694638796739_n.jpg

also had a bit of trouble scaling the forearm. i'm going with another motorcross under suit and like the first one it has a bit of body bits attached. on the first one i had to scale it disproportionally large to fit it over the body armor. so i have been trying to fix that issue. scaled it up fairly large and then started cutting out material from the inside to make it fit over the body armor bits. i also made it shorter than the first one like i did with t he thighs as i had issues with mobility. hopefully will turn out well

273086281_641051803781043_8211018852624581105_n.jpg
 
I got fed up with sanding the chest so i have started the paint up. I had planned to go with out the hip joiner bits but i'm thinking now it will look incomplete with out them.

273749919_5024119800960063_4625154890660268294_n.jpg273758115_936874703630596_1348909375254571964_n.jpg273770598_5245760455485939_8472934082646949486_n2.jpg273854381_363827725312458_7217337568759970711_n.jpg

i have layered the orange over a metallic base and it seems to present a different colour in different lighting conditions
it is bright orange in high light and then a sort of redish colour in lower light.
274058978_1676570936012387_5060883906908143526_n.jpg273868494_658466288635654_8729279736372794380_n.jpg

i got me new size nozzles so have been putting them through their paces. the larger .6mm nozzle has turned out a lot better better quality prints than i was expecting, so now i'm confident using to print the larger bits and it is saving me hours in print time.
i also put the .2mm nozzle to work but it seems there is a limit i wasn't able to get the desired quality out of the badges i printed up. I guess you can go too small.
274056340_534530961405476_1582388304815656783_n.jpg

i also finally got a quality pic of my last cosplay so i'll put it in as a bonus
INTEGRITY.png
 
Aww yea, love the variety of colour, even before weathering! For the .2mm nozzle, did you make sure to adjust settings such as extrustion rate? It'd probably take a fair bit of calibrating to get right
 
Aww yea, love the variety of colour, even before weathering! For the .2mm nozzle, did you make sure to adjust settings such as extrustion rate? It'd probably take a fair bit of calibrating to get right
I wanted to break up the color a fair bit, i still have a few ideas/color to add in and then i still have a roll of carbon fiber wrap to play with before the weathering see how i go. i havent messed with the extrusion rates. i went through a period of repeated failed prints so i have stopped messing with things though i'm still getting issues with the first few layers stick to the bed but not to each other, so i have been printing the sliced sides ont eh bed and then melting it all together.

i ahve been doing some painting on and off but i have had a few hair line cracks reappear to i took the time to re melt all the joins on the back side since i went with only super glue on the front i think this is what is causing it. i have also had a bit of bubbling happen to the paint not sure if air is getting in from the hair line cracks or it is some issue between the 3d print resin i coated them with and laying on the primer filler too thick.
274736891_625912335154921_2748721735354010809_n.jpg
this bit i sanded back but it still has quite a difference between the heights of the paint layers so it going to become wear and tear
274735485_506298570856964_959174601160251120_n.jpg

painted up the shoulder logo. i was tossing up between a few color ideas. was going to go gloss black with the white but i ended up dusting it with grey on the airbrush first and then dry brushing the white on. the other alternate was black with metal then blue (heat stain) on the top might do that on a different badge.
273945118_1355543584889032_4624845089435454979_n.jpg

also got my tool belt that im going to attach everything to. will sit under the chest and have the shoulders attached to the top. then the shins attached to the thighs and the thighs to the belt. that way it will stop my pants being pulled down all day and i can take the chest off at will. is a bit of a tight fit and i still need to test it with the gaskets in the chest.
274725215_1231648290699335_7837276918295876050_n.jpg
 
welded on the gaskets to the chest and the shoulders to the bicep pieces. the weight is starting to add up. hoping my strapping system is up to the challenge.

277611113_1358604557988740_3129904513859263047_n.jpg277967989_393714768942141_6557163990778748021_n.jpg
277615784_548735536544337_1343865555496190691_n.jpg277971514_342192007905234_606221782073940099_n.jpg277823664_342655904594160_7970087333260228619_n.jpg

printed out a case for my raspberry pi and screen, still have to sort out some clearance issues and make sure all the mounting screws will hold, might end up having to use some glue just to make sure it all stays put.

i also successfully tested a 10000mah power bank to power it using the 3a 5v usb-c output. from the short test i did it should be able to run it for 6-8 hours. i tested it with the spinning unsc logo but not with continually cycling through the user interface to keep accessing all the screens.

277910391_1178860822940413_7435994368505437235_n.jpg277613072_362214752497911_158607958868864838_n.jpg
 
Status
Not open for further replies.
Back
Top