You are using an out of date browser. It may not display this or other websites correctly.
You should upgrade or use an alternative browser.
You should upgrade or use an alternative browser.
ODST Foam/Pep Build [Pic Heavy]
- Thread starter deactivyoke
- Start date
- Status
- Not open for further replies.
I really need help
New Member
I thought army surplus stores were soupossed to be like the thrift shops of military goods. Hrmph, Well looking online it seems like I will be spending a decent amount on just the boots. I remember when I bought the desert boots for my marine they were only 17 bucks.
Also I would like some input from every one who reads this on what type of BDU should I get? It seems like ODST's have just plain black undersuits but with my lack of gray paint I feel there is already too much black on the costume. So any suggestions would be nice.
You can get a very solid service boot from Big 5 with a side zipper too. They're awesome boots and look great. They go on sale practically weekly for $30. They fit the part perfectly.
I'd link but I'm on mobile.
Thanks I'll look into them. Though right now I'm looking at some black jungle boots that look cozy.You can get a very solid service boot from Big 5 with a side zipper too. They're awesome boots and look great. They go on sale practically weekly for $30. They fit the part perfectly.
I'd link but I'm on mobile.
Thanks! I love the encouragement!.amazing job!
Any how I have a little bit of an update. I don't have pictures of this but I have plasti dip on the knees and the belt buckle. I plan on finishing the painting on those this week the same with the painting for the torso and hopefully the thighs aswell. I also hope to have the first shin fully formed too I got a few more parts for that.


Okay so I kinda lied. I am using velcro but for light weight stuff. Like attaching the hip plates and groin plate.Build is looking fantastic
I was curious as to something you said earlier about velcro. I was just wondering why you dont trust it is all?
keep up the great work
")

Also I got quite a few things getting painted and or being sealed. Just got the shins left and I hope to make great progress on the helmet this weekend. Here are paining pictures.


Wow man, I really like this build. I'm just starting my build. But I can't find Hughs templates. Could you pm them to me.
Okay so I kinda lied. I am using velcro but for light weight stuff. Like attaching the hip plates and groin plate.
View attachment 4024
Also I got quite a few things getting painted and or being sealed. Just got the shins left and I hope to make great progress on the helmet this weekend. Here are paining pictures.
View attachment 4025View attachment 4026View attachment 4027View attachment 4028View attachment 4029View attachment 4030View attachment 4031View attachment 4032View attachment 4033
Wow man, I really like this build. I'm just starting my build. But I can't find Hughs templates. Could you pm them to me.
Yeah, They are on the 4shared data base and since they are not up on the sites archive I messaged Art to see if I could upload them here.
I'm sending the PM now. If you ever need any help just ask me and I'll do my best to help you out.
Thank you very much, umm to start with always keep sharp blades when working on foam, once the knife starts to jump and tear the foam I normally put it in a container for blades I use on paper. You hardly ever have to use a whole pepakura file for foam. Just select parts that show up once and the mirroed ones and you are good to go. Example the shin for my ODST.this looks amazing, im starting my ODST with foam and pepakura, any suggestions?
 thats all I printed.
Also try and have parts connected before you cut them out. In my opinion the less seams the better. Example.
 notice how most of the parts are already connected.
Read tutorials. I'm not some innovative genius teling you how to make a costume I just take what others do and do it my way. Umm that's all I guess. If you need help free to contact me.
Any how update time.
I finished weathering the torso.


I got weathered knees now!


I got a belt assembly. I just need a fanny pack!


I also got boots and as a result the shin I made isnt too small now!


That's all for now. Somebody threw away my bondo so I need to buy more to work on the helmet.
.
Last edited:
Still waiting on insurance to pay up. On the bright side I got a new workshop. Well my brother and I are working on converting his garage into a work shop.
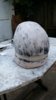
I also got some more painting done along with some minor work on the helmet. I applied the bondo to soon after the paint so most of the bondo just peeled off. I also started to bondo the smg.


I also got some more painting done along with some minor work on the helmet. I applied the bondo to soon after the paint so most of the bondo just peeled off. I also started to bondo the smg.
Last edited:
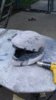
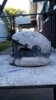
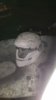
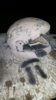
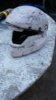
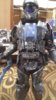
I have done a ton of work since my last update. I finished the first shin and I am ALMOST done with Bondo on the helmet. Here are some images. Also got paid to smooth out a imperial guard helmet.
Attachments
-
 uploadfromtaptalk1413989734176.jpg1.4 MB · Views: 273
 -
 uploadfromtaptalk1413989747618.jpg1.5 MB · Views: 305
 -
 uploadfromtaptalk1413989765012.jpg1.4 MB · Views: 295
 -
 uploadfromtaptalk1413989782450.jpg810.2 KB · Views: 284
 -
 uploadfromtaptalk1413989800946.jpg1.1 MB · Views: 273
 -
 uploadfromtaptalk1413989811914.jpg1 MB · Views: 260
 -
 uploadfromtaptalk1413989821262.jpg1.2 MB · Views: 264
 -
 uploadfromtaptalk1413989860482.jpg808.7 KB · Views: 285
 -
 uploadfromtaptalk1413989873347.jpg658.9 KB · Views: 263
 -
 uploadfromtaptalk1413989890876.jpg765.6 KB · Views: 312
FoxtrotZero
Jr Member
Man, things are coming along really nicely here. I never would have considered using straight up nuts-and-bolts hardware to secure this whole thing together. Your parts are solid, and your weathered paint is coming out really nice.
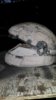
Keep up the good work, I look forward to seeing it finished. And hey, sorry about your car, man.
Keep up the good work, I look forward to seeing it finished. And hey, sorry about your car, man.
They work really well. You just have to get their lengths perfect to avoid spikes on the inside of your suit.Man, things are coming along really nicely here. I never would have considered using straight up nuts-and-bolts hardware to secure this whole thing together. Your parts are solid, and your weathered paint is coming out really nice.
Keep up the good work, I look forward to seeing it finished. And hey, sorry about your car, man.
Any ways I replaced the car.
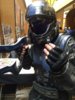
And I also did a bunch more work on the helmet. Plus a test fitting when I went to a party.
Attachments
Last edited:
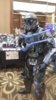
Well I rockes my costume at the Memphis Comic and Fantasy Convention this weekend. Helped out the 501st with some charity work while I was there.
Attachments
Hey do you have pictures of the shins? i am having problems making mine, i am going to use the files for the foam build but do you have photos of yours being made or finished?
How do you get the top of the knee guard to bend like that? I'm having trouble with mine.Thank you very much, umm to start with always keep sharp blades when working on foam, once the knife starts to jump and tear the foam I normally put it in a container for blades I use on paper. You hardly ever have to use a whole pepakura file for foam. Just select parts that show up once and the mirroed ones and you are good to go. Example the shin for my ODST. View attachment 4163 thats all I printed.
Also try and have parts connected before you cut them out. In my opinion the less seams the better. Example. View attachment 4164 notice how most of the parts are already connected.
Read tutorials. I'm not some innovative genius teling you how to make a costume I just take what others do and do it my way. Umm that's all I guess. If you need help free to contact me.
Any how update time.
I finished weathering the torso.
View attachment 4165
View attachment 4166
I got weathered knees now!
View attachment 4167
View attachment 4168
View attachment 4169
I got a belt assembly. I just need a fanny pack!
View attachment 4170
View attachment 4171
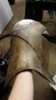
I also got boots and as a result the shin I made isnt too small now!
View attachment 4172
View attachment 4173
That's all for now. Somebody threw away my bondo so I need to buy more to work on the helmet.
- Member DIN
- S2424
Chiefmartin650, please check dates before posting. This thread is 15 months old. If you have a question, send direct to the author. Necro-posting is frowned upon here.
- Status
- Not open for further replies.