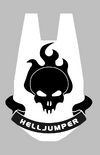
ODST - Helldivers Collab - Cape Feedback

JRTaylorThird

New Member
HELLO FELLOW LIBERATORS.

With the announcement, and some footage of the collaboration between Helldivers and ODST (accurately named Obedient Democracy Support Troopers), I've been planning and designing a HELLJUMPER Cape based on what little I've seen so far. That being said, I'm in need of some feedback regarding my color scheme and stitches to blend seamlessly into the style and aesthetic of the suit/cosplay so far.

I have my Rookie-style costume fully printed, and I'm going with the standard Rookie color scheme for paints (blacks, greys, whites, probably skipping the camo design because I'd rather just have solid colors.) I'm not going for Tier 3 in the long run, so exact color matches aren't a priority.

HOWEVER. The emblem on the Cape being offered as part of the ODST Warbond available in the next week or so seems too plain. The emblem is just a plain white on black fabric, with some grey striping along the outside portions trailing downwards. I've restyled the color scheme to fit what I think looks better, but I would love some feedback.

The warbond:

1755876080359.png


My design:

1755875619656.png


I've done this quick mockup in CAD just because it's what I have available. The left style matches the color palette from the videos & available graphics, while the right is my slight redesign of the color scheme.

Switching gears, the stitching is also something I'm wanting opinions on. The easiest would be of course to get an iron-on print and call it a day, but I like the flair of creating an applique and attaching it to the cape fabric, similar to a flag. I'll attach a screenshot from the "We Are ODST" ad from 15 years ago (yikes...) In this video, the flag/banner has a nice satin stitch around the emblem.

1755875915127.png


I'm planning on working on this extensively over the weekend in between sanding jobs, but we'll see where life takes us.

TL;DR: Should I stick with the original color scheme or my own redesign? And would a custom applique be worth the extra effort?

FOR MANAGED DEMOCRACY!
 
I'm an idiot.

I rewatched the trailer, and noticed there's some extra detailing that I missed. Another quick mockup shows the difference.

1755878493256.png


I realize the drawing isn't perfect, obviously, and it's missing the slight black cross-hatching in the empty black areas, but I'm thinking a simple black stitch or silk bias tape could accomplish that nicely. But it would definitely add to my work...

1755878771750.png
Shown in blue to emphasize where it actually would go.
 
I like the idea of the additional stitching. IMO things like that really sell realism and texture, and add to a quality product.

Watch any movie that’s known for its costumes! I remember watching the andor series a while ago and just blown away by the costumes! Textures everywhere. Just great costume design all around.

Flat costumes lose their believability!

Thanks for the feedback! I'm definitely leaning towards the idea of using a satin stitch for the emblem, just gotta buy a lot more thread for it!
 
Well, it’s definitely not perfect, but for my first attempt at doing a satin stitch, I’m pretty happy with the result! Tomorrow I’ll work on the actual cape, and maybe give the appliqué a second go.
IMG_7810.jpeg
 
Some minor hiccups along my cape crafting journey:

Capes use so much more fabric than you think. Crafting a proper half circle cape has used up twice the amount of fabric I would have thought, namely because of the width necessary. The length I’m aiming for is around 5'6", without seam allowance, so I need about 2x12' of fabric, or 8 yards of 72" wide fabric (4 yards for the exterior, 4 yards for the interior lining of the cape). Yikes. More than I expected, but manageable.

Secondly, and more annoyingly, I obviously don't know how to copy colors from a screen to my brain and back onto a screen for a design. The skull, flames, and banner should be black. I roughly transferred this to a .svg vector file and converted it to a .png for ease-of-use posting online. The text is the free downloadable font "Denmark", in case anyone's curious, or if anyone wants the vector image just message me, I don't know of a way to post them here.

Anyway. Back to the crafting board.
 

Attachments

  • HELLJUMPER EMBLEM.png
    HELLJUMPER EMBLEM.png
    116.8 KB · Views: 11
  • HELLJUMPER EMBLEM.pdf
    11.1 KB · Views: 7
Just wanted to post a quick update. My third (?) attempt is going really well. Not perfect by any means, but nothing a little weathering won’t help hide.

It’s late and the photo I have is from my Snapchat, but I wanted to include my progress.
IMG_7839.jpeg
 
I’m think of getting black sections printed on transfer paper & applied instead of what I’ve done the past few attempts, because the lines just aren’t coming out as cleanly as I would like. When I finish this appliqué I’ll have the cape completed, and maybe I’ll make another more professional looking one, but I’m thinking this will do.

Thoughts?
 
Small update before my beautiful bride & I celebrate our 7 year anniversary lunch, and callbacks for our theatre’s production of The Crucible in Central Florida.

Attached the banner, next up is lettering. I purchased some sans-serif lettering and I’m pretty sure I’ll just use these instead of trying to embroider them myself. I don’t want to mess this up being so close to wrapping it up.
image.jpg
 

Attachments

  • IMG_7840.jpeg
    IMG_7840.jpeg
    382.9 KB · Views: 6
I am wanting to add a cape to my cosplay as well. I have been working on the design and found out some elements you may not have noticed. The cross pattern is the same as Aunt Dot from Reach I have everything drawn out but I did it in fusion 360 and I don't know how to bring it in to the real world. I was hoping do be able to go straight to the Cricut and make stencils or Iron on vinyl but there is obviously an intermedium step I am missing.
 

Attachments

  • Hell Jumper Cape.png
    Hell Jumper Cape.png
    130.5 KB · Views: 11
Last edited:
I am wanting to add a cape to my cosplay as well. I have been working on the design and found out some elements you may not have noticed. The cross pattern is the same an Aunt Dot from Reach I have everything drown out but i did it in fusion 360 and i don't know how to bring it in to the real world. I was hoping do be able to go straight to the Cricut and make stencils or Iron on vinyl but there is obviously an intermedium step I am missing.
The detail is great on this, and you’re right, I have missed it! I can’t get any great in game footage of the cape, and pictures/videos all seem to cut off before the extra trim on the bottom corners.

I’m doing mine with a matte black fabric on the outside, black “costume satin” for the lining (just my preference), matte grey for the main stripe going the length of the cape, dark grey satin trim/ bias tape for the detail greeblies, and an embroidered appliqué for the logo. The “HELLJUMPER” logo I’m most likely going to do with individual vinyl transfers, since I don’t trust myself to machine those in & the premade lettering doesn’t match the style as much as I would like.
 
Not finished yet, but the sewing is taking soooo long on this project. I realize a little too late that my Auntie Dot pattern is skewed, but I’ll just call it artistic liber-tea. Getting close to the finish line with this!


IMG_7847.jpeg
IMG_7849.jpeg
IMG_7851.jpeg
IMG_7853.jpeg
 
Greetings fellow divers,
Wanted to pop by and say this thread's been very inspiring for me---I've been printing out an HD2 ODST cosplay for the past two weeks and didn't know how to tackle the cape, but watching your progress has been great encouragement! I'm not sure how you're planning on attaching the cape to your armor, but I'm thinking of using velcro to attach the cape to a plate carrier which also suspends the armor parts.

Looking forward to your future progress posts and hopefully soon, I'll post my own!

Stay free!
 
I’ll do a quick mockup of the measurements tomorrow! It’s not too difficult if you can sew, and especially if you have access to a vinyl cutter (cricut etc.). You can do it!

Managed Democracy!
 
Greetings fellow divers,
Wanted to pop by and say this thread's been very inspiring for me---I've been printing out an HD2 ODST cosplay for the past two weeks and didn't know how to tackle the cape, but watching your progress has been great encouragement! I'm not sure how you're planning on attaching the cape to your armor, but I'm thinking of using velcro to attach the cape to a plate carrier which also suspends the armor parts.

Looking forward to your future progress posts and hopefully soon, I'll post my own!

Stay free!

So I may do a more in-depth walkthrough of my process later, but for now here's some quick info on how I've tackled the project so far.

**EDIT: I started this as just a basic walkthrough but added pretty much all the details I've learned through my process, so this is about as in-depth as it's going to get, at least until I finish it and learn more mistakes.**

Please note your results may vary depending on fabric choices, time you're willing to spend, and accessibility to a sewing machine or vinyl cutter.

Supplies:
  • 2-4 yards of fabric of your choice. If you're using a vinyl cutout for the emblems and don't want a liner, you'll only need 2 yards. If you want to do something similar to my cape, with a stitched/embroidered applique, you'll need a liner to cover the stitching on the back of your outside fabric, so get 4 yards.
  • Go to a thrift shop and buy a cheap bedsheet you don't mind cutting up for practice and testing measurements. Don't spend the money on expensive muslin that serves essentially the same purpose.
  • A printer to print the logo (I used 11x17 sized paper to print the full emblem in one go)
  • Sewing machine
  • Spare black (or matching) thread. (I used so much)
  • Fabric glue (I used the cheap spray kind)
  • Fabric scissors (make sure they're only used for fabric please God)
  • Tearaway stabilizer (if you're sewing your emblem)
  • Sewing pins or clips
  • Spare sewing needles (universal needles are fine)
  • Iron & ironing board or heat press
  • Teflon paper / parchment paper (like you use for baking is fine)
  • Bias tape / satin ribbon in color of your choice in multiple widths (this is for trim)
  • Measuring tape
  • A long straight object like a yardstick
  • Weathering stuff (acrylic paints, sandpaper, dirt, etc.)
  • Optional if you're sewing your own emblem: Satin stitch foot, also called an "F" foot. This makes doing thick satin stitches significantly easier, as it has a groove for thick stitching to glide under the foot. You can do satin stitching with a regular B or A foot, but this removes a lot of headache (ask me how I know). Note you normally can't buy these in big box stores, some embroidery stores might carry them, but I could only find them online near me.
  • A large flat surface (I just did this on the ground lol)
  • More time than you'd expect
  • About as much patience as you can muster (you'll run out; take a breath and walk away then come back to it after a much needed coffee break)
Measurements: (see picture for reference)
1756824276502.png

  • Length: Take your height and remove 3". I'm 6'0", this leaves me with a 5'9" length. Add a half inch or so on either side for seam allowance. This measurement leaves you with a long cape that should reach just below midcalf, and allows some length up the top to attach over your shoulders and onto your under layers (for me this will attach to my torso piece, but below my chest plate).
  • Widths: Measure the distance shoulder to shoulder across your back with a measuring tape. Cut that in half, and add a half inch or so for seam allowance. This will be your bottom width. Remove 4 inches from the total width and cut that in half. This will be your top width. We'll be folding our fabric in half for even cuts (this applies to the neck hole as well). Many precut fabrics come in 1 - 4 yard lengths, and widths can vary wildly, but make sure you get at least 36" wide fabric. This should give you ample room for a nice, wide, flowy cape.
  • Neck: First measure your neck width, and cut this in half adding seam allowance. Measure your neck from front to back, this will be length of your neck hole from the top of the fabric to the bottom of the neck hole.
I'll continue this post in a second part which won't come until later, as I don't have important pictures of my process, but this gives a rough outline of supplies and measurements needed. Any and all customizations can be done beyond this, which is mostly what the second section will entail, and maybe more details on some finishing touches such as attachment options.
 
Last edited:

Your message may be considered spam for the following reasons:

If you wish to reply despite these issues, check the box below before replying.
Be aware that malicious compliance may result in more severe penalties.
Back
Top