JRTaylorThird
New Member
HELLO FELLOW LIBERATORS.
With the announcement, and some footage of the collaboration between Helldivers and ODST (accurately named Obedient Democracy Support Troopers), I've been planning and designing a HELLJUMPER Cape based on what little I've seen so far. That being said, I'm in need of some feedback regarding my color scheme and stitches to blend seamlessly into the style and aesthetic of the suit/cosplay so far.
I have my Rookie-style costume fully printed, and I'm going with the standard Rookie color scheme for paints (blacks, greys, whites, probably skipping the camo design because I'd rather just have solid colors.) I'm not going for Tier 3 in the long run, so exact color matches aren't a priority.
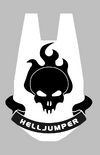
HOWEVER. The emblem on the Cape being offered as part of the ODST Warbond available in the next week or so seems too plain. The emblem is just a plain white on black fabric, with some grey striping along the outside portions trailing downwards. I've restyled the color scheme to fit what I think looks better, but I would love some feedback.
The warbond:

My design:

I've done this quick mockup in CAD just because it's what I have available. The left style matches the color palette from the videos & available graphics, while the right is my slight redesign of the color scheme.
Switching gears, the stitching is also something I'm wanting opinions on. The easiest would be of course to get an iron-on print and call it a day, but I like the flair of creating an applique and attaching it to the cape fabric, similar to a flag. I'll attach a screenshot from the "We Are ODST" ad from 15 years ago (yikes...) In this video, the flag/banner has a nice satin stitch around the emblem.

I'm planning on working on this extensively over the weekend in between sanding jobs, but we'll see where life takes us.
TL;DR: Should I stick with the original color scheme or my own redesign? And would a custom applique be worth the extra effort?
FOR MANAGED DEMOCRACY!
With the announcement, and some footage of the collaboration between Helldivers and ODST (accurately named Obedient Democracy Support Troopers), I've been planning and designing a HELLJUMPER Cape based on what little I've seen so far. That being said, I'm in need of some feedback regarding my color scheme and stitches to blend seamlessly into the style and aesthetic of the suit/cosplay so far.
I have my Rookie-style costume fully printed, and I'm going with the standard Rookie color scheme for paints (blacks, greys, whites, probably skipping the camo design because I'd rather just have solid colors.) I'm not going for Tier 3 in the long run, so exact color matches aren't a priority.
HOWEVER. The emblem on the Cape being offered as part of the ODST Warbond available in the next week or so seems too plain. The emblem is just a plain white on black fabric, with some grey striping along the outside portions trailing downwards. I've restyled the color scheme to fit what I think looks better, but I would love some feedback.
The warbond:
My design:
I've done this quick mockup in CAD just because it's what I have available. The left style matches the color palette from the videos & available graphics, while the right is my slight redesign of the color scheme.
Switching gears, the stitching is also something I'm wanting opinions on. The easiest would be of course to get an iron-on print and call it a day, but I like the flair of creating an applique and attaching it to the cape fabric, similar to a flag. I'll attach a screenshot from the "We Are ODST" ad from 15 years ago (yikes...) In this video, the flag/banner has a nice satin stitch around the emblem.
I'm planning on working on this extensively over the weekend in between sanding jobs, but we'll see where life takes us.
TL;DR: Should I stick with the original color scheme or my own redesign? And would a custom applique be worth the extra effort?
FOR MANAGED DEMOCRACY!