ODST MKIII. I'M BACK, BABY

It has been quite some time since I last posted anything here. Even longer since I showed any progress toward anything. But right now I'm going to do my best once more to compile and show my logs and data of what I'm doing to build my next ODST suit. This time I'm going for the one in the Halo 4 game. Haven't seen much love for this type of armor.
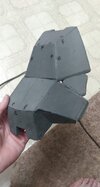
Not to mention that since I built it last time it was fragile and weak as can be. But this front torso piece not only has some actual weight to it but is also sturdy as a rock. MUCH better than my MKII. Here's what I got so far for the rest of the suit:
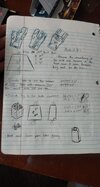
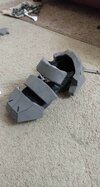
View attachment 319158 View attachment 319159 View attachment 319160 View attachment 319162 View attachment 319165

For the overall concept:
Since armor builds like this require a lot of space to pack and transport, I've decided to try and break this build into several different parts:

- Front Torso.
- Shoulder Straps.
- Side Straps.
- Back Torso.

The collar that is usually worn by them WILL be an optional thing to include. Though and AM doing some planning to implement it for the build. Maybe I'll separate it into half's: one for the front, one for the back, and create a locking device for them to meet at the sides. As for the build so far, it's going along super smoothly. Kinda wishing that the chest piece was a bit smaller so I can reach my arm forward but I've noticed this problem with any cosplayer who does an ODST build, so I'm not alone there.
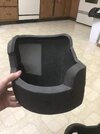
I've made the shoulder strap solid because I'll be covering it in a fabric of sorts and gluing on a black nylon strap to the top. Make it a bit more authentic. The white strips you see along the shoulder strap is of 5mm foam I got from Hobby Lobby. I've noticed that in most builds that these are crucial and VERY important in understanding the placement of a part. Especially if they have an edge ID on them.
So I cut them in 5mm strips for that spacial purpose. I cut the larger pieces in an inward cut so the strips can be easily cut and glued on since they were very small. I DID mess up on the buckle placement on the shoulder placement and strap though.

I didn't have enough surface space to place the shoulder strap on and only had the cut edges. If I had continued with this then the shoulder area would've been weak to withstand the tension. So I cut out a piece of scrap foam that would be covered by the strap and glued on the extra surface. This made it much easier to plan on more ways for the strap to not only use the buckle to be attached, but also use other means for a more secure placement.
View attachment 319168 View attachment 319165 View attachment 319170

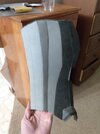
The buckle placement on the strap was another failure but was recovered with quick thinking. I honestly thought that two buckles would do the job for a more secure fit but failed to realize that there would be no room for my fingers to detach them. So I had to use scrap foam and reglue the sides. And instead only hot glued one buckle instead of two.
View attachment 319169 View attachment 319167View attachment 319162

Note: I used a LOT more hot glue to make sure this piece was not going anywhere.

I'll post more pics of the what I'm aiming to achieve, what my plans are, and how the progress is going in the future.
Welcome back
 
I started making the gauntlets after some time waiting on some tools for my torso, but also because I wanted to try out a new technique that was shown to me by Impact Props when they made their new Chief suite: Scratch Building and layering.

Now, granted I've heard of this style of building before, but that was just me only HEARING about it, and very faintly at that. So I decided to try my HAND at it. Starting with the gauntlets. To do this I took some inspired techniques from Odin and his tutorial on the Infinity Gauntlet and mixed that with some layering from Impact props.

And the process looked VERY promising.

-

First, I tried using the duct tape method, but that only worked SOMEWHAT. The finished product when transfered to foam made the fit become a bit too tight and just bent awkwardly.
IMG_20221002_170611838.jpg IMG_20221002_215758019.jpg

So I took a foam ruler and measured my forearm and wrist, divided that by four and got the measurement. I then divided the wrist and forearm by two to get half of the template, since I'm gonna fold it and cut it it out at once. Transfered that piece onto foam and it stayed working perfectly. I then added a zipper for more form fitting so the gauntlet won't look TOO bulky. Also added a glued on stopper in the back so the zipper won't come undone. Didn't necessarily need this since I only need to zip it open a bit to get my hand through. But you never know.
IMG_20221006_230648144.jpg received_469345741637144.jpegIMG_20221008_210732575.jpg


Here's my detailed written plans to log in my trials.
received_1829233467409652.jpeg received_824497428964513.jpeg

I also started doing some drawings to get a general placement of where each piece goes. The numbers indicate what layer the piece will be. "#1" being the base gauntlet itself.
received_819625852520002.jpeg received_1518516008596124.jpeg

Went through three test pieces before I settled into the foam ruler trick again. And to be honest, it's much more easy. Sometimes the simplist method is usually the right one.

Edit: Notch Cutters. HEAVILY recommend. They will GREATLY HELP YOU in making registration marks for templates.
IMG_20221002_180125497.jpg
 

Attachments

  • received_3388286498116515.jpeg
    received_3388286498116515.jpeg
    124.6 KB · Views: 93
HEAVY reminder I'm STILL working on these gauntlets, I just haven't been posting much due to how close the end I am with them right now. I am LITERALLY about a 2 glued pieces away from having the build completed, but not the painting. After that, I'll show ALL the pics of the progress so far. Shouldn't take me more than a day or two at most. Been also kinda busy with life and whatnot.
 
Ho boy! Where to begin?
Well, how about this:

After making the top fins out of the same thickness as the foam below, I then began to layer the entire thing; covering up the visible seams.
IMG_20221025_202248599.jpgIMG_20221025_202221056.jpg
received_1838509809823132.jpeg received_677725966948894.jpeg

After that, it was just a matter of making the elbows. Now THIS is where things got tricky. Yes, the elbows have a VERY simple shape!
IMG_20221108_202537_288.jpg

BUT the road to GET that simple shape turned out to be very complex. What it boiled down to was:

1.) Making the top first. This gives you the length of the sides.

2.) The front of the sides indicates how much of a bend you want when the top piece and front are connected.

3.) Due to the complexity of the front, I had to glue the sides to the top first, put some masking tape on the front, and then use that as a template to transfer to foam and glue on.
IMG_20221109_234758422~2.jpg

The result of the shape was a massive success, but the size was way out of whack. It was too tall and too wide. I gave in and ripped it out while the contact cement and hot glue was settling. It was risky, due to a result of damaging the top of the Gauntlets, but worth it.
IMG_20221101_222902577.jpg IMG_20221101_222919889.jpg
IMG_20221107_233130309.jpg IMG_20221108_200538037.jpg
IMG_20221108_200618542.jpg IMG_20221108_200633529.jpg

Afer taking off the previous parts and shrinking the newer ones, it started to look a LOT better.
IMG_20221108_212401926.jpg IMG_20221109_080855922.jpg

And this was the result. Besides a few Velcro pieces to put on the white blocks and the rectangular pieces on top to hide the zipper, as well as painting, I say the gauntlets are pretty much done.
received_689068929109683.jpeg received_3200745450255757.jpeg
received_678146750392698.jpeg

Onto the arms!
 
Last edited:
So MAJOR upgrades of my shoulder piece have been made. For starters: it doesn't look so ragged. It's all clean and cut. Second, it has a LOT more detail going for it. Lastly, but not least, IT'S MORE STURDY!

So here's what I did:
I started out having the basic FEEL of how this piece was going to form, and then added detail over it.
received_5568663173209175.jpeg received_395736696018964.jpeg

Did both the triceps and the biceps. The bicep pieces were a bit of a bother, since I had to do some reworking and drawing to figure out it's dimensions without the extra unnecessary parts from the template. Simple, but complex is the phrase for these builds.
received_692673955914063.jpeg received_672468727589872.jpeg

This is what kept me up at night. Now that I built the shoulder part, I need to try to attach it to the arm band. It was time to stop delaying the inevitable. I eventually came up with an idea to use 5mm and glue 2 popsicle sticks in the back to give it that MUCH NEEDED stiff support. And then glued onto the band with a brick on top for more ease and less bending on the glued area.
received_827625565196796.jpeg received_861413111662375.jpeg
received_1314789096001224.jpeg IMG_20221221_224401989.jpg

Now, I only did the tricep and bicep on the arm band mainly due to the fact that if I did the plate on the inner arm, it would rub against the chest armor. Rubbing off the paint and such.
IMG_20221221_224332386.jpg IMG_20221221_224346749.jpg
received_1079685312701475.jpeg

After that, the arm pieces were finished. Truth be told, I got done with this about a week ago or so. I was just too busy to post it here. ^^;
received_3401105493436297.jpeg received_6343831662313125.jpeg

Now I'm currently working on the thighs.
 

Attachments

  • received_642727944201155.jpeg
    received_642727944201155.jpeg
    98.1 KB · Views: 69
Last edited:
So MAJOR upgrades of my shoulder piece have been made. For starters: it doesn't look so ragged. It's all clean and cut. Second, it has a LOT more detail going for it. Lastly, but not least, IT'S MORE STURDY!

So here's what I did:
I started out having the basic FEEL of how this piece was going to form, and then added detail over it.
View attachment 326375 View attachment 326373

Did bothe the triceps and the biceps. The bicep pieces was a bit of a bother, since I had to do some reworking and drawing to figure out it's dimensions without the extra unnecessary parts from the template. Simple, but complex is the phrase for these builds.
View attachment 326372 View attachment 326368

This is what kept me up at night. Now that I built the shoulder part, I need to try to attach it to the arm band. It was time to stop delaying the inevitable. I eventually came up with an idea to use 5mm and glue 2 popsicle sticks in the back to give it that MUCH NEEDED stiff support. And then glued onto the band with a brick on top for more ease and less bending on the glued area.
View attachment 326365 View attachment 326366
View attachment 326367 View attachment 326364

Now, I only did the tricep and bicep on the arm band mainly due to the fact that if I did the plate on the inner arm, it would rub against the chest armor. Rubbing off the paint and such.
View attachment 326362 View attachment 326363
View attachment 326369

After that, the arm pieces were finished. Truth be told, I got done with this about a week ago or so. I was just too busy to post it here. ^^;
View attachment 326371 View attachment 326370

Now I'm currently working on the thighs.
looks super good i wish i could do foam im still trying but i love the added details
 
Base of the thighs are done. Had to Frankenstein it in the inner part to get a more tighter fit. As well as make that base plate and fill the other side with scrap foam to make sure it's not a structural weak spot. And now with the layering done, these noticable problems have been buried; RIGHT besides the dinosaurs!^^
received_3514369745460934.jpegreceived_697561075202467.jpeg
received_545221310897292.jpegreceived_899050031278976.jpeg
 

Attachments

  • received_2386812711471804.jpeg
    received_2386812711471804.jpeg
    186.2 KB · Views: 77
Last edited:
Just added the layering for the thighs. Main reason it took a little bit longer than usual was because I wanted the straps to be nylon, but then I figured that I would just be creating more problems for myself. Yeah it would look cool, but how would I have the entire armor piece painted without the nylon strap getting affected? And if I were to paint the entire thing before putting the nylon strap on, how would the glue fair with the paint? So I just went with an Eva foam type deal. Keep it simple. Lol

IMG_20230304_230826020.jpg IMG_20230304_230812560.jpg
IMG_20230304_230849003.jpg IMG_20230304_230854203.jpg
IMG_20230304_230834287.jpg IMG_20230304_230751211.jpg
 
This is what the shins looked like so far.
IMG_20230415_000543934.jpg IMG_20230415_000559977.jpg

The knees are just built with a simple elastic strap glued on. Nothing too serious for a part so simple. Shins didn't look like this before. There where a couple areas where they needed to be layered like the post before this for the front. BUT I made a mistake.

Note: DON'T glue on a large 2mm thin piece of foam on a complex and curved piece. Because if you do, then the piece might be shorter than you anticipated and rip if you tug it. Leaving you to remove thin pieces connected by contact cement.
received_681967373702984.jpeg

But after dividing the thin pieces into different flat sections, caulking the openings, and sanding them down, I was able to restore most of the damage.
IMG_20230502_152812825.jpg IMG_20230502_152833360.jpg
IMG_20230502_152845785.jpg

I also made some improvements on the knees. Makie them a bit more eye-catching.
IMG_20230502_152920741.jpg

Now I'm off to build the shoes and torso-YES I KNOW I ALREADY BUILT IT, but the torso and back WEREN'T really my best and I learned MUCH more techniques and styles to glue, sand, and sizing to make the piece better.^^
 
So after some time creating a hat for a friend, I'm back to building my suit! So hears what I got done within the 2 weeks:

After being that the chest has some areas that lessen the mobility, I resized it and managed to build it. It's got a good fit, not bad, but COULD be better. I still like it.
received_1489586198236782~2.jpeg received_250072547591883.jpeg

After going to a Convention, I went to work on building the back piece. It was a double edged sword at this point, couldn't really do anything to improve it since I already caulked it and needed to make a new one to make it more clean. And with the entire thing resizing the front, that also meant the shoulders and back needed to follow suite. That meant I had to redo the back and shoulders. Magnets, layering, and all. Luckily I didn't need to do much with the shoulder straps since it was PRACTICALLY the same size, if not a bit thinner. So THAT saved some time.
received_628860465930761.jpeg received_679701250868833.jpeg
received_1280679359322587.jpeg received_269426942314512.jpeg
received_757635482589127.jpeg

Now, I'm just working on a way to connect the front with the shoulder straps and finding a way to create side straps to hug the body a bit more.
 
SUCCSESS! I have made, the side straps for the torso and now it's FULLY FUNCTIONAL! As an added bonus, the mobility and flexibilty has GREATLY improved since I resized it. Now I'm just adding some details to make it look cooler, as well as making some prototypes for the straps of the shoulder pieces since the traditional method of gluing the straps onto the shoulders is out of the question.
ODST Build 01.jpg ODST Build 02.jpg
ODST Build 03.jpg ODST Build 04.jpg


The main reason being that the shoulders are now a GIGANTIC weak spot and will most likely result in having them snap the frontal clips if too much stress is applied. Luckily I'm taking some notes from a YouTuber by the name of Angelegend who made the MK VI from Halo 4.
ODST Build 06.jpg ODST Build 07.jpg
ODST Build 08.jpg


Got the principle down, just need to replace a few parts for the prototype to take hold. So far so good.^^
 

Attachments

  • ODST Build 01.jpg
    ODST Build 01.jpg
    486.5 KB · Views: 61
Been a while, but I've been busy with cons and life, but now, here we are!

Alright, so, first off, I added some more detail to the front torso with a woodburner and I think it turned out pretty good!
IMG_20230622_220314_01.jpg

After that I decided to do a full body test fit and I started to feel like Kronk:
200.gif

IMG_20230704_222423315.jpg IMG_20230704_222451696.jpg IMG_20230704_222514931.jpg

The only ONE complaint I had was the shins; TOO wide. After seeing that, I just couldn't stop thinking about it. I MIGHT redo them in the future, but I'll do that after the helmet has been created first. Worry about the NOW, think about the THEN later.

After that, I sanded my shoe armor to give it a more rounded feel and added the straps. Thought I only had enough for the front and Heel, but then found some more stashed away in a drawer. Guess I can finally finish it tonight!

IMG_20230716_214710_01.jpg IMG_20230716_214801_01.jpg received_3514672468769069.jpeg

And the keen eyed of you MAY have seen that for the top of the foot I only have ONE middle piece rather than TWO like in the game. And the answer is just simply that I'm using straps on pieces that are difficult to attach to the shoe without it PHYSICALLY gluing on to the surface. If i used a slip-on boot, then this would be no problem. But the straps need to be wrapped around the subject to a degree that if I were to follow the design, there would be too much overlapping in areas where the build would contradict it. But I think the ONE middle piece looks JUST as good, if not better.
ODST Build 11.jpg

Also did some wood burning on the rear and front plats. Only a little, but enough to not make it plane.
IMG_20230716_231701394.jpg IMG_20230716_231706517.jpg
 

Attachments

  • received_241824821971766.jpeg
    received_241824821971766.jpeg
    158.5 KB · Views: 61
  • received_816908936402266.jpeg
    received_816908936402266.jpeg
    168.5 KB · Views: 50
So I began working on the helmet, but didn't really post any pics, because the process was just SO fast! This is the first draft piece. And to be honest... it's not looking too hot. I mean, it looked SO promising at first. Everything was going according to the build in the pepakura and shaping well, but the side ear holes KINDA started to bow. And the entrance hole is a bit small where I feel like the thing will tear once I paint it and whatnot. I could try and fix and shape it, but I already put hot glue on to try and reinforce it to see how it is, and it would be a LOT easier to try and make a second draft rather than cut and re-glue areas that would need more/less material. Plus, with the sturdy hot glue on, it'll dull the blades quicker than trying to get a clean cut. So I guess I'll just start cutting the second draft pieces after I made the helmet a bit larger. hopefully that made a difference.
ODST Foam 01.jpg ODST Foam 02.jpg ODST Foam 03.jpg ODST Foam 04.jpg
ODST Foam 05.jpg ODST Foam 06.jpg
 
I find with foam helmets I usually have to make a second one to fix all the mistakes of the first so good luck dude it still came out well for a first draft.
That being said my ODST foam bucket came out a little tilted too, but I fixed that by just hitting it with a heat gun and heat forming it into place.
I think I will implement that on mine when it’s complete. I have a habit of not using my heat gun as much as I should. Especially on thinner pieces like this.^^;
 
The helmet has been coming along perfectly. Some areas here and there are a bit warped, but what're you gonna do at this point. Foam helmets are ALWAYS the trickiest. Managed to smooth out what I could with the pieces on top with some sanding and heating...
F4_jPdbX0AANesA.jpeg F4_jSd3WMAAp2SE.jpeg F4_jTKQWUAAdI7y.jpeg

Followed by the first layer of caulk. But not After adding some more detail and the vents on the house and the side cheeks. After this dries, I'm going to smooth what can again and add the second layer. Hopefully building up to a more ROUNDED surface. And while THIS dries. Going to apply caulk to my other pieces as well and make a V.II of the calves if there's time.
F5YkTEDXcAApT07.jpeg F5YkT4aWkAArLI0.jpeg F5YkUu9WoAAvu4C.jpeg F5YkVojWIAAmCQH.jpeg
 
Just Plastidipped my 5-6th layer on SOME pieces. I think the added layers do them good; giving them a GREAT sense of firmness. Even my helmet was less flimsy before it's 5th layer. Gonna do some caulking opening seams and give it one last medium coat. I'll see what alcohol needs to be used to give it more of a smoother finish. I remember it being SOME sort of acidic alcohol, but can't really remember.
received_241634028882428.jpeg
 

Your message may be considered spam for the following reasons:

If you wish to reply despite these issues, check the box below before replying.
Be aware that malicious compliance may result in more severe penalties.
Back
Top