Phauxelates's Mk. VI EVA Foam Build [Project Status: Done! New build thread link on my profile]

Status
Not open for further replies.

Phauxelate

Active Member
Member DIN
S554
(Throughout this thread, I will be editing the content in the bottom of this main post with what I'm currently working on, and what I have thought of/what I was recommended to work on)

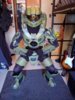
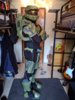
Hello! First time maker here! I've made a couple other props, but not anything as big as a full foam cosplay. I'm pretty happy with how it tuned out, and I see a few ways I can improve on it which I'll detail later.

Here was my process:

Firstly, you gatta get your foam bases. Pretty straight forward.

Second, putting it together. Hot glue is a godsend, honestly. The whole thing went though about thirty 5" glue sticks, and by the time I finished I was fresh out of them. Going this route, I'd have bought more to be safe.

Because I was low on cash and time (took me a total of 2 weeks with the foam already cut), I used a heat gun to seal the foam while being careful not to melt the glue binding the whole thing together. As for the paint, I used around 5oz of acrylic paint for the primary color, and 1oz for the second color.

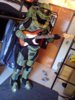
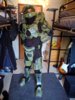
Under suit is just classic Under Armour. Nothing special.

Helmet was repurposed from one my brother gave to me around 3 years ago. It's just been sitting on my shelf collecting dust, so why not make a use out of it?

received_307978790039448.jpeg
IMG_06821.jpg

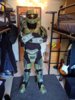
I finished making it the night before Halloween, as I wanted the paint to be fully dry before then. Attended a costume contest at my College, and what do ya know! I got first place.

45224293_1888691331207660_1208367238885670912_n.jpg

Me, 2nd place is in the middle, and 3rd place is on the right.

45163628_1888691351207658_4957018740693663744_n.jpg

After my first build, I can see a few areas I can work on.

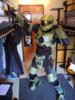
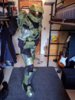
Firstly, the COD and Butt plate were a little wonky. I'm planning on making a whole new piece that wraps all the way around, rather than just a sort of flap that flops around.

Second, the stomach is a bit exposed. I'm planning on making a piece that will attach right under the chest plate to cover that area. That, or I could invest in a waist trainer and attach some painted foam pieces to it so it's not so bare. I might go with the second option, because I'd be nice to have a little bit of dimension to the armor having some visibly behind the chest plate.

And third, just some touching up here and there. I was rushed on painting it so some of the black outlines for the edges of stuff are rough. I could also add a few more layers of paint to give it more color

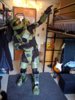
For my first build I feel like it went rather swell! Let me know of any areas I can improve on that I didn't state above, and I'll see you all in the comment section.


Stuff on my mind to do (A.K.A. "The List"):
  • Finish gluing the pelvis system
  • Paint the newly made armor
  • Add nylon strap to the new armor
  • Re-add strapping to the thighs after removing the Velcro so that they don't slide down
  • Add improved strapping to keep the shoulder armor from sliding down
  • Curve the shoulder armor more
  • Take some awesome pictures
  • Touch up on some of the paint on the helmet
  • Add a way to secure the support belt higher up on my midriff
  • Add some weathering
  • Make the weathering stand out more
  • Stop breaking my legs*]Filling the Gaps
  • Replace under suit
  • Add some padding to the right forearm to make it fit better
  • Make a Battle Rifle weapon prop [IN PROGRESS]
  • Add some thicc curves to the codpiece and pauldrons
  • Create some better gloves. Maybe 3D print some armor for the top of the hand and fingers?
  • Add additional plating on the side of the feet to minimize visible footage
  • (Sleep?)
 
Last edited:
********Progress update********
Stuff Recently made:

I have cut everything for the new pelvis part (front, back, and sides) and a part for the midriff. The front plating for the pelvis and the midriff is all glued together. The only things I have to do now is glue the butt plate and the side parts, paint it, and PRESTO! A much better looking spartan armor suit!

IMG_20181209_161221.jpg

I put on the chest and held the pelvis and midriff to my chest, and boy does it look so much better!

Some Improved stuff:

For the chest I removed the velcro and added parachute buckles in place of it. So much easier to work with, and I trust it to not pop off a whole lot more!

IMG_20181209_181312.jpg

For the feet I added some more foam to reduce visible footage from the top view

IMG_20181209_181538.jpg


EDIT: I will edit and update the original post for my completion progress!
 
Last edited:
Small Update & Question:

I have finished making cutting, gluing, and painting the whole new pelvis system... However I can't shake the feeling that I need some sort of black outline on the C.O.D. and the butt plate to make the green pop out.

What do you guys think of that? I want to make sure this is all said and painted before I start adding on the nylon strap to secure it to my limbs. (And yes, those are Heelys in the background)

20181212_213702.jpg

Edit: I did end up adding the black outline
20181213_230746.jpg
 
Last edited:
Small update: I haven't been sitting on my bum this whole time. This is what I got so far in terms of attaching it to my body
(I was too lazy to put the rest of the suit on, and I didn't have my glasses on so I didn't know the photo was blurry)

20181215_223304.jpg
 
definitely looking good. :)

Thanks! Everything is all built that needed to be, but I've decided to weather my armor to make it look simply smashing, and then get someone to take professional photos. That way you can see every pixel of my luscious body. So until then, just hold tiddly tighty tight for some more photos of my bod
 
********Progress update v1.5********
Along with some minor fixes of stuff n junk, I have finished re-strapping all of the parts with nylon strap and buckles instead of using Velcro. What I'm real happy about is that after I finished the new codpiece.... I've weathered my armor!

BURST20190106115212085_COVER.jpg


This is a huge improvement from what it was, because the paint job was all matte with no life to it. Here's what I did for the weathering:
  • Sealed it with mate Mod Podge
  • Used silver metallic paint to add scratches n scuffs around the edges and body of the armor
  • Used the same metallic paint and lightly applied it everywhere with variations to give it different gradients of color
  • Created a black-wash that is 2x thinner than what it should be, and applied it all over the armor, using a paper towel to wipe nearly all of it up (This gave it a darker. dirtier color, while removing the blinding silver shine from the step above)
Here's a comparison from the difference from weathering it:

20190106 Spartan Suit Comparison 1.png


Here are some photos of the front, back, and sides:

BURST20190106114439004_COVER.jpg BURST20190106114454234_COVER.jpg BURST20190106114444859_COVER.jpg BURST20190106114459186_COVER.jpg

And below are photos attached for your enjoyment (The guitar one is my favorite). This project is long from finished, since it is and will always be a labor of love. I'll keep posting to this thread, and I'll see all of you in the comments. Cheers!
 

Attachments

  • BURST20190106114657011_COVER.jpg
    BURST20190106114657011_COVER.jpg
    3.6 MB · Views: 311
  • BURST20190106114735520_COVER.jpg
    BURST20190106114735520_COVER.jpg
    3.5 MB · Views: 368
  • BURST20190106114819382_COVER.jpg
    BURST20190106114819382_COVER.jpg
    4.1 MB · Views: 332
  • BURST20190106114921287_COVER.jpg
    BURST20190106114921287_COVER.jpg
    3.8 MB · Views: 277
  • BURST20190106114933240_COVER.jpg
    BURST20190106114933240_COVER.jpg
    4 MB · Views: 344
  • BURST20190106115040319_COVER.jpg
    BURST20190106115040319_COVER.jpg
    3.8 MB · Views: 324
  • BURST20190106115212085_COVER.jpg
    BURST20190106115212085_COVER.jpg
    3.9 MB · Views: 341
  • BURST20190106115245344_COVER.jpg
    BURST20190106115245344_COVER.jpg
    4 MB · Views: 320
  • BURST20190106114657011_COVER.jpg
    BURST20190106114657011_COVER.jpg
    3.6 MB · Views: 266
  • BURST20190106114735520_COVER.jpg
    BURST20190106114735520_COVER.jpg
    3.5 MB · Views: 335
  • BURST20190106114819382_COVER.jpg
    BURST20190106114819382_COVER.jpg
    4.1 MB · Views: 310
  • BURST20190106114921287_COVER.jpg
    BURST20190106114921287_COVER.jpg
    3.8 MB · Views: 331
  • BURST20190106114933240_COVER.jpg
    BURST20190106114933240_COVER.jpg
    4 MB · Views: 344
  • BURST20190106115040319_COVER.jpg
    BURST20190106115040319_COVER.jpg
    3.8 MB · Views: 330
  • BURST20190106115212085_COVER.jpg
    BURST20190106115212085_COVER.jpg
    3.9 MB · Views: 327
  • BURST20190106115245344_COVER.jpg
    BURST20190106115245344_COVER.jpg
    4 MB · Views: 319
I giggled at the before picture because I dont know why, but It makes it look like you are a little kid (maybe 7) in a costume your dad made for Halloween. There's just no reference to base your size on and your posture makes you look small :)
 
I giggled at the before picture because I dont know why, but It makes it look like you are a little kid (maybe 7) in a costume your dad made for Halloween. There's just no reference to base your size on and your posture makes you look small :)

Hahaha. Yeah... Someone else said something about that, and I didn't realize what they were talking about until they pointed it out! I find it a bit comical myself as well.

The before picture was the best photo I have taken of that version of armor, during Halloween

I'm 6'2"
 
100% looks great there! The weathering adds just the bit of wow factor. Very nice job.
So what cons are you excited for this coming year? Also, now that you have this done are you looking to make a weapon for yourself?
 
100% looks great there! The weathering adds just the bit of wow factor. Very nice job.
So what cons are you excited for this coming year? Also, now that you have this done are you looking to make a weapon for yourself?

I'm not sure what cons I can go to, so I'll look into some later at some point. And yeah! I am planning on making a weapon! I started to make an assault rifle, but it was taking up way too much of my foam stock I currently have. 4 foam tiles is too much of a price to pay for me. So what I might do is buy some filament and borrow my college's 3D printer to print a DMR or something.

Edit: Looking into some cons, the Wisconsin Comic Convention hosted by Imaginarium looks promising. Plus, I live less than a mile away from it!
 
Last edited:
I'm not sure what cons I can go to, so I'll look into some later at some point. And yeah! I am planning on making a weapon! I started to make an assault rifle, but it was taking up way too much of my foam stock I currently have. 4 foam tiles is too much of a price to pay for me. So what I might do is buy some filament and borrow my college's 3D printer to print a DMR or something.

Edit: Looking into some cons, the Wisconsin Comic Convention hosted by Imaginarium looks promising. Plus, I live less than a mile away from it!

A DMR will likely eat up 1.5kg or more so you'd likely save money overall making it a foam build. If you already have the filament though, might as well burn through it and make something cool!
 
A DMR will likely eat up 1.5kg or more so you'd likely save money overall making it a foam build. If you already have the filament though, might as well burn through it and make something cool!

Oh, I was meaning the assault rifle I drawing out on foam was taking up too many tiles, though it might be closer to 3 1/2 (2ftx2ft) tiles rather than 4. The DMR has less mass to it, because it's not as big of a solid block compared to the AR. I definitely could make a DMR out of foam, though a plastic one have a more solid feel in the hands. It also means less time cutting the foam, and more time studying :)
 
Last edited:
Andrew’s DFT on the battle rifle or dmr is where I would recommend starting. Three pieces of 2x2 foam and about a 6 in dowel rod and you can make a pretty good BR or DMR in about 8 hours cutting 2-3 sealing and another 2 painting, so not long over all.


Attachments

  • C0EAA361-85BD-4E71-A5EE-AEA88D186918.jpeg
    C0EAA361-85BD-4E71-A5EE-AEA88D186918.jpeg
    836.8 KB · Views: 310
Andrew’s DFT on the battle rifle or dmr is where I would recommend starting. Three pieces of 2x2 foam and about a 6 in dowel rod and you can make a pretty good BR or DMR in about 8 hours cutting 2-3 sealing and another 2 painting, so not long over all.


I watched that video and a few of his others and might I say they are quite good! Matter of fact, I'm going to go out and print off the templates for the Battle Rifle and start tonight while I have time. I'm also planning on making that magnum from one of his videos as well. Thanks for showing me that video!

Edit: I didn't start it last night, but I will today!
 
Last edited:
So, continuing this thread...

Give me all of your ideas and criticism of how I could make my armor better, and don't hold back. I want to become the best I can at this, so I want to hear ideas about anything ranging from painting/weathering to making a whole new armor piece that I can improve on my current build.

So, throw your ideas at me! (I'll be sure to duck.)

In certain lighting and poses your under suit is a bit sheer. If you had another black layer of Under Armour or a second morph suit to conceal the skin tones it'd help consistency of colour to make everything look like a single piece tech suit.
 
In certain lighting and poses your under suit is a bit sheer. If you had another black layer of Under Armour or a second morph suit to conceal the skin tones it'd help consistency of colour to make everything look like a single piece tech suit.

Yeah, I won't lie: I'm a bit too white;). I'll plan on getting a better under suit soon to replace the old one I currently have. I have added it to the list!
 
Status
Not open for further replies.
Back
Top