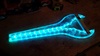
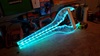
One of my projects I wanted to make for my Master Chief was the energy sword seen below.

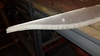
I started with plexiglass from homedepot and traced out a pattern of a blade.

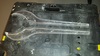
Next I made several plexiglass rectangles the same size as the template, bolted them all together, and used a ban sawed to cut all the templates out as one whole piece.

Next step, I etched out lightning in the middle piece using a dremel. I then glued all the pieces together using a plexiglass acrylic glue offsetting the first and last piece to leave a channel for LED lights. LED lights were from Homedepot but not as expensive as the link in the store.

After the glue made everything solid, I used a router (like what you would use on wood) to give an edge to the outside of the blades.
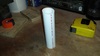
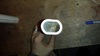
Next step, I need a handle. I took a 1" pvc pipe:

and heated with a heat gun it until I could shape it into an oval. I had it in a vise grip to keep pressure on it.

Next step was to cut that handle down the center and notch the ends for the blades. I then epoxied the LED lights into the channels.

I finished off filling the channels with hot glue.
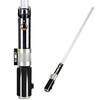
Next, I had an old battered Force FX lightsaber like this one:

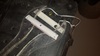
I wanted to use the sound fx from the prop so I took it apart and positioned the chip and speaker into the handle. I drilled out holes on the handle for a switch from radioshack . The LED lights from Home Depot is a multicolor one (red, green and blue). In other words, the LED has 4 wires, 3 for lights and one for return (negative hookup.) Disregarding the Red light all together, I set up the connections to use the green and blue lights to get my desired color. Next step, Layout all the electronics:

Time to hot glue electronics in place and solder/organize all wires:

[not pictured] I added a metal bar from sword tip to tip to stabilize the end. Otherwise, it would wiggle back and forth while you handled it and I didn't trust it.
Next, secure the cover, and light it up:


And here's what it sounds like:
[video]http://www.moesizzlac.com/Videos/20150129_084013.mp4[/video]
Handle is wrapped with a Carbon fiber contact paper. You can pick it up on Amazon. The final look of the handle is on the back of my suit. It looks great lit up in a dark room.

And that's all for now. Enjoy! Comments and critiques are always welcome.
I started with plexiglass from homedepot and traced out a pattern of a blade.

Next I made several plexiglass rectangles the same size as the template, bolted them all together, and used a ban sawed to cut all the templates out as one whole piece.

Next step, I etched out lightning in the middle piece using a dremel. I then glued all the pieces together using a plexiglass acrylic glue offsetting the first and last piece to leave a channel for LED lights. LED lights were from Homedepot but not as expensive as the link in the store.

After the glue made everything solid, I used a router (like what you would use on wood) to give an edge to the outside of the blades.
Next step, I need a handle. I took a 1" pvc pipe:

and heated with a heat gun it until I could shape it into an oval. I had it in a vise grip to keep pressure on it.

Next step was to cut that handle down the center and notch the ends for the blades. I then epoxied the LED lights into the channels.

I finished off filling the channels with hot glue.
Next, I had an old battered Force FX lightsaber like this one:
I wanted to use the sound fx from the prop so I took it apart and positioned the chip and speaker into the handle. I drilled out holes on the handle for a switch from radioshack . The LED lights from Home Depot is a multicolor one (red, green and blue). In other words, the LED has 4 wires, 3 for lights and one for return (negative hookup.) Disregarding the Red light all together, I set up the connections to use the green and blue lights to get my desired color. Next step, Layout all the electronics:

Time to hot glue electronics in place and solder/organize all wires:

[not pictured] I added a metal bar from sword tip to tip to stabilize the end. Otherwise, it would wiggle back and forth while you handled it and I didn't trust it.
Next, secure the cover, and light it up:


And here's what it sounds like:
[video]http://www.moesizzlac.com/Videos/20150129_084013.mp4[/video]
Handle is wrapped with a Carbon fiber contact paper. You can pick it up on Amazon. The final look of the handle is on the back of my suit. It looks great lit up in a dark room.
And that's all for now. Enjoy! Comments and critiques are always welcome.
Attachments
-
 20150127_105758.jpg115.9 KB · Views: 519
 -
 20150127_105812.jpg84.9 KB · Views: 1,052
 -
 20150127_105826.jpg171.4 KB · Views: 695
 -
 20150127_105857.jpg115.9 KB · Views: 479
 -
 20150127_105917.jpg103.7 KB · Views: 466
 -
 20150127_161304.jpg134.2 KB · Views: 475
 -
 Force%20FX%20Lightsaber.jpg7.4 KB · Views: 517
 -
 20150128_233749.jpg122 KB · Views: 497
 -
 20150201_102411.jpg170.1 KB · Views: 530
 -
 20150129_004122.jpg114.5 KB · Views: 652
 -
 20150129_004138.jpg136.7 KB · Views: 2,468