Alright, time for an absolute Beast of an update. Only finished my con crunch a few hours ago, and the cons tomorrow, but I got what I wanted done, at least. Unfortunately, I didn't take a lot of photos in some steps, so there's gonna be some gaps followed by "and then here's the thing".
Picking right up from where we left off, I had armor printed, and it was time to sand. However, the weather was
not being cooperative. Sanding outside wasn't an option, and my indoor options were limited - I live in a studio apartment, and the main space is carpet. All I had was the entrance hall. So, I went to Canadian Tire, and bought myself a chair...

And ended up with probably the most ominous sanding station you could imagine. It was a bit awkward working everything over my knee, but an apron helped a lot, and then cleanup on the tiles was a breeze. By the time I had to take it outside to sand the spot putty application later on, things were warmer. It was around this time that I took the pieces and filled the holes I included in the models with the threaded brass inserts, which worked out great. I unfortunately don't have photo's of the sanded items so far as I can tell, except for one - Because the back plate had a glue failure during my work, and one of the legs broke off! Scraped the Gorilla glue off, and applied some E6000 I had gotten since the first glue round, and sent it right back into janky clamp land, with an even more aggressive clamping pressure. Random filament boxes come out to save the day, once again.

The good news is this repair has held, and I haven't had any major issues - the E6000 didn't seem to like the primer in a spot, but I suspect its because I didn't let it dry a full 72 and it interacted weirdly. Its on the inner surface though, so no harm done. Speaking of, I had to paint this whole mess. By this point the worst of the cold weather had broken for good, but Canada be as Canada do, and it was windy. Luckily, the 3d printer could help with this too! Not by printing anything useful, of course, but you see, the printer came in a really big box, that I still had. So when I was out buying the sanding throne, I also got a tiny plastic table, and a few firebricks for weight, and set up my
Advanced Solution Systems painting station, by putting the bricks in the box and the box on the table. To my surprise, it worked!
Also pictured, the boot plates going through - I had to reprint them AGAIN because I realized I had the sizing of the back loops wrong to fit the straps I got, but that only took a pittance of time, and I realized well before I sanded and finished anything. I don't have any good photos of priming in progress, but I managed to avoid any terrible runs and did manage to apply primer all over, even when I could only paint from one direction. Just took more coats and turning.
Out the other side, however, I had some decent pieces.
The filler/sanding loop was getting frustrating and I was running a bit outta time, so I ended up deciding that complete is better than perfect, and just went for it with a few imperfections. And imperfections abound - priming outside, even with the box to protect from the worst of the wind, seemed to have collected a lotta faint debris. Nothing terrible aside from a few annoying hairs, but irksome. Good news is the filler did a great job of all but masking the remaining layer lines.
So, while it went in for painting, I did some painting of my own. Specifically, I had some details for the magnum to finish, so busted out the brushes and citadels. The only part that didn't cooperate was the yellow - I feel like I had to lay it on so thick for it to not be translucent, that some details like the sight post just came out blobby feeling. Couldn't get in there well either. Still, not a bad first try.
But that still left me with time to use while my main layer colors went down on the armor, and sewing that needed to be done. I consider myself as not knowing how to sew, but took a crack at things anyway. First up, the weird brown belly plate thing. I don't have in-process photos, I just went for it apparently, and came out with these middling pieces.
They got upholstery foam for structure, and zippers to let me get the foam out - one of which I somehow managed to sew onto the wrong side - Again, I'm not a smart man. Trying to figure out how to keep them in place, I just thought I'd let the belt do it with a band between them.
It didn't really work out, top plate would flop down. This all has to go back to the drawing board, so I didn't bother sewing in the rest of the details. Can't win them all, I suppose. But when this finished, so did the flats for the chestplate - And I was worried, because it was looking paler than I'd hoped.

So while the back plate went in for its flats, I got to work weathering it, and kind of fucked up. I don't have any photos because I wasn't super happy with it and didn't want to show anyone, but I ended up deciding "I can darken it while applying the wash" and went a bit heavy on that. I also did some silver edge scratching, since I didn't have a real silver undercoat or anything. By the time I was done with the chestplate, the backplate had its flats and came in for the same treatment, including the heavy wash - it was there I had actual notable issues that persist, blobs and streaks of shame you'll see later. But, I didn't let that deter me - I needed something to work on before sending the armor back out to be sealed, so I decided to get the straps going. Somewhere in this process, I'd modeled and printed out real quick the blocky shoulder straps the marine armor uses, and had already primed and hand painted them - I genuinely can't recall exactly when, its been a fuzzy two weeks. But, started measuring out and positioning the straps and hardware, and using my attachment plan - melting holes in the straps with my iron.


Took a bunch of pins, some time, a sacrificial empty filament box to burn through, and one minor layer of iron induced skin removal, and the results? Pretty good!
And that first fit emboldened me. See, the marine has that black undershirt, with two distinct lines down it, and the half-sleeves with the straps. Weird stuff. But I was feeling confident enough to try it. And to be fair, that confidence was a trap, but one I didn't leave empty handed from. So while the armor went out to seal, I did the thing. I don't have photos along the way, but I do have another bad selfie, but in the 'full softs' as I called it. Also pistol because why not.

Also pictured, the haircut to make me look like someone who should be in camo and a patrol cap, rather than a crazy man as I did earlier with the cap. You can't really make out the lines I sewed in the photo, but they're there, and visible in person. I think. Either way, this is officially placeholder. The sleeves are really bad, the shoulders as a whole are far too wide, but I learned a lot of what not to do for next time. At the least, this'll work until I make a replacement. But any disappointment I might have had in the shirt was dismissed entirely when I brought the chest in from being sealed - Because I was completely ignorant to the fact that the sealer would darken everything under it! Not by an incredible amount, but by enough for me to be much happier with the look.

This is also when I removed the masking tape from the area intended for the velcro, and glued that down over the raw plastic for better adhesion. I didn't end up using screws there, but if the E6000 doesn't turn out to be enough in the future, they'll still be there. I didn't take any photos of sticking the velcro on, but you'll see it later. So while the back plate was sealing, I started strapping the boots up as well, buckles and slides to make them adjustable enough to ensure a good fit - hopefully. Another "I'll show it later" piece. Dayjob kept me busy for most of the rest of the sealing period, but came right out of it to add a detail I nearly forgot, the fabric under the straps for the shoulders. Hit it with some quick sewing, and eyelets to allow the screws to pass through without the fabric falling apart. Three sides of it are beautifully sealed, and one side is garbage, but I'm hiding that under the buckles so maybe nobody will notice


But, that takes us to the end of the documented journey! Here's the final hards lineup!
From here you can see the velcro on the chest, the D-Rings on the bottom of the marine straps in case I ever want to hang a bag or something off them, and the boots all buckled up. Here's some 'glamor' shots if you want to see my bad filler, sanding and wash jobs. The splotches around the rivet holes in the backplate are particularly bad and painful.
My favorite part by far is also the part I was most worried about, the side joint for the front and back. As a refresher, they slide over eachother, and lock in place with a combination of pressure/friction fit, and magnets. And these lock together flawlessly, I'm so happy.
The bootplates also interface pretty well, they're actually retained firmly enough that moving them into position is almost as hard as moving them out of position, intentionally or otherwise. The buckles come around the right rear side, just as in the halo 3 models, and use slides to adjust tightness, or to remove the strap if needed in the future.
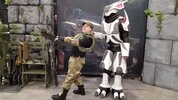
Which takes us right to the end, con ready, for now at least! You'll have to excuse the terrible photos, between the gloves and being excited, my already terrible selfie skills achieved an entirely new legendary level of failure. Also pictured, a close up of the collar, just to show that it doesn't actually poke or jab the head at all.
And that's that! The big missing piece, obviously, is the helmet. Simply put, didn't have time, triaged it out. Making due with the officers cap for now, anyway. I'm sure I'll have better photos of it all from this weekends Calgary Expo!
Y'know, writing this and looking back, that is a lot of stuff I did for con crunch. Kind of wild what you can do when you put your mind to it. And don't mind some of the floating threads in the pictures, I've gotta do a quick scissors clean up but just kept having more to do first. Other than that, I'd love to hear what y'all have to say about it, super excited to have reached this point!