When it gets warmer out I plan on running some fairly controlled tests using basic PLA with UV Resin coating for post processing, because I suspect that the resin adds a ton of protection against warping. I recently tried to hot staple some resin printed parts and all it did was burn the surface. I suspect that PLA + resin will meet or exceed the capabilities of the "better" filament types while still maintaining all of the PLA benefits for ease of printing and low cost.
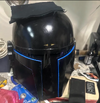
I am a "PLA all the way" guy and wore my Mark IV (entirely printed in basic Overture PLA and post processed with UV Resin) to walk in the DragonCon parade with the 405th, which involved standing in a parking lot with two skyscrapers acting as focusing dishes for sunlight directly onto us for about 45 minutes before walking a mile on blacktop for the parade in mid-90s temperatures without any signs of warping.
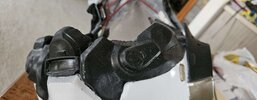
Specifically in regards to your broken armor, do you have photos of the break? If it was PLA, you can probably glue it back together and use bondo/resin/a 3D pen to fill the seams and then sand it away and then you'll have another viable helmet (because who doesn't want more helmets?).
Don't worry too much about ruining anything with sanding. Unless you're going ham on it with a power sander, it's pretty tough to over sand. It's annoying enough just getting below the crests of the layer lines (which is why I post process with resin).
Buy more sandpaper than you think you need, there is always room for more sanding. I am a big fan of orbital sanders for flat surfaces. I wet sand everything (hate dust) and usually start with 180 grit, filler primer, then do another round of 180 grit and then move up to 220. For parts that nobody will inspect very closely, I usually stop at 220. For other parts (helmets, chest/shoulder armor), I will move up to at least 320, with some helmets going as high as 600 grit.

 Looked more into it and it states PLA+