Props Recruitment Booth Build (Pacific Regiment)

Status
Not open for further replies.

PerniciousDuke

RCO & BCO
405th Regiment Officer
Member DIN
S128
I've got to give hats off again to Asgardianhammer . It's people like you that remind me how lazy I am! How I go home after work and just play video games. You're a super active Division Identity Officer, active Regiment Commander, community organizer, scout leader, dad, employed, and you still have time to play video games! I hope you approve of the direction I took with your recruitment booth idea.


We've had the discussion here and on our regiment facebook group about what we want to see in a recruitment booth here in the Pacific. Now it's time to build it!

Drafting

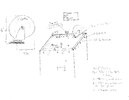
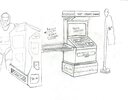
To start off, I'd like to show you a transition of concept sketches.
AsgardianBooth-page-001.jpg Boothdraft1-page-001.jpg blackwell.jpg design3.jpg

With the idea in mind now we needed exact measurements to create a cut list.
\


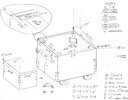
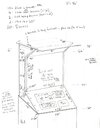
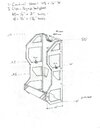
First I had to draw with real 3d effects! By drawing the actual thickness of wood I can see where joints need to be mitered, where dowels or screws or dados need to go, which board sits on which and how does it change the dimensions. I broke down each section and even started the beginning of a supply list on each page.
box.jpg monitor.jpg cap.jpg rack.jpg0487_0001-page-001.jpg 0485_0001-page-001.jpg (not to scale)

front.jpg Leftside.jpg rightside.jpg (to scale)

Since the bottom box is the cart that holds all the pieces (except the weapons rack which will hang on the outside). I had to write up all the thicknesses of the pieces used to make sure it fits in the box. Plenty of room to spare!
thickness.jpg

All in all this took me around 21 hours to doodle.


Cut List

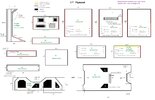
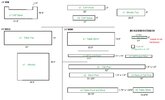
From these dimensions I used MS Paint to lay out a cut list (only the 3/4" material for now).
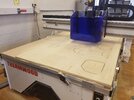
mblackwell1002 is also doing a CAD drawing so we can cut these pieces on CNC.
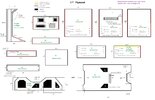
3-4 cut list.jpg 1 misc cut list.jpg (not to scale)


Materials List
*means still need to purchase


General Materials:
Computer Drafting mblackwell1002
(3) 4' x 8' x 3/4" Birch Plywood|$180
CNC work [Rogers HS]
(1) 4' x 4' x 1/4" Acrylic|$20 donated - Interstate Plastics
(2) 2" x 4" boards|$9
(3) 1/2" wood board scraps|$3
(1) 10" x 80t HiATB Saw Blade|$45
(1) 1/4" Downcut CNC Spiral|$30 [Rogers HS]
(1) 1/16" Roundover Routerbit|$20
(1) 45* x 3/4" Chamfer Routerbit|$25
(2) Grey Primers|$8
(2) Primary Paint|$9
(1) Secondary Spray Paints|$4
(1) Tertiary Spray Paint |$4
(1) PaintersTape|$8
(1) Wood glue|$5
*(1) Wood Putty
(3) Safety Glasses|$3
(5) Dust Masks|$2


Main Terminal:
(4) 5" Caster Wheels with locks|$35
(16) 5/16-18 x 1-1/4" bolts, nuts, washers $10
(1) 28" x 22" Insulation foam to cover inside base of box
(2) 1/4" x 36" Wood Dowel|$2
(34) 2hole L brackets|$30
(8) 1hole seam bracket|$4
(2) 6" x 3" x 1/16" sheet metal strips|$5
(3) 3/4" square hooks|$5
(2) modified 2x4 brackets $2
(1) Tablet|$60
(1) Keyboard|$30
(1) Mouse|$10
(2) Anti Theft Kits|$40
(2) Small Caribiners|$2
(2) 5/8" eyelet bolt|$2
*(1) Custom Aluminum Plaque mblackwell1002
(200) 3/4" deep screws for brackets| $10
(20) 1 1/2" wood screws (just in case)|$2
(1) Power strip|$11
*(1) Extension Chord|$5 used
*(1) UNSC Text Stencil
*(1) UNSC Logo Stencil
*(1) Build Your Character Sticker
*(1) Regiment logos Sticker
*(1) Monitor sticker

Table:
*(1) Custom Aluminum Frame|$?
(1) 16" x 36" Mirror|$8 used
*(1) 16" x 36" x 1/4" Acrylic-donated
(1) 16" x 36" Reflective Window tint|$10
(3) 3' Addressable LEDs|$23
(1) 9' of 1 1/2" x 1 1/2" board
*(1) Particle Photon
*(1) Logic Level Shifter
*(3) 10k Potentionmeter
*(3) Knobs
*(1) 2 and 3 pin terminals
*(1) 5v 10A power supply
(5) 5/16-18 x 1-1/2 bolts, nuts washers|$4
(1) 1-1/2" cabinet hinge|$2
(1) 5/16-18 x 3/4" bolt and nut|$1
*(1) Light-up A.I. Plaque [Kevin Hurd]
(5) Acrylic Business Card Holders|$5
(1) Acrylic Brochure Holder|$7
(1) Acrylic Half Page Holder|$7
(40) Earth Magnets|$10
*Business cards, brochures and booklets| $100
DIY (long stapler $16)
(100) Activity Books |$30
(500) Business Cards |$20

Weapon Rack:
*(1) Caution Stencil| $ [Kevin Hurd]
(3) 1" x 3" x 1/16" Sheet Metal|$5
(10) 1/4" x 2" Lag Bolts|$4
(4) 1/4" x 1 1/2" lag Bolts|$2
(1) 72" x 1 1/4" Wood Dowel|$8
(1) 72" x 3/4" Wood dowel|$5
(100) 11" zip ties|$2
(20) 24" zip ties|$2


Extras:
(1) Mannequin Stand|$100 PerniciousDuke
(1) Flag Pole $18 and Stand DIY PerniciousDuke
*(1) Custom 405th Flag Huntress217
(1) 20' Truck Strap|$6
(2) Eyelet bolts|$2
PerniciousDuke
(2) cloth covers $25 PerniciousDuke


Discounts:
Friend's Military discount @ Lowes
 
Last edited:
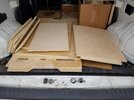
Cut Parts: (2-3 days work)

3-4 cut list.jpg1 misc cut list.jpg


If you want to cut out on CNC you will need someone to create a cut path file.
*disclaimer* you could also cut the large dowel holes and recesses for the weapon rack (not shown on cut list)
Without a CNC you can cut these out using a table saw and a plunge router.

Once you have the pieces cut you will need to manipulate the wood according to the cut list (Note: legend on top of 3/4" Plywood page)

You'll need:
table saw to cut the dado grooves
1/16" radius roundover bit
45* chamfer bit
1/2" dado clean out bit
1/4" bradpoint drill

Hopefully you had a CNC to do the dowel holes, otherwise that is going to take some time to get accurate. Dowel holes should only be about a 1/2" deep unless noted as "thru" holes. Also keep in mind which side the dowel is on. The box base will need dowels on the outside, but the skirt will need them on the inside so they can fit into the box base.

Another tricky one is the left and right Monitor Side Walls, seeing as the 45* is along an angled edge. I would recommend this being the last piece you router so you have a little more experience with the tools. I'd also cut about a 1/2" off the point to make it flat now before it breaks off.

To make the 1.5" square posts just rip a 2x4 in half and then table saw each side to 1.5".

I like to take the time and sand everything. 220 or 320 on the faces. 100 grit on the edges to round corners slightly.

Variations

Table top: I chose to do an infinity table with an aluminum frame. You can do whatever you want. You could do etched acrylic with lights like a command table. You could do it in solid wood. Whichever way you choose it will need to be the same dimensions as I did unless you want to do that mathematical changes to the parts that fit with it. (36" long, 16" wide, 2" thick)

Screen: I chose to buy a giant sticker and put it on a piece of acrylic. The booth design has an open back design to help save on space/weight. This also means that light can pass through the acrylic and sticker to make it more monitor like. You could instead paint or sticker a regular piece of 1/4" plywood provided it is the same size. If using acrylic+sticker I would recommend getting the sticker image face to press against the acrylic (sticker on the inside) this way the sticker is protected during transportation.

20180627_135826.jpg20180627_161610.jpg


Purchasing Parts:

I'll list most things out, but just plan to have access to a full wood shop with chop saw, table saw, disc sanders, belt sander, drills etc.

Magnets: We're going to be recessing a lot of rare earth magnets. Buy them in disc form so we can easy drill the recesses for them. It will be good to have a small size (roughly 1/2" or 12mm) and a large size (roughly 3/4" or 18mm). When you buy them also buy a forstner bit for each size.


Assembly: (2-3 days work)

Box Base
1 misc cut list.jpg3-4 cut list.jpg0487_0001-page-001.jpgbox.jpg


IMPORTANT: The base walls need to have the edges rabbeted, sides doweled and the dado recess for the table before assembling.

You'll need:
(1) box base front
(2) box base sides
(2) box base back brace
(2) short posts
(2) "rest of tall posts"
(32) 2 hole L-brackets
(1) box base bottom
(2) custom 2x2 brackets
(4) 5" caster wheels (6" Overall Height)
(16) 5/16-18 x 1-1/4" bolts + nuts
(32) 5/16" ID washers
(many) #6 x 3/4" wood screws
(2) 5/8" eyelet bolts + nuts
Drills for bolt sizes

Let's start with the base of the box base. Everything needs a good foundation. Grab your casters, a pencil and a piece of paper. Put the caster mounting plate on top of the piece of paper and trace the outside of the plate as well as all of the bolt holes. Draw a cross through the center of each bolt hole circle. Now poke a hole through the center of each cross you just made. If you cut out your drawing you now have a template you can use to drill perfect holes and make sure the plate is not too close to the edge.

There is a not so great drawing above to help think about the caster placement. First not too close to the edge. Think of when the front legs swivel, you absolutely do not want them to turn and knock the skirt off. The back legs can be closer to the edge and probably should be for more stability. Another thing to note is there will be l-brackets along the inside. Just keep it in mind so we're not overlapping bolt holes and brackets. Go ahead and drill the holes for eyelet bolts. (these will be your tie off points for straps while wheeling the box around)

Don't bolt anything yet. Let's hit your holes with some sandpaper and start assembling the box. It will help to have someone hold things here.

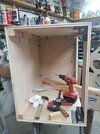
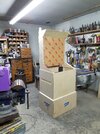
With your box base on the table, orientated the way you want, grab the box base front and a couple of l brackets. Carefully line up the boards and screw in the brackets like shown in the upside down box picture. Repeat for the side walls.

Set your "short posts" in the front corners. They should be about the height of the box. Use six L-brackets for each post. You can now move onto the 16-inch "rest of tall posts" and do the same, four brackets in each attached to one of the back support braces. You will attached the second back support brace soon. This makes the back open so while the booth is set up you can use the booth to store your lunch, power chords and whatever you need.

Variations

Custom Bracket: I ended up buying some thin steel, cutting it and bending it to my needs. You might be able to find something pre made. This bracket will not only finish attaching the side walls to the second back brace to complete the support and super strong box shape, but it also will support the beams that hold the monitor side walls. So the shape needs to firmly support sliding the "tall pole" pieces into them, while also making sure the box is level on the top.

20180825_183126.jpg20180826_110948.jpg

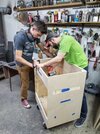
Attach the wheels and eyebolts and wheel it around the shop a bit! You've made a wheeled box! If you've made some 1/4" dowels (or just bought some) you can grab the skirt front and sides to see if everything is lining up. Make adjustments as needed now before moving on.


Box Top (Monitor)
Here we go!
design3.jpg1 misc cut list.jpg3-4 cut list.jpgmonitor.jpg


IMPORTANT: You need to have your wood pieces routered, drilled and dado grooved. The keyboard base can be routered later to fit your needs.

You'll need:
(2) Monitor Sides
(2) Tall posts
(2) Monitor back wall brace
(1) Monitor piece -in wood or acrylic
(14) 2hole L-brackets
(6) 1hole straight brackets
(20) 1/4" wood dowels

We'll start with the Monitor sides. Lay them flat and screw two L-brackets at the top on either side of the 1/4" groove that the monitor piece will slide into, not too tight. This will help you find the slot to slide the monitor in. You'll also need one L-bracket at the proper height as a stopper for when you slide the monitor piece in, it will need to rest on this bracket so it doesn't just slide all the way through.

Go ahead and slide the Tall posts into the brackets of the lower box you've already made. If they are loose then you should clamp them so they are snug and square along the bottom box walls. Set the Monitor Sides in their final place on top of the box. You should now be able to connect the Tall Posts to the Monitor Sides using the straight 2hole brackets. These pieces will be permanently attached and are the main supports for the rest of the top.

You can slide the monitor in and put the 1/4" monitor top piece and the 1/4" cap base on now. As well as the keyboard plate. It should look something like this now:

20180825_202202.jpg


Monitor Cap
This was my favorite part, magnets!

1 misc cut list.jpgcap.jpg

You'll need:
(1) Cap Base
(1) Cap Front
(2) Cap Sides
(2) Cap Support Sides
(2) Cap Support Front
(2) Cap 1" x 1" x 1" blocks
(?) Earth Magnets

The idea here is to glue blocks of wood so the side walls will rest in the proper spots. Then use magnets that click into L-brackets (or other magnets) so nothing will fall off. You could figure out the best way for you to do it, but I will also upload a series of photos to show how I did it, the next time I set up the booth. The drawing above was my original idea, but I ended up doing a little different once I started.


Weapon Rack
Certainly the crowd favorite
3-4 cut list.jpgrack.jpg

IMPORTANT: The backside needs to have the rectangle mortise cut to set the table into before proceeding.

You'll need:
(2) Weapon Rack Sides
(1) Weapon Rack Back
(1) Weapon Rack Front
(2) 1-1/4" x 29.5" dowels
(2) 3/4" x 29.5" dowels
(5) 1-1/4" x 5" dowels
(4) 12mm magnets
(4) 15mm magnets
(10) 1/4" x 2" Lag Bolts
(4) 1/4" x 1 1/2" lag Bolts
(2) 1-1/2" angle brackets
1-1/4" Hole saw
2" Hole saw
15mm Forstner bit (for magnets)
12mm Forstner bit (for magnets)
3/4" hole saw or forstner bit
1/8" drill bit
3/16" drill bit
3/8" countersink
(7) #6 x 1-1/4" screws
Power Drill
Dremel
Sandpaper

Let's start by cutting the dowels into the proper lengths as noted above. Now with your scrap 3/4" plywood you'll need to hole saw (7) 2" discs and (2) 1-1/4" discs. Hit them with some sandpaper to make them look nice. Draw a cross on each one and drill a 1/8" pilot hole through the center and countersink the hole (if you don't have a countersink you can use the end of a larger drill bit). Draw a cross on the end of each dowel and drill a 1/8" pilot hole. Using the #6 screws you should be able to screw a wood disc onto the end of each dowel. Set aside.

Grab the rack back wall and lay it on a table with the rectangle recess facing down. Stand one of the side walls next to it. Make sure the bottom edges line up the best. With some help start drilling 3/16" pilot for the longer hex bolts, locations shown in the drawing above. No need to countersink, go ahead and bolt the sides on, wood glue can be used in addition. Move on to the other side and bolt that one on too. From here grab your square and using the shorter lag bolts secure the weapon rack front board.

*disclaimer* you could have made the holes and recesses for the dowels with the CNC during the cutting process.
 
Last edited:
*space reserved for Painting/Detailing*

I bought a keyboard and picked up a MS Surface at the pawn shop.
received_10155192584057574.jpeg

Here are the image files I created for this project:
405th stickers.png CAPfront.pngCAPside.png Cautionsign - ACTUAL.png Cautionsign - STENCIL.png Crest-STENCIL.png JOIN - text - STICKER.png Recruiting Text - STICKER.png Stickerprint.png TERMINAL- text - STICKER.png UNSC STENCIL.png BoothSideWall-scaled.pngMonitor- scaled.png
 
Last edited:
*space reserved for First Appearance
*space reserved for Second Appearance and Modifications*
 
I'll toss some cash your way later on today. The CAD/USD exchange rate is pretty terrible right now so it won't go as far but if you have a specific component you want covered, let me know and I can send it over.
 
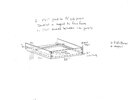
I've updated the first post with a drawing of the infinity table frame and the underside of the box for wheel placement.

I've also updated the materials list a lot.. :unsure:

Biggest hold up I can see is all of the stickers/stencils
If there is any chance you have any leads for me Asgardianhammer on how I can get things made up on the cheap I would be grateful.
 
PerniciousDuke I cut all my stencils in vinyl in reverse on cheap vinyl. Base coat it all, make sure everything is good and dry then pop those puppies down and paint it. Remove the stencils while the paint is wet. You don't want that vinyl staying on too long. Then any other stickers, I made and stuck them down. I can dig up my files and send them to you if you have someone that can scale them for you and cut them to the size you need.
 
I've updated the first post with a drawing of the infinity table frame and the underside of the box for wheel placement.

I've also updated the materials list a lot.. :unsure:

Biggest hold up I can see is all of the stickers/stencils
If there is any chance you have any leads for me Asgardianhammer on how I can get things made up on the cheap I would be grateful.
I can make stickers. I have a silhouette cameo.
 
Status
Not open for further replies.
Back
Top