You are using an out of date browser. It may not display this or other websites correctly.
You should upgrade or use an alternative browser.
You should upgrade or use an alternative browser.
RoadWarriors Mk V sculpt Wip.
- Thread starter Roadwarrior
- Start date
- Status
- Not open for further replies.
Roadwarrior
Well-Known Member
Roadwarrior
Well-Known Member
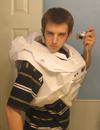
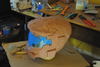
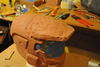
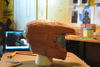
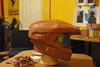
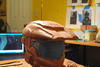
More pics.


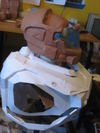
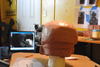
Red indicates top of the collar.
I'm thinking I'll Make a separate mold for the Jaw bubble then removing it from the main sculpt. Then they can be added to the cast helmet, this way it can be an all reach helmet or the throwback version.
Red indicates top of the collar.
I'm thinking I'll Make a separate mold for the Jaw bubble then removing it from the main sculpt. Then they can be added to the cast helmet, this way it can be an all reach helmet or the throwback version.
Attachments
Roadwarrior
Well-Known Member
Wow! Why can't this be finished already! It looks so good!!
Danke sehr!
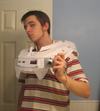
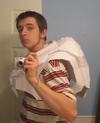
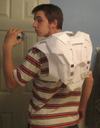
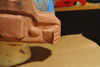
Progress on the chest, it's done for the most part I just need to put the supports and small pieces in.
Attachments
Roadwarrior
Well-Known Member
dude this is just amazing man, keep up the great work
Oh c'mon, it's not that good. lol
Oh c'mon, it's not that good. lol
you kidding me yes it is
i am going to start a sculpt soon hopefully very nice work man Roadwarrior
Well-Known Member
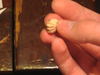
I suggest buying the 40lb case, it will be a little cheaper than buying 20 bricks of the 2lb. If I knew I would have to spend another 90$(With shipping) for additional 20lbs of clay I would have bought the case.
http://shop.brickintheyard.com/Clay_c10.htm
http://shop.brickintheyard.com/Clay_c10.htm
Roadwarrior
Well-Known Member
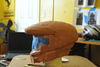
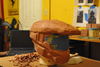
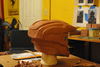
Stuff.
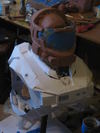
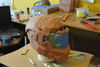
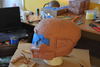
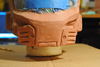
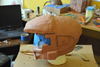
Re-worked the right vent, still need to do the left one.


Adding more clay than I need so I can trim it off to a more precise shape.

Re-worked the right vent, still need to do the left one.
Adding more clay than I need so I can trim it off to a more precise shape.
Attachments
Tip from a experienced sculptor, stop detailing!
What you need to do is take a second, third and even fourth look at your sculpt. Its impressive what you have accomplished so far, so here a few pointers.
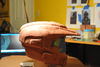
- Your vents are sticking out, if you look at the picture, they are more inwards then outwards.
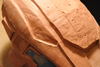
- The back of your helmet is to curved. It helps to build your sculpt up in blocks. This way you curve them down later.
- Try to keep using templates, try to use pieces of plastic or other straight objects for thing like the box behinde the visor. This way you know for sure its straight and flat.
- Try a rolling pin for pieces of clay you are putting on. This saves alot of time flatting the clay out.
I dont know they hardness of your clay but its seems to me that you are using a clay that is way to hard for this type of sculp. Your Clay should be firm and not to soft. If you are using clay that can only be modeled when hot (cant find the English term) you are absolutely F*****. Its impossible to work with unless your are building a car model larger then 30cm.
BUT your sculp doest look really promising, I will keep a eye out
What you need to do is take a second, third and even fourth look at your sculpt. Its impressive what you have accomplished so far, so here a few pointers.
- Your vents are sticking out, if you look at the picture, they are more inwards then outwards.
- The back of your helmet is to curved. It helps to build your sculpt up in blocks. This way you curve them down later.
- Try to keep using templates, try to use pieces of plastic or other straight objects for thing like the box behinde the visor. This way you know for sure its straight and flat.
- Try a rolling pin for pieces of clay you are putting on. This saves alot of time flatting the clay out.
I dont know they hardness of your clay but its seems to me that you are using a clay that is way to hard for this type of sculp. Your Clay should be firm and not to soft. If you are using clay that can only be modeled when hot (cant find the English term) you are absolutely F*****. Its impossible to work with unless your are building a car model larger then 30cm.
BUT your sculp doest look really promising, I will keep a eye out
Roadwarrior
Well-Known Member
Tip from a experienced sculptor, stop detailing!
What you need to do is take a second, third and even fourth look at your sculpt. Its impressive what you have accomplished so far, so here a few pointers.
- Your vents are sticking out, if you look at the picture, they are more inwards then outwards.
- The back of your helmet is to curved. It helps to build your sculpt up in blocks. This way you curve them down later.
- Try to keep using templates, try to use pieces of plastic or other straight objects for thing like the box behinde the visor. This way you know for sure its straight and flat.
- Try a rolling pin for pieces of clay you are putting on. This saves alot of time flatting the clay out.
I dont know they hardness of your clay but its seems to me that you are using a clay that is way to hard for this type of sculp. Your Clay should be firm and not to soft. If you are using clay that can only be modeled when hot (cant find the English term) you are absolutely F*****. Its impossible to work with unless your are building a car model larger then 30cm.
BUT your sculp doest look really promising, I will keep a eye out
Thank you.
I'm using Chavant NSP Medium I can move the clay around when it's not heated, I know about blocking it out and then carving/detailing I have mostly just been getting the shapes correct. The only real detail I've done is the vent, I Just noticed that the vents are a few degrees off but they are symmetrical(The same on both sides) so I'm not to concerned about them at the moment. The rolling pin is a good idea, I'll have to get one for clay.
Again Thank you for the advice
That would totally boss if you could send it to me.; Is it a formula or some actual paint chips? Did they give you a Spray Can or did you have to use a paint gun? I have no experience what so ever with this.
I bought a quart of it and used a spray gun. It is very similar to a spray can, but it can be a little tricky getting the right air pressure, but it works great.
I think if you take these specs to a paint store they can mix it for you.
Dupont formula # 677566
Roadwarrior
Well-Known Member
Roadwarrior
Well-Known Member
Roadwarrior
Well-Known Member
NickNackPattyWack
Active Member
I you please just pat yourself on the back for me bro. This is amazing
Roadwarrior
Well-Known Member
Ha, well here's more amazing.
This is my all time favorite song
This is my all time favorite song
Last edited by a moderator:
- Status
- Not open for further replies.
Similar threads
- Replies
- 0
- Views
- 276
- Replies
- 4
- Views
- 746
- Replies
- 4
- Views
- 683