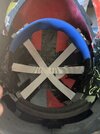
Test fit! Feels good and the helmet doesn’t look too awkward. And no I don’t have an octuple head I used one of these head baskets I took from a hard hat and it works well at keeping my head cool. The torso still feels a bit empty.
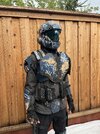
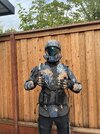
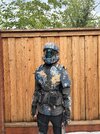
Good grief it’s been a while since I posted on the forums. Anyway I’ve been hard at work making new additions to this armor set since forever ago. Most recently is new leg armor and some updates to my shoulders. 3D printing from home has been a huge blessing ngl
Good grief it’s been a while since I posted on the forums. Anyway I’ve been hard at work making new additions to this armor set since forever ago. Most recently is new leg armor and some updates to my shoulders. 3D printing from home has been a huge blessing nglView attachment 361202View attachment 361203View attachment 361204