- Member DIN
- S170
Hey all! After a long hiatus, I’m back!
I passed my kit in 2022 with a tier 1 clearance, and since then I’ve been working on upgrades and changes. Not just on the armour, but weapons, undersuit, soft kit. Basically just everything.
We’ll start from the top. Right after my deployment certification came in.
2022:
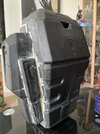
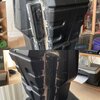
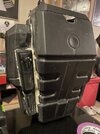
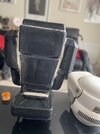
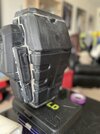
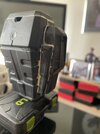
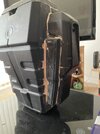
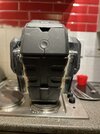
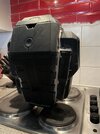
I started with a new helmet. My Xcoser helmet had gotten too small, and would be an issue going forward. So I went to this place called Cybercraft. At the time, I’d gotten my helmet from them in the March of that year, and had a discount to use. So I got my ODST helmet from them. Everything was fine at first. Did the usual sand, smooth and prime, even got all the colouring done. And then the helmet cracked. From the face, round to the back of the head, and it seemingly happened out of nowhere. I chalked it up to the extreme temperatures we were seeing in the UK that summer. But I had to start over.


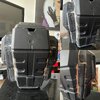
I reinforced the entire inside with fibreglass resin, doing 3 layers of the stuff inside the helmet. I then began filling and smoothing the entire helmet. I got to a point where i felt it was good as new, but I’m cautious of it to this day.


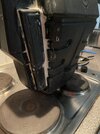
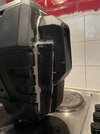
The sanded and smoothed finish.


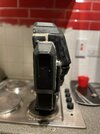
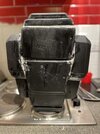
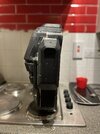
Once the helmet was completed again, I began working on taking the chest in, and tightening up the chest in general. Still running on the old straps from version 1, I would change this in late 2023.


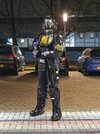
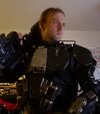
That’s kinda it for works on the kit in 2022. Here it was at MCM Expo in London of that year.


2023:
There wasn’t a lot of work until late that year. I was more Star Wars that year with my Republic Commando, and my family went through the loss my grandfather, I changed jobs and relocated. But there were some big changes in the latter half of that year.
My now ex partner took me horse riding one day, and as I was putting on my riding vest, I had a lightbulb moment. We did our riding session (if you want to know how that went, I hit the deck cocsyx first, boot still in the stirrup. Comforted Will, gave him a cuddle and got back on to finish the session.)
We got back home, and I ordered a vest. I figured that I could utilise the vest’s strapping to place the chest’s weight on the vest instead of directly on my shoulders. And it worked a charm. I strapped up the chest to the straps to adjust the shoulders, and utilised a bit of Velcro at the back to secure the neck, while I also buckled the side plates to the abs. We then sewed my hip guards to the vest straps.


My chest was like this for a while. We also retooled my boot covers for the kit. Which to be fair, I’m going to revise again soon.


The kit didn’t have any other changes that year, and nothing would change on it until late 2024. Here it was at Megacon London and HCS in the January and May of 2024 respectively. [Colorful close up credit of SaffyJemzPhotography]


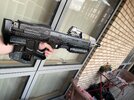
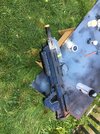
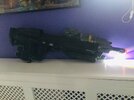
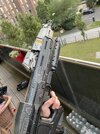
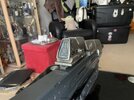
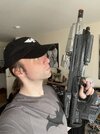
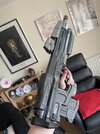
Oh! Actually. I did get my hands on Plasma Rifles! This was in the November of 2023. I managed to get them both working again!

2024:
After ANOTHER relocation and job change in early 2024, I picked up the kit again in the rough Octoberish of that year.
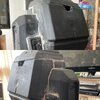
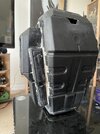
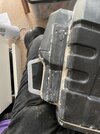
The first thing I did was trim down the legs. I had these huge lips of plastic on my armour, which restricted my movement drastically. I spent a few days with the dremel just grinding all away and freeing up space in the legs. Please excuse the tactical crocs.


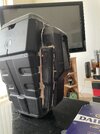
Once that was sorted, I started on the knees. Which used to be connected to my shin guards, which again restricted movement. So what I did was head to Poundland and put kneepads inside the knees, thus making them their own piece. Which allowed me to properly bend my legs.


Having that wonderful little idea, I thought about applying the same to my shoulders. As my shoulders were sat on knee pads, which at the time, seemed like a great idea. Until I had go through doors sideways.


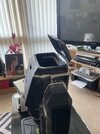
At this point, I was happy with it again. Little changes to enhance motion. Here it was at the end of 2024.


That was it for 2024. This was it for the year, as it was approaching winter. And it was time for me to wind down.
2025:
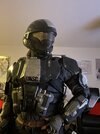
This is where the new kit really came in. It’s so far been an overhaul of the entire kit.
This began at the end of May this year, after the first half of this year was spent starting Red Hood, Qui Gon Jinn, The Eleventh Doctor, Indiana Jones and a Biker Scout.
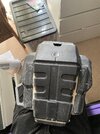
I decided it was time to update the ODST kit, which meant I stripped it right back. The armour went an anthracite grey from WRX paints.
My first port of call was to open up the gauntlets, and widen the gap on the inside of the arm, so that I could move my arms more. It was here that I realised that I could do more with the armour’s colour scheme and play with colour theory a bit more. So I’ve started adding accents of black, and weathering in Leadbelcher.


The next point was the belt, and oh boy was this one eye opening. I had to take the belt in by nearly five inches due to how oversized it was on me. But I simplified the belt buckle system, adjusted the belt size, and altered the position of the back plate.

I took in the calf armour at the back by a small amount, and did some minor grinding back on the ankle plates.


I’ll be continuing this in extra threads, as I’ve just hit the the 50 attachments.
I passed my kit in 2022 with a tier 1 clearance, and since then I’ve been working on upgrades and changes. Not just on the armour, but weapons, undersuit, soft kit. Basically just everything.
We’ll start from the top. Right after my deployment certification came in.
2022:
I started with a new helmet. My Xcoser helmet had gotten too small, and would be an issue going forward. So I went to this place called Cybercraft. At the time, I’d gotten my helmet from them in the March of that year, and had a discount to use. So I got my ODST helmet from them. Everything was fine at first. Did the usual sand, smooth and prime, even got all the colouring done. And then the helmet cracked. From the face, round to the back of the head, and it seemingly happened out of nowhere. I chalked it up to the extreme temperatures we were seeing in the UK that summer. But I had to start over.
I reinforced the entire inside with fibreglass resin, doing 3 layers of the stuff inside the helmet. I then began filling and smoothing the entire helmet. I got to a point where i felt it was good as new, but I’m cautious of it to this day.
The sanded and smoothed finish.
Once the helmet was completed again, I began working on taking the chest in, and tightening up the chest in general. Still running on the old straps from version 1, I would change this in late 2023.
That’s kinda it for works on the kit in 2022. Here it was at MCM Expo in London of that year.
2023:
There wasn’t a lot of work until late that year. I was more Star Wars that year with my Republic Commando, and my family went through the loss my grandfather, I changed jobs and relocated. But there were some big changes in the latter half of that year.
My now ex partner took me horse riding one day, and as I was putting on my riding vest, I had a lightbulb moment. We did our riding session (if you want to know how that went, I hit the deck cocsyx first, boot still in the stirrup. Comforted Will, gave him a cuddle and got back on to finish the session.)
We got back home, and I ordered a vest. I figured that I could utilise the vest’s strapping to place the chest’s weight on the vest instead of directly on my shoulders. And it worked a charm. I strapped up the chest to the straps to adjust the shoulders, and utilised a bit of Velcro at the back to secure the neck, while I also buckled the side plates to the abs. We then sewed my hip guards to the vest straps.
My chest was like this for a while. We also retooled my boot covers for the kit. Which to be fair, I’m going to revise again soon.
The kit didn’t have any other changes that year, and nothing would change on it until late 2024. Here it was at Megacon London and HCS in the January and May of 2024 respectively. [Colorful close up credit of SaffyJemzPhotography]
Oh! Actually. I did get my hands on Plasma Rifles! This was in the November of 2023. I managed to get them both working again!
2024:
After ANOTHER relocation and job change in early 2024, I picked up the kit again in the rough Octoberish of that year.
The first thing I did was trim down the legs. I had these huge lips of plastic on my armour, which restricted my movement drastically. I spent a few days with the dremel just grinding all away and freeing up space in the legs. Please excuse the tactical crocs.
Once that was sorted, I started on the knees. Which used to be connected to my shin guards, which again restricted movement. So what I did was head to Poundland and put kneepads inside the knees, thus making them their own piece. Which allowed me to properly bend my legs.
Having that wonderful little idea, I thought about applying the same to my shoulders. As my shoulders were sat on knee pads, which at the time, seemed like a great idea. Until I had go through doors sideways.
At this point, I was happy with it again. Little changes to enhance motion. Here it was at the end of 2024.
That was it for 2024. This was it for the year, as it was approaching winter. And it was time for me to wind down.
2025:
This is where the new kit really came in. It’s so far been an overhaul of the entire kit.
This began at the end of May this year, after the first half of this year was spent starting Red Hood, Qui Gon Jinn, The Eleventh Doctor, Indiana Jones and a Biker Scout.
I decided it was time to update the ODST kit, which meant I stripped it right back. The armour went an anthracite grey from WRX paints.
My first port of call was to open up the gauntlets, and widen the gap on the inside of the arm, so that I could move my arms more. It was here that I realised that I could do more with the armour’s colour scheme and play with colour theory a bit more. So I’ve started adding accents of black, and weathering in Leadbelcher.
The next point was the belt, and oh boy was this one eye opening. I had to take the belt in by nearly five inches due to how oversized it was on me. But I simplified the belt buckle system, adjusted the belt size, and altered the position of the back plate.
I took in the calf armour at the back by a small amount, and did some minor grinding back on the ankle plates.
I’ll be continuing this in extra threads, as I’ve just hit the the 50 attachments.