Where to start.........hmmm.......well for starters I know VERY little about blender. I understand the vertices, edges and faces. I know about loop cutting, extruding, merging vertices and a few other small things.
A while ago, I figured out on my own how to use blender and I began to edit models if they seemed a little off. These files would not get released since I did this just for myself to be happier with my armor pieces.
Anywho, I am in MAJOR need of a more accurate and up-to-date model of the case on Kat's thigh. I have attempted to try and actually model something this time.
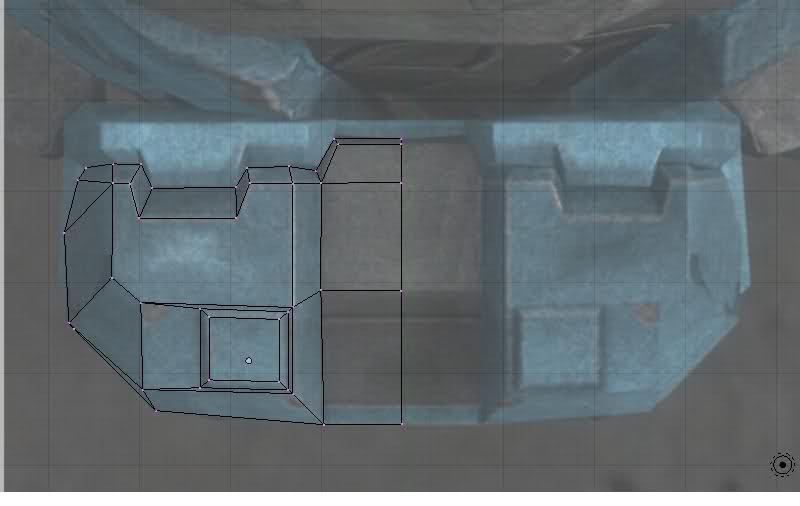
Here is where I am so far:

I already got my front, top and side view images set up so that when I have a left and a right side showing in blender, the model lines up correctly. I know about having the different views of the picture.
Anyway, since I was NOT sure how to actually start on a model, I deleted the default cube that appears when you load blender and I have been using: ctrl + left mouse button to make my vertices for now.
I have NO clue if that is right, but it seems to be working. I know I still need to create a few more edges since in order to create a face, I discovered that you can only have up to 4 vertices selected. Once I finish that, I will then switch to my front view of the image and start arranging my vertices and try to make it so that they line up right.
Am I even ANYWHERE close to doing this right or should I just leave this modeling thing to the pros? I'm ONLY trying this case since it does not appear to be such a complex shape.
I am trying to make this so that the "lid" of the case is seperate from the rest so that I can build a functioning case to hold stuff in. In the image, it looks like the 2 notches seen at the top on either side appear to be hinges so that is what I'm aiming for.
If there is anyone out there that really knows blender and can maybe walk me through some steps by also explaining what to click, press, whatever so that I can MAYBE build this model.
Or, someone else can just try and model it. XD haha I have some GREAT reference images that really show the detail of this case and how it's constructed. hehe
hehe
Also, you can see that I am only focusing on half. Once I have one half fully completed, if I make it that far, I am going to "mirror" it so that I end up with a full, solid model.
A while ago, I figured out on my own how to use blender and I began to edit models if they seemed a little off. These files would not get released since I did this just for myself to be happier with my armor pieces.
Anywho, I am in MAJOR need of a more accurate and up-to-date model of the case on Kat's thigh. I have attempted to try and actually model something this time.
Here is where I am so far:
I already got my front, top and side view images set up so that when I have a left and a right side showing in blender, the model lines up correctly. I know about having the different views of the picture.
Anyway, since I was NOT sure how to actually start on a model, I deleted the default cube that appears when you load blender and I have been using: ctrl + left mouse button to make my vertices for now.
I have NO clue if that is right, but it seems to be working. I know I still need to create a few more edges since in order to create a face, I discovered that you can only have up to 4 vertices selected. Once I finish that, I will then switch to my front view of the image and start arranging my vertices and try to make it so that they line up right.
Am I even ANYWHERE close to doing this right or should I just leave this modeling thing to the pros? I'm ONLY trying this case since it does not appear to be such a complex shape.
I am trying to make this so that the "lid" of the case is seperate from the rest so that I can build a functioning case to hold stuff in. In the image, it looks like the 2 notches seen at the top on either side appear to be hinges so that is what I'm aiming for.
If there is anyone out there that really knows blender and can maybe walk me through some steps by also explaining what to click, press, whatever so that I can MAYBE build this model.
Or, someone else can just try and model it. XD haha I have some GREAT reference images that really show the detail of this case and how it's constructed.
Also, you can see that I am only focusing on half. Once I have one half fully completed, if I make it that far, I am going to "mirror" it so that I end up with a full, solid model.
