SirPalesAlot’s MK VI WIP: You’re still not done yet?

Status
Not open for further replies.
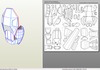
So I think I have the torso model ready for unfolding. I know there are some things that could probably use some more work, but I think this is as far as I need to take it. If the weather wasn’t so nice right now I might be inclined to do more to it, but I need to do what I can to take advantage of the warm weather. If no one sees any deal breaker problems I think I will start unfolding these files either tomorrow or the day after. I will also unfold the modified shoulder file at that time. After all of the files are done I will see about having them added to the database so you can get started using them. I thought about waiting until I built them, but I have no clue when I will get around to building the torso again.


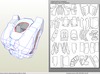
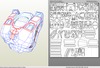
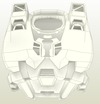
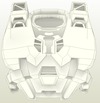
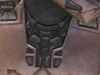
This is the medium detail version. Almost no recessed detail is featured in this model except for what I felt was needed, and all raised details are represented with floating faces.

Torso_MD_Front_zpsbb2ecd4e.png
Torso_MD_Back_zpsaf38ee1c.png
Torso_MD_ISO_zps3af6527e.png


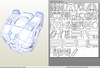
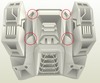
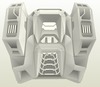
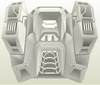
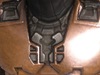
This is the high detail version. All recessed detail is featured in this model, and all raised details are represented with floating faces.

Torso_HD_Front_zps80186334.png
Torso_HD_Back_zps92402198.png
Torso_HD_ISO_zps0220d160.png


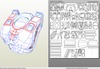
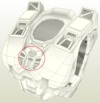
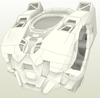
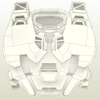
This is the full detail version. I think the name says it all.

Torso_FD_Front_zpsa54fcd3c.png
Torso_FD_Back_zps018595ee.png
Torso_FD_ISO_zpse50ce06e.png


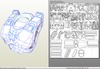
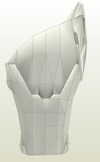
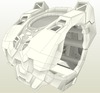
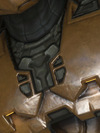
This is the area I was questioning before. I decided to use this shape in the end because I felt that it fit inside that area the best. Although I am sure it isn’t really accurate I thought it looked alright.
Torso_FD_Neck_Detail_zpsa37b20ba.png
 

Attachments

  • Torso_MD_Front_zpsbb2ecd4e.png
    Torso_MD_Front_zpsbb2ecd4e.png
    204.3 KB · Views: 166
  • Torso_MD_Back_zpsaf38ee1c.png
    Torso_MD_Back_zpsaf38ee1c.png
    396.3 KB · Views: 156
  • Torso_MD_ISO_zps3af6527e.png
    Torso_MD_ISO_zps3af6527e.png
    203.7 KB · Views: 152
  • Torso_HD_Front_zps80186334.png
    Torso_HD_Front_zps80186334.png
    200.4 KB · Views: 175
  • Torso_HD_Back_zps92402198.png
    Torso_HD_Back_zps92402198.png
    427.8 KB · Views: 184
  • Torso_HD_ISO_zps0220d160.png
    Torso_HD_ISO_zps0220d160.png
    403.5 KB · Views: 165
  • Torso_FD_Front_zpsa54fcd3c.png
    Torso_FD_Front_zpsa54fcd3c.png
    396.4 KB · Views: 169
  • Torso_FD_ISO_zpse50ce06e.png
    Torso_FD_ISO_zpse50ce06e.png
    436.6 KB · Views: 163
  • Torso_FD_Neck_Detail_zpsa37b20ba.png
    Torso_FD_Neck_Detail_zpsa37b20ba.png
    264 KB · Views: 161
Have a look at these…

24396244-Full.jpg


24391006-Full.jpg


22532515-Full.jpg


There are multiple "layers" in there which I'll be building up with foam for a decent look.
 

Attachments

  • 24391006-Full.jpg
    24391006-Full.jpg
    58.5 KB · Views: 144
  • 24396244-Full.jpg
    24396244-Full.jpg
    67.9 KB · Views: 143
  • 22532515-Full.jpg
    22532515-Full.jpg
    55.6 KB · Views: 139
There are multiple "layers" in there which I'll be building up with foam for a decent look.

I noticed that as well, but I thought it might be best to leave those extra layers out of the model. When I added those details to the model, with the torso at my size, those details are only 0.039" high. I did leave one of the floating faces for them in, but that was it.

After looking at these pictures together I decided to change that detail piece I was talking about before. I think what I have now matches much better. I also managed to unfold the medium detail chest, but I think I want to rearrange some of the polygons in the model so that the unfold comes out a little bit cleaner. Hopefully I can have that version of the torso done later this afternoon.
 
You know I was thinking that since youre doing all this work and detail into the HD files I think you should kick it up a notch and call them Blu-ray files.
 
One thing that I've noticed, since you're adding in all this detail, is ridges around the areas flanking the neck...

24396244-Full_zps0d160bcd.jpg


It shouldn't be terribly difficult to add them in. Maybe that's on the future line of additions; if so, feel free to ignore this.
 

Attachments

  • 24396244-Full_zps0d160bcd.jpg
    24396244-Full_zps0d160bcd.jpg
    48.3 KB · Views: 146
You know I was thinking that since youre doing all this work and detail into the HD files I think you should kick it up a notch and call them Blu-ray files.

I laughed pretty hard at that.


One thing that I've noticed, since you're adding in all this detail, is ridges around the areas flanking the neck...

24396244-Full_zps0d160bcd.jpg


It shouldn't be terribly difficult to add them in. Maybe that's on the future line of additions; if so, feel free to ignore this.


I had originally planned to leave them out, but now I feel compelled to add them in lol. Since I'm in that area I might as well add that overhanging detail that is a little bit above this area.
 

Attachments

  • 24396244-Full_zps0d160bcd.jpg
    24396244-Full_zps0d160bcd.jpg
    48.3 KB · Views: 142
might want to add a strap with a buckle in that section so you could mod it to some reach add on to the top of it.
 
might want to add a strap with a buckle in that section so you could mod it to some reach add on to the top of it.

I think something like that would only work if the add on parts were modeled with that in mind as well.


So I attempted to add that raised detail in, and it just isn't looking right. Trying to offset that shape up any amount leaves the bottom left corner looking awkward because of the angle of the original surfaces. If that shape were one sweeping curve instead of several polygons it would look better. Since I would rather not mess with the original shape of that area I think I will just leave it out. That detail should be easy to add even without the use of floating faces as templates.


EDIT: I take that back. I have something that might be passable.

Torso_FD_Extra_Detail_Test_zps916c1635.png
 

Attachments

  • Torso_FD_Extra_Detail_Test_zps916c1635.png
    Torso_FD_Extra_Detail_Test_zps916c1635.png
    399.6 KB · Views: 148
well yeah most of the part from reach looked like that just clipped on to that section of the chest.
 
I laughed pretty hard at that.

Yeah I did too. Who knows maybe it will catch on. I cant wait for you to start releasing, I think I will end up doing the recessed version with floating faces. I havent worked with floating faces but they cant be that hard to do at all
 
In my opinion, adding the raised borders around the shoulder clip recesses just complicates the pep and weakens the model. Much easier to simply add those in with mat board after the torso is pepped. I'm thinking I'd be building your medium or low definition files because all the various raised and recessed areas being added will just weaken the whole structure too much and invite potential warping due to the small faces.
 
This build is stunning to say the least. These files are perfect, and I would love to see someone tackle the "Blu-ray" torso at some point. I'm both excited and sad to say that once these files get released, my other projects are going to get derailed. Keep up the good work, man. I'm quite literally cheering at my computer hoping you'll hear me. :)

-Ryan
 
In my opinion, adding the raised borders around the shoulder clip recesses just complicates the pep and weakens the model. Much easier to simply add those in with mat board after the torso is pepped. I'm thinking I'd be building your medium or low definition files because all the various raised and recessed areas being added will just weaken the whole structure too much and invite potential warping due to the small faces.

Yeah I was concerned about over complicating that area just to add that little bit of detail. I modeled it in the full detail version first and then I moved the top surfaces to the other files. I'm going to do my best to set up the files so that way you could interchange sections if you felt like it.

I've had more problems with large flat areas warping on the chest than anything else, but I understand what you mean. I do plan to build the full detail model for my build, but I plan to brace and strengthen any areas that I think may warp.

I will also be releasing a file that I will refer to as my low detail file. It is the first file I used in this build. It only has one or two minor changes to it, but the unfold was streamlined pretty well.


This build is stunning to say the least. These files are perfect, and I would love to see someone tackle the "Blu-ray" torso at some point. I'm both excited and sad to say that once these files get released, my other projects are going to get derailed. Keep up the good work, man. I'm quite literally cheering at my computer hoping you'll hear me. :)

-Ryan

Thank you! I do plan to make the full detail version, but it may be a little bit down the road before I get to that piece. I will probably save that part for last.

Yeah I did too. Who knows maybe it will catch on. I cant wait for you to start releasing, I think I will end up doing the recessed version with floating faces. I havent worked with floating faces but they cant be that hard to do at all


I can't wait to be done with them either lol. This part has been pretty fun, but I need to get these files done so I can work on something else. So much to do...so little time.
 
Yeah, it's not really the details I'm interested in with your files because they aren't too hard to add during a build with spare cardstock and mat board. I'm more interested in the base structures and how you've corrected the shapes of them, like the torso's upper back. I've seen people do those kinds of corrections with bondo and rondo, and that's just adding too much weight. So it will be great to have the main structural shapes already corrected in the pep file.
 
It’s been a while since my last update. I haven’t been slacking. I’ve been pretty busy with other things, but I finally managed to finish all the torso files. Today I will be releasing the FD Torso, HD Torso, MD Torso, LD Torso, LD Torso Tester, FD Shoulder, and the fixed HD Thigh.


Note to the original creators of the models: I did message the original creators (that I could find) to ask for permission to release the modified files. I received no replies. I am releasing the modified files here under the condition that I give you proper credit, and stop distribution of the files if you ask me to do so. The files will be placed onto my 4shared account, and they will also (probably) be put into the 405[SUP]th[/SUP] database. Thank you!


Original creators of the files include

Robogenesis – Shoulder

Crackhead09 – Thigh

FlyingSquirl – Torso


______________________________________


Now it’s time to check out some pictures.


When I built the LD torso file in the database I noticed that the overall proportions are a bit different than the HD version. That caused me problems when I tried to use the same measurements on my HD version. I picked the wrong number to hold in the XYZ values and I ended up with a torso that wasn’t big enough in the Y direction. So, I decided to throw this in so there is a lower detail file that matches the proportions of the high detail file.


Here is the LD Tester Torso
Torso_Tester_Final_1_zps0bdc731b.png


Here is the LD Torso. This version is the last version I built shown earlier in the build. It is pretty easy to build in comparison to the MD version. This version only has a few changes compared to the original version.
Torso_LD_Final_1_zps7641de45.png


Here is the MD Torso.
Torso_MD_Final_1_zps1e65f024.png


Here is the HD Torso.
Torso_HD_Final_1_zpsc7f081e2.png


Here is the FD Torso
Torso_FD_Final_1_zps488013ac.png


There are 3 areas that will give you a little bit of a headache. The first area is only on the FD version. If you are doing any other version then it is represented by a floating face.
Torso_FD_Final_3_zps4ac8974f.png


The next trouble spots are located on the back. The upper trouble spots are in all versions of the model. The lower trouble spots are on every version except the LD version.
Torso_FD_Final_2_zpseff8df4d.png


Here is the FD Shoulder
Shoulder_Final_1_zps1ba3f64e.png


Here is the HD Thigh
Thigh_Final_1_zpscc9deb5c.png


I hope my unfolds aren’t completely useless to everyone else lol. I prefer to build my things in this way, but I’m pretty sure most people may end up modifying the unfolds quite a bit. Next I plan to finish up the forearm, and then I will start fixing the cod model. I probably won’t build any of these files until I am done with all the model work. There isn’t much of a rush on building them because I couldn’t resin them for a little while anyways.

Download Links:

MK VI Torso Pack

MK VI Shoulder Pack (updated with newest files)

MK VI Thigh - HD -File removed new version coming soon.


Thanks for looking!
 

Attachments

  • Torso_Tester_Final_1_zps0bdc731b.png
    Torso_Tester_Final_1_zps0bdc731b.png
    198.1 KB · Views: 151
  • Torso_LD_Final_1_zps7641de45.png
    Torso_LD_Final_1_zps7641de45.png
    222.1 KB · Views: 161
  • Torso_MD_Final_1_zps1e65f024.png
    Torso_MD_Final_1_zps1e65f024.png
    238.3 KB · Views: 131
  • Torso_FD_Final_1_zps488013ac.png
    Torso_FD_Final_1_zps488013ac.png
    246.5 KB · Views: 164
  • Torso_HD_Final_1_zpsc7f081e2.png
    Torso_HD_Final_1_zpsc7f081e2.png
    242.9 KB · Views: 149
  • Torso_FD_Final_2_zpseff8df4d.png
    Torso_FD_Final_2_zpseff8df4d.png
    445.6 KB · Views: 154
  • Torso_FD_Final_3_zps4ac8974f.png
    Torso_FD_Final_3_zps4ac8974f.png
    495.2 KB · Views: 164
  • Thigh_Final_1_zpscc9deb5c.png
    Thigh_Final_1_zpscc9deb5c.png
    133.4 KB · Views: 138
  • Shoulder_Final_1_zps1ba3f64e.png
    Shoulder_Final_1_zps1ba3f64e.png
    181.7 KB · Views: 145
I was just wondering the past few days what youve been up too. 7 Unfolds of models certainly answer's my question. Now to start planning about when im going to build it.
 
Thanks for uploading these. Mac doesn't recognize the .rar file type, so hopefully when I transfer them over to my Windoze machine I'll be able to decompress them. I can see already that I'll be modifying some of the unfolds. For example, the center detail area of the outer arm is attached to the surrounding area and I prefer to pep those grooves using mat board. I'll also be modifying the added lower indents on the shoulder, as you've mimicked my first implementation of these which turns out being not quite the correct shape (these will be fixed on my shoulders 2.0).
 
I was just wondering the past few days what youve been up too. 7 Unfolds of models certainly answer's my question. Now to start planning about when im going to build it.

It all took longer than I expected. I went back and remade almost all of the detail, but the second time I did it while the model was scaled to my size. At the default scale, almost all of the recessed detail I added is 0.125" deep. This size is big enough to pep without much issue, and it's not so deep that it will look strange when it's built.

Thanks for uploading these. Mac doesn't recognize the .rar file type, so hopefully when I transfer them over to my Windoze machine I'll be able to decompress them. I can see already that I'll be modifying some of the unfolds. For example, the center detail area of the outer arm is attached to the surrounding area and I prefer to pep those grooves using mat board. I'll also be modifying the added lower indents on the shoulder, as you've mimicked my first implementation of these which turns out being not quite the correct shape (these will be fixed on my shoulders 2.0).


If you need me to upload the files individually then let me know. I kind of figured you would need to change the unfolds a good bit based on your build so far. Well I guess since I haven't started building my shoulders yet I can always fix that detail down the road lol.

Since we already have HD you should call them 4k files. :D
Really great work on those! :)

Thank you! I don't know if I would go that far, but I don't really know what else to call them lol.


Oh, and I started on this guy earlier...
Forearm_Back_Detail_1_zps22af4fec.png
 

Attachments

  • Forearm_Back_Detail_1_zps22af4fec.png
    Forearm_Back_Detail_1_zps22af4fec.png
    127 KB · Views: 149

Hey…I recognize that! That's the pain in the…arm…that I've been working on for the last week doing it from scratch instead of from somebody's "here ya go!" pep file! (Actually, the lower line which you haven't added yet is even more a pain in the…arm.)

Looking good. (In that photo it kind'a looks like the right side of the ridged line is too low? And the angles at the indent's bottom should be a little steeper.)
 

Attachments

  • Forearm_Back_Detail_1_zps22af4fec.png
    Forearm_Back_Detail_1_zps22af4fec.png
    127 KB · Views: 155
Status
Not open for further replies.
Back
Top