Well the helmet you would of course have to make mo way around that, and the torsos would have some problems if you molded. But from what I know all the shoulders use the basic Mk VI then they just rest on top of that. But you would still have the forearms, legs, and Cod piece thats more than half a suit down.
You are using an out of date browser. It may not display this or other websites correctly.
You should upgrade or use an alternative browser.
You should upgrade or use an alternative browser.
SirPalesAlot’s MK VI WIP: You’re still not done yet?
- Thread starter SirPalesAlot
- Start date
- Status
- Not open for further replies.
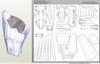
So I’ve been slacking a bit. I’ve had the forearms unfolded for a few days now, but I’m just now getting around to posting them. Yes, I have been a bit lazy lol.
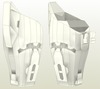
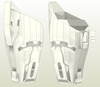
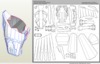
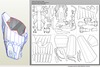
There are three separate files in this pack. There is a MD, HD, and FD version of this forearm. Rather than go into detail describing the differences I think it will be easier to show them.
MD Version

HD Version

FD Version


________________________________________________________________
I will repost this again here since I am releasing more files.
Note to the original creators of the models: I did message the original creators (that I could find) to ask for permission to release the modified files. I received no replies. I am releasing the modified files here under the condition that I give you proper credit, and stop distribution of the files if you ask me to do so. The files will be placed onto my 4shared account, and they will also (probably) be put into the 405[SUP]th[/SUP] database. Thank you!
Original creators of the files include
Nugget – HD Forearm
RobotChicken – Corrected inner forearm detail
________________________________________________________________
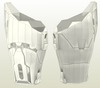
Here are the unfolded versions of each file. I tried to keep the number of parts down as low as I could while still maintaining a manageable file for each, but I cannot say for sure what needs to be changed since I have yet to build the file myself.
MD Version

HD Version

FD Version

The files can be found here.
Well, next is the helmet. I still have to go back through that gallery of screenshots to find some good shots of the helmet.
Thanks for stopping by!
There are three separate files in this pack. There is a MD, HD, and FD version of this forearm. Rather than go into detail describing the differences I think it will be easier to show them.
MD Version

HD Version

FD Version


________________________________________________________________
I will repost this again here since I am releasing more files.
Note to the original creators of the models: I did message the original creators (that I could find) to ask for permission to release the modified files. I received no replies. I am releasing the modified files here under the condition that I give you proper credit, and stop distribution of the files if you ask me to do so. The files will be placed onto my 4shared account, and they will also (probably) be put into the 405[SUP]th[/SUP] database. Thank you!
Original creators of the files include
Nugget – HD Forearm
RobotChicken – Corrected inner forearm detail
________________________________________________________________
Here are the unfolded versions of each file. I tried to keep the number of parts down as low as I could while still maintaining a manageable file for each, but I cannot say for sure what needs to be changed since I have yet to build the file myself.
MD Version

HD Version

FD Version

The files can be found here.
Well, next is the helmet. I still have to go back through that gallery of screenshots to find some good shots of the helmet.
Thanks for stopping by!
Attachments
-
 Forearm_MD_Final_2_zpsef413978.png343.8 KB · Views: 308
 -
 Forearm_HD_Final_2_zps04fee695.png333.6 KB · Views: 311
 -
 Forearm_FD_Final_2_zpsef2c644f.png359.3 KB · Views: 304
 -
 Forearm_FD_Final_3_zps0ecb28f6.png353.1 KB · Views: 321
 -
 Forearm_MD_Final_1_zps850ff312.png191.2 KB · Views: 293
 -
 Forearm_HD_Final_1_zpsaa09c878.png199.9 KB · Views: 301
 -
 Forearm_FD_Final_1_zps5ba1a53c.png203 KB · Views: 329
Cool, I'm sure I speak for a lot of people here when I say great job and thanks for posting them! It's too bad my own forearms are nearly finished or I'd be using these files for my build. Now the question is, can SirPalesAlot size them correctly for his own build…? 
- Member DIN
- S288
Cool, I'm sure I speak for a lot of people here when I say great job and thanks for posting them! It's too bad my own forearms are nearly finished or I'd be using these files for my build. Now the question is, can SirPalesAlot size them correctly for his own build…?
Great job. I can not wait to build. All i see in the pack is right are you going to make them left to so i can make left & right for both my forearms.
All i see in the pack is right are you going to make them left to so i can make left & right for both my forearms.
Just invert the model to get the other side.
- Member DIN
- S288
Just invert the model to get the other side.
How do i do that, lol
Cool, I'm sure I speak for a lot of people here when I say great job and thanks for posting them! It's too bad my own forearms are nearly finished or I'd be using these files for my build. Now the question is, can SirPalesAlot size them correctly for his own build…?
Thank you very much. Well the forearms and the shoulders have been the biggest issue scale wise. I'm rather slim, but I also have long arms so this presents a problem. If I scale the parts just to fit the length of my arms then the parts look as if they are much too large on me. This is especially true of the forearm. The upper opening of the forearm is huge in comparison to my arm when I scale it to fit the full length. I've had to do a bit of work on this to get a look I feel good about. I wanted to keep the shoulder and forearm proportionate with one another so it doesn't throw off the look, but I still needed to have parts that fit my body. After building both of those parts numerous times I think the scale I have them at is pretty good. I will probably take one last look at the current set I have built before I remake them, but I think what I have should work.
Very nice work. This may just be my next build
Thank you! I look forward to seeing the files being put to use.
Great job. I can not wait to build. All i see in the pack is right are you going to make them left to so i can make left & right for both my forearms.
There should have been a note at the top of each 2D layout mentioning the need to invert the pattern to create the other version. That option is found under the "2D Menu" drop down box located on the menu bar. Select the "Invert Pattern" option and it will mirror all of the parts in the 2D window so you can make the left versions. The model in the 3D window will stay the same.
BlertZ
Active Member
Loving the detail on these.
I noticed in the FD.ver that there is a face at the wrong angle.

It sticks out on both sides in the area. You have to be somewhat inside the model to see it. I haven't built it myself yet. Just tend to check the pep out and it caught my eye.
I noticed in the FD.ver that there is a face at the wrong angle.

It sticks out on both sides in the area. You have to be somewhat inside the model to see it. I haven't built it myself yet. Just tend to check the pep out and it caught my eye.
Attachments
Loving the detail on these.
I noticed in the FD.ver that there is a face at the wrong angle.
It sticks out on both sides in the area. You have to be somewhat inside the model to see it. I haven't built it myself yet. Just tend to check the pep out and it caught my eye.
Thank you! Nice find. The error was on both sides of the forearm, and it was also on the HD version as well. I went ahead and corrected this area and replaced the files. The download link has been updated.
EDIT: I took the forearm files back down to make some changes to the models. As soon as I get the changes made I will make a note of it and fix the links.
Attachments

You have put lots of time into just the pep models. How many times have you changed/remade most of a part now haha.
You have put lots of time into just the pep models. How many times have you changed/remade most of a part now haha.
Way too many times to keep up with lol. At least all of this work is being done during the winter. Since I can't do much else this does help pass the time.


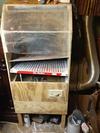
Same here. Can't really do anything big in my spray-booth. only objects that are 20x20 can fit. it only cost me around $110 to build with the fan being the most expensive.
Here's a pic of it.

I thought about building a small paint booth just to reduce the mess I have to deal with when I try to paint (living in an apartment sucks for this kind of stuff lol), but that will probably be later in the spring. My main drawback right now is the lack of a heated area to resin things. Another thing that would make my painting go smoother would be a silent air compressor and air brush set. I've seriously considered building one of my own since a normal one would cause the neighbors to complain lol.
Attachments
SirPalesAlot, thanks you for putting in the time to do the modded files! awesome work! i have a question though. i was in the process of downloading the forearm pack, but couldn't because they are no longer available. is this because your in the process of updating the files? but you did mention that the face was fixed on the forearm, and that a new link was provided to download? just asking, because i didn't see the new link.
SirPalesAlot, thanks you for putting in the time to do the modded files! awesome work! i have a question though. i was in the process of downloading the forearm pack, but couldn't because they are no longer available. is this because your in the process of updating the files? but you did mention that the face was fixed on the forearm, and that a new link was provided to download? just asking, because i didn't see the new link.
Thank you! I did fix the error and update the files, but I took them back down to make some more changes. As soon as the files are complete I will make a note of it and update the link.
Sweet! And thanks again! If you want, send me a notification when you got it up again. If not, I'll just keep checking back. God's speed to you bro!
SO MUCH DETAIL! I think that this is really cool, there is so much work going into these models. I probably won't build them myself (I prefer LD files to add my own detail), but I'm sure these files will be a great contribution to the community.
I'm impressed that you've stuck with this build for so long - three years is a long time, and having to remake so many parts so many times would be so frustrating. I like your build method, I would have never thought of using the pepakura model as a mold. Good luck with the rest of your build, I think that this is a build to watch.
Subscribed
SO MUCH DETAIL! I think that this is really cool, there is so much work going into these models. I probably won't build them myself (I prefer LD files to add my own detail), but I'm sure these files will be a great contribution to the community.
I'm impressed that you've stuck with this build for so long - three years is a long time, and having to remake so many parts so many times would be so frustrating. I like your build method, I would have never thought of using the pepakura model as a mold. Good luck with the rest of your build, I think that this is a build to watch.
Subscribed
Thank you!. Well I am making lower detail versions for each file so some things might be useful for you if I manage to get them out in time. I think the most useful thing about the modified versions is how smooth each new file is compared to the previous version. Rather than changing the settings in Pepakura to hide the unfold lines to make it appear smooth, I am trying to make them all smooth without putting it under 170 degrees. A smoother base model means less body filler work during the smoothing stage. There are plenty of benefits to this, but using my build method will yield the most benefits because I will be able to avoid using a body filler or sculpting epoxy almost entirely (except to correct mistakes). This was actually the original plan I had going into using this method, but I learned the hard way that the models just weren't smooth enough for it (well some of them).
Remaking the parts due to my inability to correctly scale things has been a bit frustrating, but I've learned a lot from it. I think the main reason I've been able to continue working on this is because each time I find a way to improve what I'm making. I think another reason I can keep going is because it satisfies my urge to make something when I have free time (I have way too much free time lol).
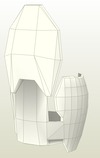
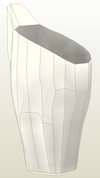
As for right now the forearm is undergoing some changes to the antecubital detail, and the upside down "T" shaped detail around the wrist opening was changed to match the game model better. I also have a Tester file for the shoulder and forearm in the works, and I plan to add test files for each piece as I go along. I think this will help a lot of people avoid the problems I had when I first began scaling parts.
I am still alive. I haven’t abandoned anything, and I have actually been working on the models I took down. I made quite a few changes to the forearm files, and the shoulder got a little update of its own.
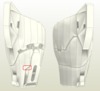
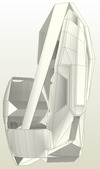
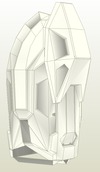
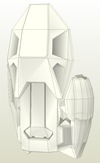
After talking to RobotChicken for a bit we decided that the antecubital detail he modeled wasn’t quite right. He remodeled the detail, and I reduced the polygon count to make it more Pepakura friendly. We also decided that the upside down “T” at the wrist opening wasn’t quite right so changes were made to it as well. The shoulder file also got an update in the form of three notches that were missing, and the indent on the outside face had its shape changed a bit.
Since I made a test file for the torso it only made sense to make one for the other files.
Forearm Tester

Shoulder Tester

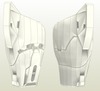
Here you can see shots of the updated shoulder with the new notches and the changed indent shape.


After talking to RobotChicken for a bit we decided that the antecubital detail he modeled wasn’t quite right. He remodeled the detail, and I reduced the polygon count to make it more Pepakura friendly. We also decided that the upside down “T” at the wrist opening wasn’t quite right so changes were made to it as well. The shoulder file also got an update in the form of three notches that were missing, and the indent on the outside face had its shape changed a bit.
Since I made a test file for the torso it only made sense to make one for the other files.
Forearm Tester

Shoulder Tester

Here you can see shots of the updated shoulder with the new notches and the changed indent shape.


Attachments
- Status
- Not open for further replies.
Similar threads
- Replies
- 2
- Views
- 699
- Replies
- 2
- Views
- 549
- Replies
- 23
- Views
- 2,548