Foam Spartan S-229 Build

Alright, thank you TurboCharizard, ill probably just use Leak seal then...


I have decided on the colors, After some deliberation, i settled on Primary Teal, With a secondary color of steel or black depending on what paint i can find.
83bf83b2-8c30-4031-8d49-f8522e9a7a17.jpg
 
Teal is a good color. Totally unbiased.
Totally unbiased, yes...:lol:

For the soft case, anyone got any ideas? I was thinking that maybe Electraknite may have something to say on this with her Jun Build, but as always, any advice is always appreciated. On Thingiverse, MoeSizzlac made some suggestions in the description of his Jun files as well, I was just wondering what y'all think I should do.
 
So, my ODST is being made out of EVA foam... I also just happen to have this handy dandy little Ender 3 pro as well... It would be a shame if no one used it...

In short, I did a thing. I printed off MoeSizzlac's hand armour piece from his Noble 6 files on Thingiverse. (Its super efficient to have the printer going while you work on an EVA project.) When I get home tonight, I will be printing the other hand. Can I just say for the record: 1. I am super excited and 2. Moe is the freakin boss when it comes to them free halo files! Keep up the great work dude!

In a perfect world, id post some pics of the raw print when I get home tonight, but my memory is horrible, so I may or may not be posting stuff.:lol:
But, they'll get up at some point.
 
Doing a bit more digging, and from wearing my ODST out in the wild, I need fans inside my helmet. the first time I wore my ODST out and about, I was basically suffocating like 20 mins in... i'm fairly confident, not 100% sure, but fairly confident that a lack of oxygen can be a bit difficult for breathing.:lol:

Anyway, anyone have any ideas/ solutions as to what kind of fans are good, and hopefully not too expensive?
Since you already have a 3D printer you're probably fairly familiar with small blower fans. All of my helmets have two 5V ducted fans that are drop in replacements for parts cooling on printers. The reason for ducted fans is that there's one flat surface that's perfect for attaching to the inside of the bucket and the 5V lets it all run off of a rechargeable USB powerbank.
 
Since you already have a 3D printer you're probably fairly familiar with small blower fans. All of my helmets have two 5V ducted fans that are drop in replacements for parts cooling on printers. The reason for ducted fans is that there's one flat surface that's perfect for attaching to the inside of the bucket and the 5V lets it all run off of a rechargeable USB powerbank.
Do 2 of them blow enough air? I’m in the middle of installing mine, same 5v 3D printer fans and they don’t seem to blow much. Was gonna get a 12v power sup and some resistors and run them off 7v or something..
 
Do 2 of them blow enough air? I’m in the middle of installing mine, same 5v 3D printer fans and they don’t seem to blow much. Was gonna get a 12v power sup and some resistors and run them off 7v or something..
I've never had an issue but it might also be that I also focus on more breathable sewn undersuits to help with cooling. My only concern about a 12V or similar is that you need a larger battery or more complex charging than plugging into the wall with a cable you have anyway. You can do 5V to 12V boost circuits but some of those need active cooling to not cook themselves so your mileage may vary depending on what you go with.
 
So, its been a minute, life kind of caught up and i've been super busy...

But! There has been a bit of progress in the meantime. I have printed off the other hand plate, as well as the Assault/breacher attachment. I was able to sand, prime and paint the A/B attachment, and pics will come later tonight from that. Very small update, but progress is progress.
 
Hallo all! I have made some progress on my spartan! It is very small, but progress is progress! I have split up and sliced all of my helmet pieces, and have completed the first part. I just put the second piece on the printer, but i'm running low on filament, so i'm kind of holding my breath and hoping that I have enough reserves to finish this piece.

On top of this, i am beginning to make the rest of the armour, starting wit the forearms.

So, small update, but more to follow, so keep your eyes peeled for my notifications!


IMG_5856.jpg
 
I have begun work on the armour itself, and I have gotten the first forearm done. I also decided to paint the hand plate with it so that I could see how everything would work because I was having trouble visualizing what it would look like. The actual flat piece of the top of the bracer is around 1/4in. too short width-wise and doesn't sit off of the top of the rest of the structure. I also realized after the fact that I forgot the piece on the back just behind the raised portion. (shown circled in pic below) In the last picture where I have the amour on/tediously balanced on my hand, i'd love some feedback on wether or not its a good fit or if it's too small for my arm.
Screen Shot 2022-08-26 at 1.36.57 PM.png

so, onto the pictures.
IMG_5867.jpg
IMG_5868.jpg
IMG_5870.jpg
IMG_5869.jpg
IMG_5872.jpg
IMG_5873.jpg


Thats all for now!

Cheers!

-S229
 

Attachments

  • IMG_5873.jpg
    IMG_5873.jpg
    920.3 KB · Views: 73
The forearms look great. I don't think the forearms are too small. You haven't built that one piece near the elbow yet so hard to judge but I don't think they are too small.
 
ok, so its been a long time, and for a moment there, i forgot i had a thread, but i have made progress, and so ill sharing my work. its gonna be pic heavy, sorry in advance.


ok, now to the meat and potatoes.
69104487265__47D6F4B2-6D53-47E2-A57B-4846EE86D67B.jpg

i printed the mirror of the jaw piece and stuck them together.
69178415119__646B8144-E3DF-46F7-8C08-8130C6F6A8E3.jpg

i then sanded them, but interestingly enough, i used pla on the right, and eco pla on the left, and the eco pla got much smoother and sanded much nicer then the normal pla, plus it was almost 10$ cheaper as well when i bought it.
69130360388__3E313DD4-FE7A-4D3F-B8E6-3DD21616C582.jpg

i then began printing the back piece, on the lower par of the helmet. then again, and again, and again, and again. for whatever reason, this part had a huge problem printing, and i ended up having to splice two pieces together.

upon looking at it, i didnt take any pictures of the upper half of the printing process, but i had many failed prints there as well, to the point where i had to go in and actually reconstruct several areas of the model in blender to get it to work, but in the end, i ended up being able to print the rest of it. not, however before the last part of the dome caused my hot end to have a.... well meltdown? thats the only way to describe it. the whole thing managed to get melted plastic in every single crack, crevasse, and hole in my hot end, causing me to have to replace the whole thing. it ended up working in the end however, and i now have a whole new bucket.
69406866123__73F81728-EDB8-4095-88AF-46C6B71B4AD0.jpg

69406866671__1577839A-6D97-4410-AE54-D46BD7843686.jpg

after assembly, i moved onto final assembly, then to sanding.
69206614651__C874548E-33EF-4C94-8248-1ED9FB998F96.jpg

after that, i aplied the base coat of filler primer, then the silver paint.
IMG_0956.jpg

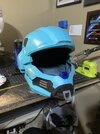
after the silver, i applied toothpaste and then added that lovely blue color that is S-229. lol
IMG_0966.jpg

after that, it was onto the small details. ignore the creepy head, his name is Phillip don't hate.
69432506277__FDF318CB-BB94-44C6-BB7E-4B14EB1CCCF7.jpg

its still very very much a work in progress, but it is progress none the less.
69432829928__2769B588-4311-49F9-A27C-DB2C2B49F65B.jpg
 

Attachments

  • 69432829928__2769B588-4311-49F9-A27C-DB2C2B49F65B.jpg
    69432829928__2769B588-4311-49F9-A27C-DB2C2B49F65B.jpg
    1.4 MB · Views: 55
This thread is more than 12 months old.

Your message may be considered spam for the following reasons:

  1. This thread hasn't been active in some time. A new post in this thread might not contribute constructively to this discussion after so long.
If you wish to reply despite these issues, check the box below before replying.
Be aware that malicious compliance may result in more severe penalties.
Back
Top