- Member DIN
- S416
Hi all,
There are some really amazing visors out there that people are making. Vacuum formed, cut motorcycle helmets, some really impressive stuff.
If you are like me though, you may not have a lot to spend on a visor right now and you may not have the technical ability to make your own vacuum-formed creation.
So what to do? Well, how about a gold-tinted, hex-pattern visor for about $4?
Yeah, that's what I said.

Here's what you will need:
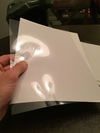
1. A plastic report cover (an overhead transparency sheet should work too).
I had some on my desk at work. If you don't have any, go to your local copy centre and see if they will give/sell you one or two. I can't imagine that they would cost more than $0.25 or so.

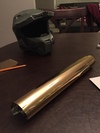
2. Gold-tinted window foil. I bought mine from eBay for $3.
Here is where I got it. https://www.ebay.ca/itm/381549045277

3. A printable hex pattern.
Here is the one I used: http://black-light-studio.deviantart.com/art/Free-Hexa-Pattern-CC0-272845671
Big shout out to Black Light Studios for making a free hex pattern (no i don't have any affiliation, I just like free stuff).
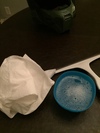
4. A dish of water mixed with dish-soap, some paper towel and a squeegee (if you don't have a squeegee, any card in your wallet can be used but be careful about scratching the tinting foil).

Here is what you do:
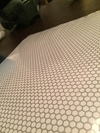
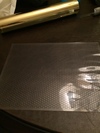
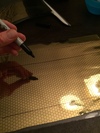
1. Print the hex pattern onto your plastic cover.
I used the laser printer at work. Be careful, you can scratch the printing off of the plastic with your fingernail.

Wait a second Jme, if it can be scratched off, aren't I going to trash it the first time I wear it?
We have a solution for that.
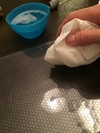
2. Place the plastic pattern-side up on your work surface.

3. Use the paper towel to wet the plastic cover. Just get it wet, don't rub!

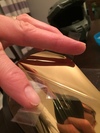
4. Remove the backing from the window tint.
The best way to do this is to stick a piece of tape to each side of the foil and use them to pull it apart.
(No I didn't manage to do this one-handed)

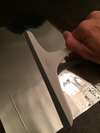
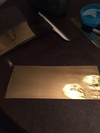
5. Place the window tint gold side down on top of the wet plastic cover.
It is best to start at one end of the cover and work your way way across.
The great thing here is that the tint would normally go on the inside if the window. By putting the tint side down on top of the printed pattern you protect the pattern from being scratched off.
6. Run the squeegee over the tint to remove the water and seal the tint to the plastic.
This is like putting a protective cover on your phone, you want to get out any air bubbles.

It should now look like this.

7. Determine the shape and size of the visor
I did this by sticking a piece of card stock inside my helmet and tracing the visor opening onto it.

8. Cut out your new visor with scissors and install.
I hot glued mine in.


NOTE:
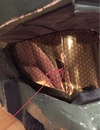
This does NOT make a perfect visor. Because the tint is being applied to the inside of a flexible surface that will be bent inward, the tint has a tendency to create a fold on itself.
I haven't figured out yet how to keep this from happening but hey, for $3 I'm willing to put up with it.

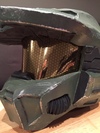
This should work for ODST type visors as well since the plastic cover can be folded. However, I made Mark VI armour so have not tried it.
I also painted the inside of my helmet black to help increase the mirror effect.
Visibility is good in my opinion.

There you have it. I will probably upgrade my visor in the future but for now this works just fine.
Sent from my iPhone using Tapatalk
There are some really amazing visors out there that people are making. Vacuum formed, cut motorcycle helmets, some really impressive stuff.
If you are like me though, you may not have a lot to spend on a visor right now and you may not have the technical ability to make your own vacuum-formed creation.
So what to do? Well, how about a gold-tinted, hex-pattern visor for about $4?
Yeah, that's what I said.
Here's what you will need:
1. A plastic report cover (an overhead transparency sheet should work too).
I had some on my desk at work. If you don't have any, go to your local copy centre and see if they will give/sell you one or two. I can't imagine that they would cost more than $0.25 or so.
2. Gold-tinted window foil. I bought mine from eBay for $3.
Here is where I got it. https://www.ebay.ca/itm/381549045277
3. A printable hex pattern.
Here is the one I used: http://black-light-studio.deviantart.com/art/Free-Hexa-Pattern-CC0-272845671
Big shout out to Black Light Studios for making a free hex pattern (no i don't have any affiliation, I just like free stuff).
4. A dish of water mixed with dish-soap, some paper towel and a squeegee (if you don't have a squeegee, any card in your wallet can be used but be careful about scratching the tinting foil).
Here is what you do:
1. Print the hex pattern onto your plastic cover.
I used the laser printer at work. Be careful, you can scratch the printing off of the plastic with your fingernail.
Wait a second Jme, if it can be scratched off, aren't I going to trash it the first time I wear it?
We have a solution for that.
2. Place the plastic pattern-side up on your work surface.
3. Use the paper towel to wet the plastic cover. Just get it wet, don't rub!
4. Remove the backing from the window tint.
The best way to do this is to stick a piece of tape to each side of the foil and use them to pull it apart.
(No I didn't manage to do this one-handed)
5. Place the window tint gold side down on top of the wet plastic cover.
It is best to start at one end of the cover and work your way way across.
The great thing here is that the tint would normally go on the inside if the window. By putting the tint side down on top of the printed pattern you protect the pattern from being scratched off.
6. Run the squeegee over the tint to remove the water and seal the tint to the plastic.
This is like putting a protective cover on your phone, you want to get out any air bubbles.
It should now look like this.
7. Determine the shape and size of the visor
I did this by sticking a piece of card stock inside my helmet and tracing the visor opening onto it.
8. Cut out your new visor with scissors and install.
I hot glued mine in.
NOTE:
This does NOT make a perfect visor. Because the tint is being applied to the inside of a flexible surface that will be bent inward, the tint has a tendency to create a fold on itself.
I haven't figured out yet how to keep this from happening but hey, for $3 I'm willing to put up with it.
This should work for ODST type visors as well since the plastic cover can be folded. However, I made Mark VI armour so have not tried it.
I also painted the inside of my helmet black to help increase the mirror effect.
Visibility is good in my opinion.
There you have it. I will probably upgrade my visor in the future but for now this works just fine.
Sent from my iPhone using Tapatalk
Attachments
-
 68949c1b910613ca7f89dfb98fe12623.jpg198.7 KB · Views: 1,419
 -
 3b2896239701b53cf906b6d21f4684d0.jpg155.3 KB · Views: 767
 -
 c1d609689d0ce6d473668837115ef692.jpg198.7 KB · Views: 624
 -
 aa809a1402c279c95ff77fc23420f14d.jpg224.8 KB · Views: 640
 -
 34cf3fe4d8fd3b252f7303dcfe1c397c.jpg263 KB · Views: 643
 -
 ff671994bb2ff19945b1d0903b06c4a3.jpg259.1 KB · Views: 646
 -
 f48dce29e66044d4883ff1c8b7281e41.jpg253.8 KB · Views: 700
 -
 bb7aa36435e0073c2698f012abca108c.jpg188.7 KB · Views: 613
 -
 4bdf4f87a1173c2d12bd3ee502079b33.jpg171 KB · Views: 633
 -
 fd36dccd2de0d39f033f2e10d295c72d.jpg235 KB · Views: 705
 -
 4807b7d4ae098c08ef7f9ca6c65dd22d.jpg264.5 KB · Views: 714
 -
 8b3e90d1fc182eeb2ebe58a05d07cf98.jpg225.4 KB · Views: 635
 -
 4b86dfe6b54430bfac955cf5051577c6.jpg236.1 KB · Views: 1,016
 -
 c5f1f2abd6de9979b5f7a40270fde779.jpg252.1 KB · Views: 637
 -
 ec8924bfdcfd37e966af215ce0be99bb.jpg161.2 KB · Views: 634