FuzzytheWolf
New Member
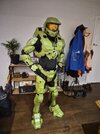
Been a bit since the last update and a decent amount of progress has been made. As it currently stands, the only thing left to print are the feet. Unfortunately, I had to reprint both thigh pieces as I got the sizing wrong, but hey, live and learn. Everything has been sanded, most of the plastic welding is done (just finishing the back half of the main chest/body piece). I've also made version one of a harness, but I'll likely re-make it as it's currently only designed to hold up a thigh piece by one strap, and I found it was prone to moving and twisting, so I plan to make another where the thighs are held i two places which will hopefully prevent this.

Everything here has been primed, sanded, and re-primed, awaiting wet sanding, all except for the re-printed thighs and helmet which were gap-filled earlier today.

First time plastic welding, proved very handy filling in a few see-through gaps around the arm holes. The front and back halves are held together with very strong Velcro, but I also added magnets at the top to help guide the pieces together ad hold in place while I attach the velcro.

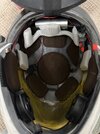
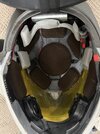
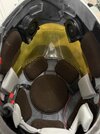
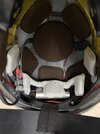
Lastly, the helmet is gap filled, awaiting sanding. I ordered a visor from Galactic Armory. Now, my helmet is printed slightly smaller than full size (93% I think) so unfortunately some details around the outer edges of the visor are lost... Unfortunately I'm starting to run short on time to create one myself, but that is on the cards in the future to eventually attempt to learn to make my own visors.
Still a bit to do; wet sand the pieces, the paint I ordered arrived, then I'll want to learn how to dirty up the armour ad make it look worn. I also need to order something to use as an undersuit (I've made allowance for room for it, but I haven't gotten one yet). Plan to try and have this all done by the end of October so I can wear it to my work halloween event. Wish me luck!
Everything here has been primed, sanded, and re-primed, awaiting wet sanding, all except for the re-printed thighs and helmet which were gap-filled earlier today.
First time plastic welding, proved very handy filling in a few see-through gaps around the arm holes. The front and back halves are held together with very strong Velcro, but I also added magnets at the top to help guide the pieces together ad hold in place while I attach the velcro.
Lastly, the helmet is gap filled, awaiting sanding. I ordered a visor from Galactic Armory. Now, my helmet is printed slightly smaller than full size (93% I think) so unfortunately some details around the outer edges of the visor are lost... Unfortunately I'm starting to run short on time to create one myself, but that is on the cards in the future to eventually attempt to learn to make my own visors.
Still a bit to do; wet sand the pieces, the paint I ordered arrived, then I'll want to learn how to dirty up the armour ad make it look worn. I also need to order something to use as an undersuit (I've made allowance for room for it, but I haven't gotten one yet). Plan to try and have this all done by the end of October so I can wear it to my work halloween event. Wish me luck!