Titanfall - Custom Battle Rifle Pilot

BRVSTR

Member
Just settled on my project for the next several months.

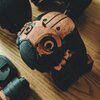
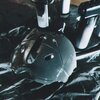
I acquired a Pro Series Kane Helmet from Titlewave Designs by way of his Patreon. I'm a sucker for helmets with unique-looking visors. I decided it'd be fun to build a suit around it. Not a Kane cosplay, per se, since he's banana sandwich and it's hard to self-insert that way. I'm just working around what I think is a really fun helmet design.

Naturally I've started working on the helmet first, since I already have the files for it. I'm going to pair this up with the Battle Rifle Pilot suit, since I like the silhouette of it and I'd love some mobility for a change. Nothing too exciting here, though this is the first Pro Series helmet I've printed from Titlewave and I love all the little wearability considerations.

F3CBB599-CA4B-4B8A-9F4B-E9670C2B4456.jpeg

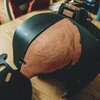
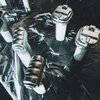
The included cap, which is compatible with all Pro Series helmets, is a welcome addition to ensure the helmet sits on the head properly without being too far forward or back. It's loaded with 10x3 magnets (sixteen total) so it's quite secure.

04AB657A-8355-4050-8BD2-C39326022C1C.jpeg
966D9006-2E4A-4B25-AB32-4026708564AA.jpeg

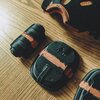
The chin plate also attaches via 10x3 magnets, which makes donning and removal a cinch. One of my biggest complaint with just about most sci-fi helmets is when the opening is smaller than the internal geometry of the helmet itself, which makes sizing on one-piece buckets very difficult. I wish they were all made this way.

E5DB11FC-4FC0-4859-9CD3-3DE0E547D4FB.jpeg
F8D44F09-E727-41A8-8A24-B584380004F4.jpeg

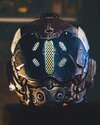
Not shown here but the face plate/visor attaches via printable clips. They're not the most secure, I think, so I think I'll try to find a way bolster the holding strength with a magnet or two.

At this point I'm trying to source all the soft parts of the suit, which is kind of a first for me, but thankfully I don't have a hard deadline for this build. Nice to keep it chill right now.


Bonus, if you made it this far:

9204D40A-3617-4F60-9BA2-6DC45E534E7A.jpeg

The googly eyes may or may not be a permanent feature.​
 

Attachments

  • 297D1779-43D0-4335-8C76-FE14CD8C5445.jpeg
    297D1779-43D0-4335-8C76-FE14CD8C5445.jpeg
    10.6 MB · Views: 26
Small update. Almost all of the little detail bits are printed, just not attached. There are a couple of faux "straps" that I need to print in TPU to tie the whole thing together, but for the most part this thing's ready for sanding.

I printed the lenses and mesh backing out of clear resin that I colored with alcohol dyes. I've had this batch mixed up for a while and I think it's lost its vibrance, but I still wanted to do a little test fit against the chest plate. For now I just used some gaff tape to keep them from falling out. This is a really fun look, I think.

1B8EBACB-21A6-479B-BCBC-B7C9A187F641.JPG
436EAB79-2402-45CC-8899-B034A6DBBD51.JPG


I think I've landed on the colors I want to use for the suit, which will primarily be Pantone 7736c (Rustoleum Hunt Club Green is the closest match I could find for that), then some mishmash of greys as a secondary, then accent it with a lighter sand color. With that in mind I'll reprint these lenses in clear orange because I think that will really pop against the faceplate, especially once it's lit. There's plenty of room for some small LEDs. I'll polish up the main lens but I'll leave the honeycomb mesh unsanded so it diffuses the light better. Of course, I need to see how that affects my visibility, but I'll cross that bridge when I get to it.

52998F23-B0D5-4F94-ACF3-E3BD8698B84F.JPG


I am almost completely blind in this photo.​
 
Last edited:
Already looking great, can't wait to see the results!

The little headcap thing with the magnets is such a good idea, almost makes me debate joining Titlewave's Patreon for whatever helmet I do next lol, cause the perfect head positioning sounds like a dream come true tbh. Also, did you need to insert the magnets mid print or are there just holes that you glue the magnets into?
 
Already looking great, can't wait to see the results!

The little headcap thing with the magnets is such a good idea, almost makes me debate joining Titlewave's Patreon for whatever helmet I do next lol. Did you need to insert the magnets mid print or are there just holes that you glue the magnets into?
Thank you!

His Patreon is certainly worth it, IMO. For the SPARTAN tier he puts up two helmets for free each month and there are exclusive discounts to his shop.

The Pro Series is a specific line of helmets that he does, and all of them have that printable cap which can be hot swapped to any Pro Series helmet.
The 10x3mm magnets are placed after printing. They’re snug in there but I do suggest using a strong adhesive because they can be pulled out with sufficient force.
 
331E4631-CCD7-4B70-ABEC-EB5521B96258.jpeg

All the pieces for this bucket have been printed.

The faux "straps" on the sides are foamed Siraya Tech TPU Air. Still need to work out those really shallow angles where the layer lines can't be avoided. I'll have to find a way to smooth them out... or maybe I just flip them upside down so the textured "plate" side is facing out, lol. I'll play around with it. I really like them, though. Really completes the look and I like how it's a different texture from what the rest of the helmet will be.

21287E82-2E8F-4AF6-AB8D-CF59B6DA04BB.jpeg

The small detail pieces, like the tubes on the back (not visible here) and the strap buttons are printed with resin. I think I'll put some really small (6x3mm) magnets on these so they can be pulled off and reattached to the chin guard. I don't think that's the design for them but there are cavities that I can fit the magnets in.

5D49403A-099B-4888-92B7-344C3D5D86A4.jpeg

I mentioned in a previous post that the clips holding the faceplate don't feel that secure. I withdraw that. They still don't hold on very strongly, but the "straps" running underneath the bottom edge actually fill in a gap, and it actually sits better now. I was judging it based off of an incomplete build.

Swapped out the lenses for orange ones, though they still need to be polished and finished off with a gloss coat. Someone on Discord asked me about visibility - it's hard to convey by sticking a camera inside the helmet, since humans have binocular (two-eyed) vision. The big center hole is actually difficult to look out of since it's dead center and I end up getting cross-eyed. I have to be conscious of avoiding that. Otherwise, it's good enough that I feel relatively safe walking around. The honeycomb mesh doesn't really get in the way since it's so close it's out of focus, though it does add a slight "haze" like scratches on a pair of glasses. That said, it's definitely not like looking through a visor. Very cool-looking, but not my favorite experience.

There's a "cushioned" detail around the bottom of the helmet that I'm thinking about cutting off. I think it'd be fun to replace it with some faux leather bunched around upholstery foam to make it fully functional as a "seal". Toying with that idea.

And now... onto sanding.
 
This episode of Bluey is called "Sanding".

I normally don't start right off with bondo, but some dummy idiot baby printed one of the four parts of the main helmet block in a different orientation from the rest, so the layer lines there are super egregious and I risk tearing them out when I hit it with the low grit. And since I already had the tube open and I'm too lazy to open it later, i just hit everything with a little bondo where needed.

373EF50E-7644-4756-BBC7-C9F7E502582C.JPG

Then filler primer. I laid down three dummy thicc coats. This dramatic lighting has been brought to you by my car headlights.

6E07A27A-F639-4CE2-AB9C-DC9F34A9E399.jpg
44953558-BBF8-4C28-8A2B-34A7C5B1D9C1.jpg
E3D4ECA8-5B90-4D56-97AA-6676D97714EC.jpg

And some more Bondo to hit the unruly bits.

28ABD579-6D01-4A88-BA93-B37F5A56D9E1.JPG

And then wet sanding at 320 grit. In case it's hard to tell the difference between the above photo and the one below, the one below is considerably more wet.

60D312F7-A040-4EC7-B600-A01696FB74ED.JPG

And that's it for today. I'm out of filler primer. I'm going to hit the hardware store this afternoon to pick up some more. This is going a little quicker than I thought - knock on wood - and if I'm lucky I may be able to start laying down paint and get this done before Halloween.

Louder, more aggressive knock on wood.

If you made it this far, here's a bonus photo:

45D4C697-981F-4355-93FE-CB6C099AE267.JPG


I wanted to see what it would look like lit up, so I threw a flash unit under the bucket and took the shot.
i used a transmitter hooked up to my camera to trigger it.​
 

Attachments

  • 0FBFE9E3-F8A7-4A2A-A1E3-3934C8C085D0.JPG
    0FBFE9E3-F8A7-4A2A-A1E3-3934C8C085D0.JPG
    9.8 MB · Views: 11
  • C24BEE30-ECAA-4F8B-BA31-5A794452FC1F.JPG
    C24BEE30-ECAA-4F8B-BA31-5A794452FC1F.JPG
    9.5 MB · Views: 9
  • 6C2052C5-969B-467E-98F4-EB69EFA87A76.JPG
    6C2052C5-969B-467E-98F4-EB69EFA87A76.JPG
    8 MB · Views: 9
Should be funny to see at a con (Why is that guy walking into walls and bumping into stuff)

Buuut loves your Mk V so I’ll stalk this build too, looking sexy
 
Okie dokie, artichokie. This is a hefty one.


Halloween has come and gone.

I put something together a little hastily just to have something to wear, and I did a speedrun on the painting portion of this helmet so it'd be done in time.

Everything got its usual silver coat to start with, but due to time constraints I had to omit the "latex mask/paint chip" part of the process.
D3621516-6BA0-45CB-9BCF-067FEB697464.jpeg
F5F1D389-C015-4B6E-89A7-DC2EFB091F94.jpeg
C9A9CDDE-5E08-4C7E-A143-9E224267B556.jpeg

Instead I went straight to an all over coat of Rustoleum Chalked Charcoal. If this stuff wasn't $11 a can I'd use it on *everything*. Really smooth matte finish.
F5D82F6B-CB12-43B7-A03F-A20F53BC2E01.jpeg
FF6D4A75-1ABF-4179-AC1D-45A028495D24.jpeg

I hit the faceplate with Deep Timber. Funny story, I thought I had Hunt Club Green the entire time. Oh, well. This actually worked great.

0892A46A-419E-4624-B58E-B2E6037F289F.jpeg

"Shiny" parts - the tube and strap buttons - were hit with Gunmetal Grey. Here they are with some small detail parts for the Mirage suits I was building for my twins.

68C94AFB-50BE-416B-840D-AE380F77CD48.jpeg

For a majority of the main helmet block I laid down some 2X Charcoal Grey. I let this cure overnight as it was already 1:15AM in the morning on October 31st. I got up at 3:30AM. Yes, I got two hours of sleep.

68BC570D-B3D4-43E6-BB2A-03DF1BB7708C.jpeg

This is where I had to really rush a bit. After laying down many, many small pieces of tape on a level that highlights my neuroses, I took a big swing. I taped off the front panels (in green, so I know what to pull) and laid down some 2X Granite Grey on the top of the dome and let it sit for 20 minutes. Then, almost immediately, I tore off the green tape, masked off the section I had just freshly painted (using tape and some packing paper), and sprayed the front side panels with Chalked Chiffon Cream, which is a light tan color.
DDE87ACE-D73B-4BBE-9A60-133C24B08A56.jpeg

Then I went to work. I didn't have time to weather it before going out trick-or-treating with the kids, but I was able to wear it.

I started the weathering when I got home. Just the basics - some black acrylic in the recesses, wiped away the excess, then dry-sponged silver for some wear. Then a black oil wash for grunge.

FC6426AF-1E92-4A37-9890-7E1A3F5CD175.jpeg

Also, I attached some magnets to the retaining pins for the chin straps - a 10x3mm on the chin guard itself, then a 6x2mm on the pins - to make them easier to put on. Also, I stuck some small LEDs on the inside of the faceplate to light it up.

0F24FC3E-BA0F-445B-AC4E-F40D002A2E43.jpeg
50F52F8E-C2F0-442C-A6EC-00BA7586EA2A.jpeg

And with all that ado out of the way, a little commotion for the helmet:

7DE66C2D-7327-49A3-80FD-422A1D25B53F.jpeg

DCAE524E-0483-4557-8DA8-5E9EC1DDE643.jpeg
 

Attachments

  • B2BF9C89-0043-4260-A5E8-549F8F36AC73.jpeg
    B2BF9C89-0043-4260-A5E8-549F8F36AC73.jpeg
    6.4 MB · Views: 1
  • A3DAFA1E-0AC0-4667-9AF9-A14DC2C97574.jpeg
    A3DAFA1E-0AC0-4667-9AF9-A14DC2C97574.jpeg
    7.1 MB · Views: 0
  • C62930BB-99ED-4866-8C4F-0543B20BDCE4.jpeg
    C62930BB-99ED-4866-8C4F-0543B20BDCE4.jpeg
    7.6 MB · Views: 0
Should be funny to see at a con (Why is that guy walking into walls and bumping into stuff)

Buuut loves your Mk V so I’ll stalk this build too, looking sexy
lol, yeah. It's only because the visors hadn't been sanded and clear coated yet.

Visibility's fine. Not ideal because of the shape of the viewports, but they were sufficient for walking around. Absolutely kills my peripheral vision though! I had to do a lot of looking around.
 
Might as well post the full fit here too.

I definitely had absolutely no time to start the armor, so I threw a quick thing together. This is just a hooded jumpsuit, tactical vest, boots, and camo net scarf from Amazon.

B9EB2DEC-FEA3-44BF-98E0-B4264A0E69B0.jpeg
0D09B8D5-B281-44DB-B950-9C6D2177165C.jpeg
789D9AA4-B011-4C59-AB26-0922181FCAC1.jpeg
 

Your message may be considered spam for the following reasons:

If you wish to reply despite these issues, check the box below before replying.
Be aware that malicious compliance may result in more severe penalties.
Back
Top