Trolls world tour - Hard Rock Guitar

Status
Not open for further replies.

OJ102

Member
Hwy everyone,

Despite being locked in the house for 4 months I've surprisingly not done any projects, mainly as my wife said it's either veronica (hulkbuster) or her staying in the house haha

But I can't turn down a request and with the release of Trolls World Tour, but 4 year old son has developed a love for HARD ROCK! He asked for a guitar like the main villain and the toys available are shocking, to which he innocently said, can you make me one... well yes.. yes I could!

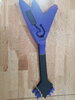
Please note, there dont seem to be any 3d images of this available so I'm having to make one up from layers and drawing it from different angles.

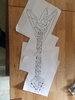
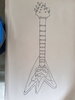
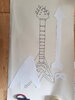
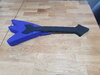
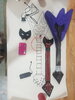
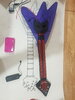
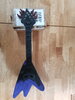
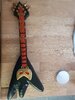
First image is a mock up for scale based on the film and it being held. Second one is a flat alteration, adjusted to be the right length. The 3rd image is now a breakdown of parts.

This will basically be a lamination of sorts given its solid and will take a lot of punishment!

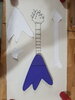
The base is to be made from 5x40x30 Yoga mat foam. The neck from layers of 10mm high density EvA and the details from a mix of 5mm and 10mm high density EvA.

To support the length I'm implanting 5 3mmx 500mm steel bars the length of the neck 0.75cm spacing.. I may reinforce this further as I progress and see.

Until now I never record a project from day 1 and thought it might be of internet to see how it goes froma film to a prop.

All foam materials are coming from Tyges.co.uk. they are UK based and their products have been great quality, shipped next day and even now arrived in 72 hours, and I live in the mountains 700 miles from them!
 

Attachments

  • 20200723_151645.jpg
    20200723_151645.jpg
    1.4 MB · Views: 607
  • 20200723_151711.jpg
    20200723_151711.jpg
    1.2 MB · Views: 1,808
  • 20200723_151738.jpg
    20200723_151738.jpg
    1.2 MB · Views: 355
Most of the materials have arrived and I've done the first part. Carving the excess off the base. The foam is rock solid, I went through several blades, eventually resorting to a dremel sander to get it down. I'll be finding purple dust for a month!

Next will be the neck. I plan to assemble the pieces, as a solid unit and then sand the entire structure to mesh the foam together, also so I can clean up the entry points from the steel reinforcing rods!
 

Attachments

  • 20200801_144649.jpg
    20200801_144649.jpg
    1.2 MB · Views: 266
Update. I've cut out the top of the guitar now, roughly. It was on 10mm foam, so I cut out 2 for strength. Between the 2 layers will sit 5, 3mm steel rods for support.

I've also cut out a part for under it to taper into the handle.

I cant do anymore for the moment as my replacement strings for it havnt arrived. Currently the entire assembly is solid foam and in parts. Once I have the string I'll carve out its housing, use washers for guiding them up and down and to stop the foam tearing.

Once I have the electrics sussed out I'll glue all the parts together and then use the sander to blend all the seams so they cant be seen, before applying any filler and paints.
 

Attachments

  • 20200802_142538.jpg
    20200802_142538.jpg
    4.1 MB · Views: 308
Update, the replacement string arrived today and works! They also sent me the USB adapter incase I want to make the guitar a charger instead of a battery!

The 5 steel pins are visible in one image, held in with tape currently, but even now the neck can support the entire weight without bending.

I've also used the broken wire to thread into the guitar neck to check lengths and set positions. To secure the strings and prevent them cutting into the foam over time they go through small steel nuts embedded into the 10mm foam. They will be glued in when I'm ready. The spacer nuts will need to be loose as they need pushing up to get the string in, then pushed down again to secure.

The skull plate is rough cut too and will hide the spacers at the base. A foam bone will cover the upper ones.

A set of smaller bones will act as pins and spacers along the neck of the guitar. This will keep then even, right and stop him trying to pluck them!

Next I'll begin working on the power supply which will be inset into the back. I've not decided if it should be the battery or USB yet. The USB will last months but has to be unplugged as no switch is on it. The batteries version has a button but will last maybe a day left on!

Once that's worked out it will be assembled and glued in place, then sanded and smoothed before the bone details being added over the strings and finally painted. All in all a quick project but its looking rather good for a practical prop!
 

Attachments

  • 20200803_165239.jpg
    20200803_165239.jpg
    1.4 MB · Views: 340
  • 20200803_165318.jpg
    20200803_165318.jpg
    1.4 MB · Views: 278
After several hours with my dremel I managed to carve out the foam as needed. I had to remake the neck as when I tried to sand them smooth they were going to end up to narrow. Plus side is I now had test parts!

The base and bottom half of the neck are solid now, with the steel beams in place. The top that has the string is the old neck and broken string, reason for this is I needed to get all the holes cut and didnt want to risk damaging the good string!

The 6 spikes at the top for tuning are small chunks of the blue foam moulded to shape, with a half sphere cut in the base and a bolt glued in. I'll glue nuts into the end of the neck so I can litterally screw them in. This will also mean I can paint them separately for final assembly.

The top part of the neck will need painting before the real string goes on alas, and as it has to be glued in place with the string in, it will be one of the last parts.

Next stage I think will be using the test neck to transfer the key points to the real one and cut the holes in place. The spikes need reducing in size a little as they rub together, but that's just sanding as I left a LOT of excess for finish.

The base will need shaping with the sander and a knife, and the details carving, and filler used on any joints for a smooth finish.

I'm intentionally not heat treating the foam as the paint I use needs to soak into the foam to bond, else it peels like pve glue on yours hands! I made that mistake with a full armour set... so much peeled paint... it was beyond touch up after Halloween! It now haunts my loft!
 

Attachments

  • 20200806_120807.jpg
    20200806_120807.jpg
    1.8 MB · Views: 272
  • 20200806_120740.jpg
    20200806_120740.jpg
    1.9 MB · Views: 413
Had a few hours to myself today so I started the metal work for the neck and strings. My paint also arrived today so I was able to put the first coat on the neck. I've also started filling the gaps and shaping the base.

I'll do 2-3 coats of black on the neck before I string it and glue it in. All the red parts will keep getting coats will they are solid. Next time I get a few hours I'll be shaping the bottom of the base and tapering it, adding details and then starting its black base coats.
 

Attachments

  • 20200807_134041.jpg
    20200807_134041.jpg
    1.9 MB · Views: 534
Status
Not open for further replies.
Back
Top