Have I ever done a whole build thread in one post? Possibly back when I was first a forum babby, do I like doing that now though? Not particularly but I've gathered as many in progress shots and materials lists as possible so that some of this can be useful to future Marines and Pilots. It may be a little different than usual build threads since I basically batch built everything to get it to a stage where I could do everything at once, move onto the next stage and keep moving through as efficiently as possible due to the time crunch of three and a half weeks.
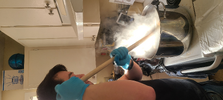
To start things off though, I have a photo from the premiere which showcases half of the destructive power of the suit with all its mobility. Overall it's a very fun costume to wear thanks to the fact that I can suit up in under 15 minutes solo and get out of it even quicker. It fits well inside a tote that is approved for airlines which makes it great for long distance travel cons and is generally recognizable as being from Halo (although I did get called a Doom Marine X ODST which is neat).
Costs
For my own morbid curiosity I needed to see roughly how much this costume cost to build. A lot of things were "off the shelf" from supplies that I already had in storage totes or ready use (foam and printer food as well as certain paints just live in this house always) so the cost isn't as painful as it looks since some of it has been spread out over the course of multiple years.
Base Materials
Foam 10mm (4 foam mats for $14)
Foam 5mm (50cm x 100cm for $10)
Foam 2mm (50cm x 100cm for $6)
UltraLite Foam Clay (150g for $17)
eSun PLA+ Grey
eSun PLA+ Black
Polyester Resin (800mL for $40)
Fiberglass Cloth (1sq.m for $19)
1mm Steel Sheet
60mm x 10mm x 3mm N35 Magnets (10 for $22)
32mm⌀ x 3mm N35 Magnets (20 for $33)
1mm PETG (24" x 48" for $20)
Mirror Tint Blue (Currently Unavailable due to Age)
Black Worbla (39" x 59" for $86)
Black Nylon Webbing 3/4" (25yds for $20)
Black Nylon Webbing 1" (25yds for $22)
Grey Nylon Webbing 1" (25yds for $22)
Non-Roll Elastic 1"
Parachute Clips 3/4" (Black) (50 for $17)
Webbing Slider 3/4" (Black) (30 for $14)
Webbing Slider 1" (Silver) (30 for $12)
Buckles Various Sizes (Silver)
Chicago Screws
1.5" Tactical Belt ($18)
Elbow Braces (2 Pairs for $17)
Foam Knee Pads ($10)
Black Marine Vinyl (Fabricland Receipts are Somewhere)
Black Denim (Fabricland Receipts are Somewhere)
Rothco City Camo (White)
Shirt and
Pants ($130)
Rit DyeMore Sandstone ($7)[2 bottles]
Original SWAT METRO 9" WP SIDE-ZIP SAFETY Boots ($140 paid for by work)
Paints
Rustoleum 2 in 1 Filler & Sandable Primer (Buying Cases makes it like $6/can)
Leak Seal Black
Rustoleum Camouflage Olive Drab
Rustoleum Camouflage Brown
Rustoleum Matte Black Primer
Tremclad Gloss Aluminum
Vallejo Model Colour 70.890 Refractive Green
Vallejo Model Colour 70.892 Yellow Olive
Vallejo Metal Colour 77.720 Gunmetal
Vallejo Metal Colour 77.701 Aluminum
Liquitex Ink Sap Green
Daler Rowney Ink Light Green
Rustoleum Matte Clear
Windsor & Newton Water Mixable Oil Burnt Umber
Windsor & Newton Water Mixable Oil Black
Electronics
3mm Red LEDs
5mm Red LEDs
22AWG Wire
490Ω Resistors
5V Ducted Fans
Female Micro USB Port
Perfboard
Consumables
#11 Xacto Blades
9mm Snap-off Blades
BSI Insta-Cure+
BSI Insta-Set
Hot Glue
E6000
Spray Super77
SteelStik Epoxy ($13)
Devcon 5 Minute Epoxy
Bondo Body Filler ($26)
Bondo Glazing Putty ($12)
Mixing Cups
Mixing Sticks
Disposable Nitrile Gloves
Sanding Pads 40/80
Sanding Sponges 120
Wet/Dry Sandpaper 320/400
Design Time
For this build I needed to have two separate sections of the pipeline going for constructing pieces. I devoted two days to modelling segments of the body armour that I wanted to be rigid to accompany the already designed Hornet Pilot Helmet and Chest UA. These new segments were the shins, tailbone plate, spine, shoulders, biceps and elbows as well as grommets and strapping greeblies for other segments of the armour. The chest core, chest plate, abdominal plate, knees and calves were constructed out of foam using the
Spidermonkey60 unfold that is available within the Armory with a few small modifications for greeblies (latches and locks) and cutouts for rivets and webbing.
The following images are drawing exports of the pieces created in Fusion360 to show the form factor of individual parts and roughly how they interact with the rest of the suit.
- The Belt Clip is a simple cover for the intersection between the thigh plate support webbing and the 1.5" decorative tactical belt. The webbing loop is inserted up through the bottom, the belt goes through the side and then through the webbing loop to secure the thigh plates onto the belt.
- The Shin Plates are two separate printed plates that are connected via webbing and mounted onto a plate of Worbla thermoplastic to complete the appearance of the game reference.
- The Spinal Guard is a segmented rigid piece that is adhered onto fabric with E6000 and sewn into the flak vest of the suit.
- The Tailbone Plate is one main plate with a secondary lower plate that is created in foam for added flexibility and not stabbing yourself in the back when sitting down. It is secured onto the decorative belt with two webbing loops beneath the main plate. Two D-rings and retainer clips as well as the dial and dial mount are separate for ease of painting.
- The Bicep Plate is also a two part system with a main printed plate and a lower mounted foam layer to match the in game appearance. A magnet is mounted on the back of the plate for placement on the flak vest.
- The Elbow Plate is a simple shell which was mounted onto the elbow brace using E6000.
- The Shoulder Plate is another simple shell that is mounted to the flak vest using a system of magnets.
Each part description includes mounting information because with a short amount of time not knowing how to stick an armour piece on and fiddling around for several hours to figure it out was not an option. Planning ahead saves time and figuring out strapping in advance helps shape a lot of pieces.
All the low poly items were added into Armorsmith, adjusted to fit and printing and foam work was started.
Fabrication
While I was designing parts I had printers working on pieces that were already available and ready. First up was the Chest UA which was a pretty simple two part print with a bunch of greeblies to add on. One tip for this type of part, if you have multiple small pieces that you plan on painting separately that all need an exact location but all look very similar, number the parts somewhere that will be hidden. I taped a small section of the underside of the LED slots and added a matching number so that future Turbo could just play connect the dots.


The Hornet Pilots have notoriously tight fitting helmets, so much so that their necks clip through the base. For this tight fit I made a removable panel for the helmet that connects with magnets and can be aligned with small tabs. To keep the back panel as light as possible I placed the three bar magnets inside the main helmet and built up the area around them using SteelStik Epoxy. The magnet locations were matched up and marked on the neck panel with sharpie. 1mm sheet steel plates were used on the neck side to reduce weight and the chance of shattering magnets when closing the helmet.
To help keep the shape of the piece after working it (heat from sanding, ambient moisture and temperatures over the life of the part) tabs were placed on the inside of the helmet to keep the neck piece at the correct curvature to match up at the cheeks. These are again 1mm steel sheet epoxied into place to guide the neck plate.
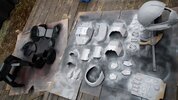
From there I proceeded to make a bucket of printed parts.
Do a bunch of foam work over the course of five days.
Pre-marking bevel angles on foam is underrated and running things through a bandsaw with an adjustable table angle makes for extremely easy glue ups. On a few of the less than perfect seams I used Lumins UltraLite Foam Clay and a wet finger to press foam clay into the gaps with slight overlap. The clay was left to cure for a minimum of one day and then cleaned up with a sanding drum without a sanding band (thanks again for that tip Mnkr) and cleaned up further with 220 grit sanding sponges.
All the armour was gathered together and displayed for a progress photo before surface finishing.
Any extra mounting points were added internally and everything printed was given a fiberglass coat on the inside for a bit of extra drop resistance. Luckily we had a sunny day in Victoria during early March where I could do this outside.
The one odd piece on this build was the thigh plates. The texture on the game model is very... difficult to decipher. I thought it best looked like a hard plastic plate like kydex or similar with strapped through mounting points. My solution was to cut a sheet of 5mm foam to shape, coat it in black Worbla and form it to thigh shape. Holes were then drilled for Chicago screws (rivet caps) and channels were cut for webbing grommets.
xXDashIVXx requested this video of the process.
Surface Prep/Painting
Also known as
This whole "sand a costume in four days" thing, I do not really recommend. My body was yelling at me and even though the results were good, I don't wish this on anyone.
For the 3D printed segments I followed the process in stages of
- 40 grit sanding pads on Mouse Sander
- 80 grit flapper wheels on Dremel
- Bondo Body Filler
- 160 grit pads on Mouse Sander
- Bondo Glazing Putty
- 220 grit sanding sponges
- Filler Primer
- Wet sand to 320
- Filler Primer
- Wet sand to 400
- Primer coat
For the foam sections it's a little less intense on the stages but always remember to give your Leak Seal a warm bath first!
- Clear foam clay seams
- Leak Seal thin coat
- Leak Seal heavy coat
- Wet sand to 320
- Leak Seal thin coat
- Primer coat
It became a pretty easy workflow to manage with laying down paint at the end of a day and giving it as close to 18-24 hours as possible before coming back to it the next day after work.
Painting
For this build I did a thing where I found "close enough" cans of spray paint for base colours and then went neurotic with a spray gun colour match. I managed to find two easily available colours locally for the main greens that ended up being within the 2.5% ΔE range and adjusted with a few drops of inks listed above.
Everything was primed black, silver was sprayed on in a poor fashion and latex masking was added for chipping. Another thin coat of black was applied before the first colour coat.
From there I moved to custom mixes of paint to get the tone I wanted. This was the first time that I've used my compressor and HVLP gun for a full suit at once and I slightly underestimated how much paint I was going to need but I managed to cover everything with at least two passes. As for the mix of the primary green it was using the Vallejo Refractive Green, several drops of the Daler Rowney ink and then thinning with water for the "skim milk consistency" that I use in an airbrush. With the HVLP gun I can likely go with a bit thicker of a mix but I really like how this turned out so I'll be experimenting more for sure.
After the main colour was down I masked off sections and added the darker green with an airbrush using a similar skim milk mix of Vallejo Yellow Olive, Liquitex Ink and water.
One last masking of parts for the metallic sections.
From there all masking materials were removed and latex chips were removed. I also added in the stencil for the wings on the helmet.
Everything was then clear coated in preparation for weathering. The primary means of weathering on this costume was the water mixable oil paints which were applied to creases and recesses and then scrubbed clean in the least effective way possible to leave behind believable grime.
Rigging
The base layer of the costume is off the shelf white BDUs that were dyed in the stovetop fashion using a synthetic dye to bring them to the proper dusty tone by making some pants soup.
White pants and recently dyed shirt for reference. The dye intensity does fade after rinsing and washing so there is a bit of tonal difference once you pull it out of the pot.

In traditional Turbo fashion I do not have many photos of the sewing progress due to the fact that I did the majority of it in an afternoon. The flak vest was the only major sewing section outside of sewing loops of webbing onto parachute clips so it's actually not that daunting of a process to make a Marine undersuit. My vest is based off of an old shirt which was cut into the appropriate fabric pattern pieces. If there's enough interest I can digitize a pattern and write the rough a rough order of operations. The main thing was adding the spinal guard to the appropriate place on the vest, everything else was just extras. The hard parts of the plate spine were added with E6000 to an oversized panel that was later sewn into the vest after 24 hours of curing. As can be seen in the third photo below the shoulders of the vest are bare of mounting hardware (which I want to change to protect the pieces after dancing them off) due to the steel plates mounted internal to the sleeve and the rings of magnets on the inside of the shoulders and bicep plates. I can just have them slapped on and we're good to go.


The chest plate itself is suspended by two parachute clips on webbing from over the shoulders and then clips into the lower underarm sections with two more clips. It's a very sturdy system and allows for plenty of storage pocket space inside the chest plate where I keep power banks for chest and helmet lights as well as helmet fans.
The knees plates are mounted onto some cheap EVA foam kneeling pads for gardening that have an outer fabric layer with sewn straps that is adhered with Spray77 to the kneepad. The calves then slide up and are friction fit against the base of the kneepads. It's very comfortable, allows for full range of movement and most importantly is good for dancing in! The test run for them was wearing them around while making breakfast and doing some housework.
Electronics
This is honestly a dead simple suit for lights. There's two helmet LEDs, six 3mm LEDs and six 5mm LEDs within the chest. The cooling system is two 50mm ducted fans in the mouthpiece of the helmet. Everything runs off of 5V USB powerbanks and with the larger one that I have I can easily do 8 hours in suit before having to switch to another.
Conclusion
Marines are seriously a fun and easy costume to wear. If I can build one in 26 days including design time, you should all have no problem making one of them.
Photo by
CplYapFlip and funny by
James


")