ViciousNinja's First Build: UNSC Marine [WIP]

Status
Not open for further replies.

ViciousNinja

New Member
So I finally got my supplies in and started building my first armor set. I'm going with the UNSC Marine build because its not as heavy as building Spartan Armor. I'm doing this forward deployed, so I may not post for days at a time because of work. But none the less photos are to follow. So far I am almost done cutting out all the pieces for the helmet.

Here is Day 1.

IMAG0370.jpg
 

Attachments

  • IMAG0370.jpg
    IMAG0370.jpg
    58.7 KB · Views: 150
I gotta sleep soon cause I got work in a few hours, but I got pretty far. All the pieces are cut out and sitting in a box waiting to be assembled. Next pay day I gotta resin, cant really use fiber glass out here.

Day 3

IMAG0372.jpg
 

Attachments

  • IMAG0372.jpg
    IMAG0372.jpg
    47.6 KB · Views: 142
So I know I haven't posted in a few days..been pretty busy. I've made some progress though so please stay tuned for pictures to come. I haven't had a day off to take photos and post them.
 
Keep it up, it's a little disheartening when you don't have any photos to upload but it'll come, your pep work is nice and clean I look forward too seeing it completed
 
So I finished the helmet today...Finally! Lol. It's 3 am, I'm going to get some sleep and post photos tomorrow before work. I'm going to start the hardening process tomorrow. Yay! Stay tuned folks!
 
As promised...here are PHOTOS!!!

IMAG0376.jpg

Front

IMAG0375.jpg

Right

IMAG0374.jpg

Back

IMAG0373.jpg

Left

Now today I am going to start using Cast-On. I chose this option because I can't use fiberglass around the barracks and its a little easier to use. Hopefully this turns out well. There are some spots I messed up on, but this is my first build. I figured once I get to sanding I could smooth it out before I start painting.

Stay Tuned For More!!
 

Attachments

  • IMAG0376.jpg
    IMAG0376.jpg
    43.8 KB · Views: 151
  • IMAG0373.jpg
    IMAG0373.jpg
    52.1 KB · Views: 166
  • IMAG0374.jpg
    IMAG0374.jpg
    45.1 KB · Views: 182
  • IMAG0375.jpg
    IMAG0375.jpg
    48.8 KB · Views: 154
Wow... the ear muff/cup area looks like it must have been a nightmare. Thin strips...? But from the photos both of yours look even. Steady hands. Great work.
 
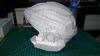
It was a nightmare!! All done before Christmas too.. hahaha. Actually finished before Thanksgiving. I am currently applying the cast on, and that is more of a nightmare. I have to get a dremel to start smoothing out the areas where there are grooves. Also, some areas are thicker than others.

This is my first build so it is more of a learning experience than anything. The Smooth-cast is such a pain in the a$$. The pot life is extremely fast. It is definitely going to take some time to make this look good. I only have a little over a month left on deployment now, so come Christmas time, whatever is finished I am going to just ship home so I can continue on it when I get back.

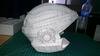
I feel like it should have gone the bondo route instead. Seems like it would have been easier to work with, but it produces more fumes than the smooth-cast. If anyone else decides to use smooth-cast i would highly recommend to use it in a very well ventilated area with a respirator on. I've tried sanding a bit here and there but very little material comes off. A dremel then sand paper is your best bet.

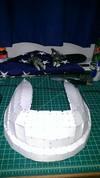
I will be posting more photos of my progress soon. I want to continue applying the smooth-cast until I have a thick enough layer to work with so I dont deteriorate the cardstock and be left with no template to work with.

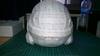
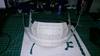
The area around the ears was extremely difficult. And actually if I take a close up photo you can see that its not perfect. The smooth-cast dries thick depending on how much you apply to the area or how much it runs so the detailed areas are going to be difficult when it comes to using the dremel and sand paper.
 
So its coming to that point in time that I will be leaving my deployment AO and returning home soon. So unfortunately, I had to ship everything home. Worry not followers!! I will continue the project at home. Where I will have more free time and tools to use. Until then, Merry Christmas and Happy New Year!
 
Did you have any problems with leaking? At least when I smooth-casted mine, I thought it was sealed properly, but the tiny holes in the pep still made it leak horribly and the outside required some major work to fix. Just looking for ideas on how other people have dealt with it or prevented that from happening. From what I've seen it looks great so far, and looking forward to pictures when you get back
 
Status
Not open for further replies.
Back
Top