WIP* Bandit Thug Helm (Borderlands)

Status
Not open for further replies.

Z0M8I3

Active Member
FINISHED* Bandit Thug Helm (Borderlands)

First off, I would like to say Hello to everyone and I am glad this place exists. Forum member Snilton was kind enough to get me the model of the helmet which I then did some work to and unfolding in pep. I got it assembled today after about 5 hours of straight gluing/cutting/folding and wanted to share it with everyone.

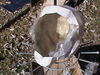
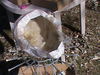
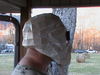
This is my first attempt at anything other than small paper models and I have to say, As intimidating as it is, It's also very relaxing. I've gotten the resin coat on the outside today as well but will have to wait on a documented pic of that for better lighting tomorrow.

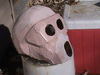
Here's A pic of the Actual Character from the Borderlands Wiki:
Bandit_Thug.png


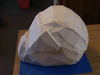
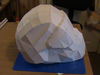
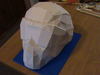
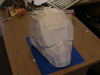
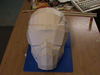
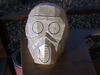
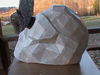
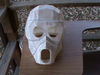
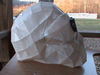
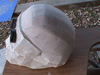
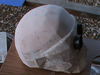
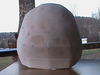
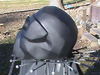
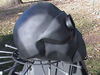
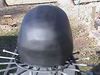
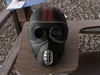
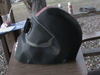
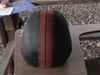
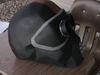
My Helm So far(It is rough but I'm going to work with it):
DSC01162.jpg

DSC01161.jpg

DSC01160.jpg

DSC01159.jpg

DSC01158.jpg


I may have to wait until next week before I can get to the fiberglassing of the interior so in the mean time, Is there a recommended amount of coats for the resin outer? I've been reading all day in the fiberglass/bondo/resin "help thread" and unless I skipped it, I didn't see an answer although I did see it was asked there.

Anyways, Thanks for looking and any input is very welcome. ;)
-Tim
 

Attachments

  • Bandit_Thug.png
    Bandit_Thug.png
    198.9 KB · Views: 214
  • DSC01162.jpg
    DSC01162.jpg
    33.7 KB · Views: 132
  • DSC01161.jpg
    DSC01161.jpg
    34.3 KB · Views: 126
  • DSC01160.jpg
    DSC01160.jpg
    33.9 KB · Views: 144
  • DSC01159.jpg
    DSC01159.jpg
    37.7 KB · Views: 134
  • DSC01158.jpg
    DSC01158.jpg
    41.6 KB · Views: 144
Nothing new to report at the moment, The very cold weather is making it hard for me to have a chance to fiberglass the helmet since I have to do it outside. :(
 
Yeah, I think I might have picked the wrong time of the year to start on this considering the weather conditions and all..lol. It was something that I failed to take into account but oh well, It just gives me more time to plan and read. :)
 
wonder if we could write an complain report to the weather? cuz we all surely dont want Cold/snow weather anymore so we could keep working on our hobbies LOL
 
wonder if we could write an complain report to the weather? cuz we all surely dont want Cold/snow weather anymore so we could keep working on our hobbies LOL

Lol, Tell me about it, I started this because it was getting too cold for R/C and didn't think about the resin/fiberglass curing temps. Oh well, Guess that's why I'm a noob after all. :cool
 
Finally got a day off work with some nice weather so got to fiberglass it! This was my first time glassing anything and let me tell all those who haven't, Although not difficult, takes longer than one might think. I would compare it to toxic paper mache...lol

Pics:
DSC01171.jpg

DSC01172.jpg


And now we play the waiting game. :)
 

Attachments

  • DSC01172.jpg
    DSC01172.jpg
    93.6 KB · Views: 123
  • DSC01171.jpg
    DSC01171.jpg
    77.1 KB · Views: 139
After glassing I trimmed everything up and Marked out for the eyes and "filter" sections.
DSC01173.jpg


Cut the spots out and used two old flashlight rims that hold the bulb and plastic. For the "goggle" look.
DSC01175.jpg

DSC01177.jpg

DSC01178.jpg


And here is it for the test fit. I love the pic where it looks like I've got a anime smile going on there..lol.
DSC01184.jpg

DSC01183.jpg

DSC01182.jpg

DSC01181.jpg
 

Attachments

  • DSC01173.jpg
    DSC01173.jpg
    43.5 KB · Views: 137
  • DSC01177.jpg
    DSC01177.jpg
    53.6 KB · Views: 132
  • DSC01175.jpg
    DSC01175.jpg
    51 KB · Views: 135
  • DSC01184.jpg
    DSC01184.jpg
    59.2 KB · Views: 123
  • DSC01178.jpg
    DSC01178.jpg
    48.4 KB · Views: 121
  • DSC01183.jpg
    DSC01183.jpg
    63.2 KB · Views: 118
  • DSC01182.jpg
    DSC01182.jpg
    61.6 KB · Views: 129
  • DSC01181.jpg
    DSC01181.jpg
    64.7 KB · Views: 136
Looking good. It's cool to see people build things out of the halo box. I love the flashlight detail for the googles. It's looking pretty close to the game pic so far. Keep up the good work! Nice smile!
 
Looking good. It's cool to see people build things out of the halo box. I love the flashlight detail for the googles. It's looking pretty close to the game pic so far. Keep up the good work! Nice smile!
Thanks, I'm trying to get as close to the game model as possible. I'm having fun with this build and learning a lot at the same time. It's fun to finally make something like this as opposed to my smaller paper models. I like that I'll be able to actually show it off by wearing it..lol.:cool


:Small Update:

I'm at the filler stage now and should be working on more of that today. I hope to have it roughed out if not finished by the end of this week and start painting by the weekend. I'm also working on the "filter" separately and I'll post pics as progress permits.

Thanks for looking and keep the comments coming:)
-Tim
 
Got some filling/sanding done before I go in to work tonight, here's just a few pics of it. It's about 2 hours worth of filling/sanding by hand.

DSC01187.jpg

DSC01186.jpg

DSC01188.jpg

DSC01185.jpg


Thanks for looking.
-Tim
 

Attachments

  • DSC01186.jpg
    DSC01186.jpg
    50.5 KB · Views: 140
  • DSC01187.jpg
    DSC01187.jpg
    47.3 KB · Views: 129
  • DSC01188.jpg
    DSC01188.jpg
    38.3 KB · Views: 137
  • DSC01185.jpg
    DSC01185.jpg
    49.3 KB · Views: 120
this is almost too sexy, I do belive that you should make a version of one of the RAW revolvers AND put a big blade on the end
 
Thats so cool! I love seeing something outside of the usual Halo build. As much as I love Halo, I do enjoy seeing people work on neat little things like this! Great job! :)
 
Thanks guys, it means alot to me to get some positive feedback on this as it's my first time. I couldn't have started this without the 3d model provided by snilton. I hope to be able to knock some more filling/sanding out tomorrow after I run to the hardware store and pick up a sanding block because the arthritis doesn't like it too much..lol.


@Late to the meeting: There will be weapons involved hopefully. I just need to find someone to rip some models from the game so I can unfold them. I also plan on doing the entire outfit as well but that won't be until after the helmet (and weapons if possible) are done.
 
Sweet, thanks for the update I'll try and help if I can
 
Great to see you doing this.
It looks awesome so far, and man do you work fast! (compared to me anyway)

I could render some reference pics for the painting if you want.
 
Great to see you doing this.
It looks awesome so far, and man do you work fast! (compared to me anyway)

I could render some reference pics for the painting if you want.

Thank you for the compliments and offer. I got it all finished and almost all the paint done today. (I took some pics off of the game on the tv..lol.) I may contact you about some gun models if you have time. :D Just send me a PM and let me know if you think you could get me a few(3 at the most) and I can let you know what ones I'd like to try and get if possible.

Also, are the knee pads and boots that the psycho bandits wear the same ones the thug wears? I was thinking of using your knee pad and boot file for the costume.

only two words can describe this. BAD A$$

Thanks!


:UPDATE:

I worked on this all day today. Everything is hand painted minus the black which was sprayed on. I'll let the pics do the talking this time around.

DSC01189.jpg

DSC01190.jpg

DSC01191.jpg

DSC01192.jpg

DSC01194.jpg

DSC01195.jpg

DSC01197.jpg

DSC01198.jpg

DSC01199.jpg

DSC01200.jpg

DSC01203.jpg

DSC01211.jpg


That's it for today. Tomorrow I'm going to finish up the painting on it and look for some matte clear to put on it.

Thanks for looking and let me know what you think.
-Tim
 

Attachments

  • DSC01189.jpg
    DSC01189.jpg
    50.3 KB · Views: 121
  • DSC01190.jpg
    DSC01190.jpg
    45.6 KB · Views: 140
  • DSC01192.jpg
    DSC01192.jpg
    68.5 KB · Views: 115
  • DSC01191.jpg
    DSC01191.jpg
    81.7 KB · Views: 132
  • DSC01194.jpg
    DSC01194.jpg
    71.1 KB · Views: 125
  • DSC01195.jpg
    DSC01195.jpg
    75.1 KB · Views: 148
  • DSC01197.jpg
    DSC01197.jpg
    52.8 KB · Views: 134
  • DSC01198.jpg
    DSC01198.jpg
    50 KB · Views: 116
  • DSC01199.jpg
    DSC01199.jpg
    50.2 KB · Views: 132
  • DSC01200.jpg
    DSC01200.jpg
    37.7 KB · Views: 116
  • DSC01203.jpg
    DSC01203.jpg
    41.3 KB · Views: 112
  • DSC01211.jpg
    DSC01211.jpg
    36.1 KB · Views: 124
Status
Not open for further replies.
Back
Top