[WIP] Samus Aran Phazon Suit MP1

Status
Not open for further replies.

inclol

New Member
Hi all,

After a few hours of research and reading, mostly here, I'm starting my first pep armor project, and it doesn't sound like an easy one. Why ? Cause it's... tadaaaaaa !

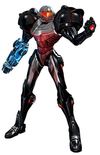
As the title said, Samus Aran Phazon Suit from Metroid Prime 1.

20071206013153!Phazon_Suit.jpg
Damn. I'm in love.

Which is a pretty massive project for a first one, and considering the lack of ressources, unlike some well-known Masterchief. :)

Of course, like a good noob, I first documented a lot on the building process. It's advised to start with something small, a simple part, then move on to something bigger, so I of course chose the helmet. :p Hum... Wait !

I first went to buy the necessary supplies. Found everything except the paper. Of course, I've read countless times "110 lb" paper here... So I stopped at "110". But.

I'm in France, so here it's gsm...! After buying the resin and body filler, I happily and hastily purchase some 110 gsm paper without even checking. Aaaaaargh !:angry
So, back at home, I searched quickly on the net the equivalent, and found a wrong one : 300 gsm... I spent all the day searching for 300 gsm paper...

And when I got back home, I checked here on 405th and found the "lb to gsm" thread, only to find I was misled again...:rolleyes Damn me.

Anyway, I had so much glue and paper, I HAD to do something (sounds creepy). Every store was closed so, I figured it could be a good idea to make a test-build of my model to check the scale.


With that much glue, I could make an armor just out of glue. Sounds awesome, hmm ?

So I went on and built a quick and dirty prototype of the helmet. Now I have an excuse as to why I chose the helmet ; it's a tricky part on this one to scale correctly, as I suspect it's never been designed to really fit a head in there... !

When I printed the parts, I immediately saw it was too small but chose to build anyway. That way, once built I could have a better idea of the real scale and the shape of the model. Here's what I came up with :


Yes, the mess behind is my desktop. Just a small part of it, in fact. You don't want to see the rest of my room.

Not perfect, but decent. I did'nt try to make it perfect, to begin with. It was more of a test-run for scaling.
As you can see in the next picture, something's definitely wrong scale-wise...


Yes, that's the kind of face you make when you spent 3 hours melting your fingers.

So I'll scale it up, but first I'd like your (yes, you ! :) ) advice on one thing.
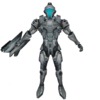
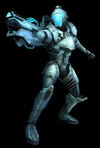
On the original model, the "bottom" part of the helmet is pretty large. See pic below.


I mean the part that closes the shape and comes back "in". Now this model isn't supposed to be an actual helmet so it's normal. I think I should cut a little bit of that part to just be able to fit a head in there, but how much ? I'll need some kind of "border" to that helmet and I can hardly get references pics from below.

And if you wanna say something else, preferably constructive (excepted about my silly face), you're welcome.

Tomorrow I'll try to scale up that thing and I'll go buy the correct paper to start with. I may be busy for a few days but I'll keep posting when I have something to show.
 

Attachments

  • 20071206013153!Phazon_Suit.jpg
    20071206013153!Phazon_Suit.jpg
    16.5 KB · Views: 1,860
Small update, today I had some time to go buy a better suited paper. Couldn't find what I wanted, ended with Bristol... I don't know how it will act later on when resined and such, but anyway that's all I had available.

So again, same steps ; going from this...


Kinda messy, I know. That's my style.


To this.


Tadaaaa ! Ninja Hyperslash Cut. Note : you shouldn't pile them like this, it's hard to search that *#/*ù$ piece you're looking for.

Assembling...


Final result. Not too bad. Bristol paper is waaaaaaay easier to work with than regular paper. Folding is a bit longer but it keeps the original shape better.


Now, to actually fit this on my head... Some cutting was necessary of course. Red edges were most problematic, colliding with my chin. Blue were too large anyway.


Admire my Paint skills. No autographs, please.

Here's a test fit... Kinda feel like Daft Punk. Or Tron. Or stupid.


Should be in Tron Legacy. Or Tron : Paper Attack.

What do you think of the scale and fitting based on those photos ? May seem big but the rest of the armor is even bigger. On those pictures the visor is lined with my eyes, and there's the chin that is kinda out. But there's no way I can fit completely into, or else the helmet will be bigger than me. :p
 
I think the last revision of the helmet is great. Keep up the good work! As far as size, from the pics, it looks to be a good fit for you. I would move on to the next steps. :)
 
The only suggestion I can offer would be to try and scale it height wise a little bit, and try to keep the length & depth as close to the what it is as the moment. This way the base of the helmet runs along the bottom of your jaw bone.

Another thing you can do is do a two piece helmet with the front part below the visor as a separate piece and connect them together.

The issue with such tight-fitting armor is it will take a lot of time scaling everything properly. It also doesn't help how Samus in armor is out of proportion then when she is out of armor.
 
Thanks for the input. Yeah, I thought about scaling it height wise but I'm afraid to change it too much... The fitting isn't THAT bad, it's just that I imagined it would completely cover my head, but it's not really. But its pretty good and I have some room in, for fiberglassing and such. And the back part offers some space to house batteries and such.

I may think about the 2-part idea, though. I think I'll move on to the next step and see what comes out of it.

Tomorrow : Resin !
 
Had some fun at the resin stage today. After having read and re-read every instructions about that step, I went to my garage, made a little prayer and started the job.:rolleyes


The initial tools and setup. Not pictured : MP3 player with Metroid OST and Metroid Metal. Absolute necessity.

That protective mask isn't just for looking badass, it's awesome how good it filters. When you take it off after a few hours, you litterally smell the difference...
But still, I'm wearing it JUST because it is badass. :)


Wow. Scary. Note : Don't know if the glasses are really necessary, but it's fun to wear anyway. :)

Let's begin slowly, at the seams... I first used small quantities of resin, which wasn't a very good idea cause it meant I wasted my brushes quicker. When I got used to the applying process, I began to use bigger quantities without problem. This thing is pretty easy.
Although I may have picked the ONLY resin that doesn't state anywhere on the package how much hardener you should put, which is dumbass. Anyway.


Left to Right : Initial state, first layer of resin on the seams only, and second on the whole parts.

It's already rock hard. I applied another layer just in case (better have a little too much than not enough) and here's the final result so far :


It's finishing curing for the moment. I'll be out for the day, so I'll check back this evening and see if it needs other layers of resin before fiberglassing. There are some large parts on this one, some weren't 100% solid with the first layer.
But so far, its really solid and I'm really happy with it.

Quick question, I used a hot air gun carefully to help a little the curing process, as the temperature was a little low in my garage. Good idea, bad idea ?

I'll go re-read instructions on fiberglassing and move on. Oh, I'm also pepping the first shoulder piece for fun. After that I'll attack the main torso, and the lower one, which will definitely be tricky.
 
I have no idea who this Samus guy is, but your model looks pretty good :)

Also, as usual, I have something to say about safety. This time it's all backwards, though: You're using too much, and I'm not talking about the glasses, those are good.
However, you're using combination filters against four different types of chemicals (organic, anorganic and acid vapours/gases and ammonia; in this order that's also what the colour stripes and the A, B, E and K on the label stand for, the 1 indicates how long the filter will last and how much of the substances it can absorb). This doesn't harm you, of course, but A2 filters would only be half as expensive and actually absorb more of the stuff that does float around your garage (mostly styrene, if you're using polyester resin).
 
That costume is looking really good so far, the idea is amazing!. Personally I recommend rondo for the strengthening of the helmet, just because it's really quick. To make 'rondo' you get bodyfiller (Rondo in the US) and mix it with resin, just add enough resin to make it pourable after you've mixed it well (don't forget to add both hardeners!). You want it quite runny. Just pour about a pint into the helmet and swish it round. Ben Streeper does a good video tut on it. Your helmet comes out a bit heavier, but it takes 15 minutes compared to hours if you glass it. If you want extra strength you can buy glass reinforced filler, which ought to work well too but I doubt is really necessary.

PS You know Samus is a girl right? Good luck fitting your manly waist into that suit!
 
I have no idea who this Samus guy is, but your model looks pretty good :)

Thanks :) Samus well, is a girl, in fact, the heroine of the Metroid game series.

This doesn't harm you, of course, but A2 filters would only be half as expensive and actually absorb more of the stuff that does float around your garage (mostly styrene, if you're using polyester resin).

Ah, really ? Didn't know. In fact it was the only type of filter they had at the store. Guess I'll try to find the correct one. Thanks for pointing that out.

Personally I recommend rondo for the strengthening of the helmet, just because it's really quick. To make 'rondo' you get bodyfiller (Rondo in the US) and mix it with resin, just add enough resin to make it pourable after you've mixed it well (don't forget to add both hardeners!). You want it quite runny. Just pour about a pint into the helmet and swish it round. Ben Streeper does a good video tut on it. Your helmet comes out a bit heavier, but it takes 15 minutes compared to hours if you glass it. If you want extra strength you can buy glass reinforced filler, which ought to work well too but I doubt is really necessary.

Well still hesitating, rondo or fiberglass... From what I read here everyone says rondo is easier but heavier, and fiberglass is harder (difficulty-wise and strength-wise). Is that all ? I don't really mind spending more time on some parts if it means they'll be a bit better.

PS You know Samus is a girl right? Good luck fitting your manly waist into that suit!

Yep, I know ! Well anyway I challenge ANY (Yeah I said any) girl to fit in that armor. Might not seem hard at first but really the proportions are crazy, especially at the waist. You may need to be anorexic to fit, and I'm not sure it would be enough.
Funny how everyone reacts about that. When a girl makes a guy armor and wears it, everyone loves it, sayin' "So cool" "Sexy" "Badass" "Marry me"... When it's a guy tring to make Samus armor, everyone says "Hummm.... You're not a girl." Is that frustration of not seeing a beautiful girl in armor ? lol


Talking about the waist, that will be tricky as my pep model isn't enough detailed (but the game model neither is), everything is in the texture. It's supposed to look like a lot of little hard parts but there's not enough space between them to allow some movement... That would mean I would be stiff-rigid. So I can increase the space but alter the design a bit, or I'm considering doing some parts in a flexible material (leather, rubber ? Don't know yet). Don't really know what's best.

In the meantime I'll try to compare fiberglassing vs rondo and pick which is best for me.
 
Ah, really ? Didn't know. In fact it was the only type of filter they had at the store. Guess I'll try to find the correct one. Thanks for pointing that out.

Well, as I said, it's not wrong. In fact, you're one of the few who seems to have worked out the safety part right from the start :)
The interesting parts for you to look at are the letter A and the number at the end. You don't really need the BEK part for resining, so it comes down to an A1 filter with bonuses vs. an A2 filter.

Well still hesitating, rondo or fiberglass... From what I read here everyone says rondo is easier but heavier, and fiberglass is harder (difficulty-wise and strength-wise). Is that all ? I don't really mind spending more time on some parts if it means they'll be a bit better.

[...]

In the meantime I'll try to compare fiberglassing vs rondo and pick which is best for me.

Yes, fibreglass (this time I mean the compound material) is stronger than Rondo, but you shouldn't underestimate the advantage of not having to work with fibreglass mats. THey're great for large, more or less even surfaces. But when it comes to smal areas with lots of vertical detail (that basically includes every high-def model), it just become a pain to use.

You could try to combine them both, I have done that and it works like a charm. Click down there for more info ↓
 
Well, as I said, it's not wrong. In fact, you're one of the few who seems to have worked out the safety part right from the start :)

Glad to hear I did that part right. Maybe my diploma in auto repair was useful there ^^

Yes, fibreglass (this time I mean the compound material) is stronger than Rondo, but you shouldn't underestimate the advantage of not having to work with fibreglass mats. THey're great for large, more or less even surfaces. But when it comes to smal areas with lots of vertical detail (that basically includes every high-def model), it just become a pain to use.

You could try to combine them both, I have done that and it works like a charm. Click down there for more info ↓

Ah, that's a little bit clearer than what I've read so far. Well in my case the helmet isn't really high-def, there are one or two spots a bit smaller but not much. I checked your thread, nice source of infos (and great work btw !) on those processes. I worked with fiberglass before, but always on plain surfaces. I think I'll use it on most of the helmet, test it on the small parts and go for something else if it fails. Seems like you used epoxy succesfully ? what would you recommend between rondo or epoxy ?
 
Like it was stated before about Samus being a girl I would suggest that you might want to change some of the suits proportions because of that to not only make it look more like a male version but just saw you can actually fit in it.

Are you planning any tricks or electronics to make the suit more like the game?
 
Like it was stated before about Samus being a girl I would suggest that you might want to change some of the suits proportions because of that to not only make it look more like a male version but just saw you can actually fit in it.

Well even a girl would have to rework some parts to fit in, it's just a little more obvious with a guy. The waist part, mainly. Other than that, I hope I can keep it close to the original. I don't have a strong build to begin with, it's kind of an advantage here... :p

Are you planning any tricks or electronics to make the suit more like the game?

Yeah, definitely. I have some past experience with full Luxeon Lightsabers, so I already know more or less what I want. Summary :

-LED's everywhere on the suit, of course.
-...including the cannon. Depending on budget at this tage, I may frist make a simple full lit cannon, or a more "functional" one. A bit more on this topic below.
-Lighting the visor with LEDs, might tint it a bit so we can't see completely my face, add a few fans here, maybe even in the armor (there's quite some space up here) or a water reserve with a little flexible pipe to drink (like those bike backpacks we can see everywhere). Don't know yet.
-I'll probably add a Voice Core from plecter labs in the helmet, allowing me have a mic and distort real time my voice, add static radio sounds when speaking (like a talkie-walkie), etc. Lots of cool things possible.

About the cannon... Two options for the moment.
1/If low on budget, I'll light it up fully blue like it's suposed to be in Phazon Mode (remember it's a Phazon Suit), and just a plain Luxeon I'll be able to trigger.
2/If enough budget I'll add a board with complete sounds from the game, and basically make it functiun exactly like in the game (excepting blowing up things). In more details for those who don't know what I'm talking about :
A normal fire would flash the main Lux. Maintaining the trigger would charge a bigger beam, then release. There are also 4 different modes of firing, each having is unique illumination colour on the cannon and on the projectile. The tricky part is that it also change slightly the shape of the cannon, some parts move. I'm not sure about that yet but it's definitely doable, should have some room here.
I might even add the missile thingy (where the tip of the cannon separates in 4 parts and rotate), but only if I can manage already everything I've listed so far.

...Once it's done, just need to hund some Metroids and I should be ready. :D
 
Seems like you used epoxy succesfully ? what would you recommend between rondo or epoxy ?

Epoxy. Contrary to my first impressions, the smell has become the most important factor now that it's too cold to just leave a window open all day.
 
When a girl makes a guy armor and wears it, everyone loves it, sayin' "So cool" "Sexy" "Badass" "Marry me"... When it's a guy tring to make Samus armor, everyone says "Hummm.... You're not a girl." Is that frustration of not seeing a beautiful girl in armor ? lol

Personally I think you'll look great in the suit ;). I'd also dress up as Samus if I could build the armour, I just can't find pep files for anything but the helmet and shoulders. I also reckon to get the proportions right you'll just have to beef up the legs and shoulders and make the waist look thin by comparison, i.e. have a HUGE suit that's in proportion. That's how I imagine the real Samus anyway, it's huge armour
 
Personally I think you'll look great in the suit :D

Thanks ^^

I'd also dress up as Samus if I could build the armour, I just can't find pep files for anything but the helmet and shoulders.

Well the pep I'm using is for the entire armor, but honestly the waist and the hand part is so low-poly its useless. Those are parts that should'nt be too hard to create from scratch anyway. At least I hope so :p

I also reckon to get the proportions right you'll just have to beef up the legs and shoulders and make the waist look thin by comparison, i.e. have a HUGE suit that's in proportion. That's how I imagine the real Samus anyway, it's huge armour

realy awsome but how are you gunna fit your legs in that armour scale-in is gunna be a beeyatch

...Well about that, I had some spare time cause my helmet is still curing (too damn long) and I don't have brushes left (they're waiting in a glass of acetone, I may have put them in it too late...), so can't apply a final layer of resin with more hardener. I decided to build one of the shoulder piece, cause this thing is supposed to be freakin' huge and it can counterbalance the proportions of the helmet (and basically the whole suit).
Also, on a side note I found a practical use for my first too small helmet.


Makes a pretty stylish webcam-cover, in my opinion.

Result of the shoulder below. My build isn't very clean, this was a harder piece to pep. Lot of very long pieces were on 3 or 4 different pages, and even if i tried to assemble them carefully, there are some little errors margins that made some problems afterwards. Well nothing a batch of bondo can't fix I guess.


This might not seem huge when seen alone, but... What happens when we can compare to some weird-looking guy... ?:rolleyes


WOOT OMG it's HUGE !

Hey, got a lot more room than my helmet...

With the helmet, it's clear this thing is definitely FREAKIN' HUGE and FREAKIN' awesome :


Whoops. Couldn't sse where the camera was, let alone try to align the shoulder piece correctly.

So, what were we saying... ? Ah yeah, the scale. Well seeing that, I'm not convinced I should scale those parts up for the moment :rolleyes Next I'll pep the leg parts to see the whole thing better. After that I won't pep more parts, I'll try to focus on finishing my helmet first to master the different processes involved. I just hope this damn resin will cure faster.
 
Yep, I know ! Well anyway I challenge ANY (Yeah I said any) girl to fit in that armor. Might not seem hard at first but really the proportions are crazy, especially at the waist. You may need to be anorexic to fit, and I'm not sure it would be enough.
Funny how everyone reacts about that. When a girl makes a guy armor and wears it, everyone loves it, sayin' "So cool" "Sexy" "Badass" "Marry me"... When it's a guy tring to make Samus armor, everyone says "Hummm.... You're not a girl." Is that frustration of not seeing a beautiful girl in armor ? lol

The only way anyone would fit that suit will be if the use severe corset training to bring their waist down enough, alternatively you will have to make serious adjustments to the model to compensate but even then if you wanted to wear the suit you may have to use a corset anyway otherwise the suit just wont look right.

Being female obviously I have bigger hips than you but I would still have to use a corset to really pull off the look. You can always adapt padding to fit your hips better and use corset to bring in your waist slightly.

Looks pretty good so far, looking forward to seeing more of it. :)
 
wow! someone else doing the exact same project as me!. sweet! nice pepping there man. if you need any tips let me know. I'm building these

Phazon_Suit.jpg

Corruption_Federation_Trooper_rip.png

PED_Trooper_Render.jpg


BTW could you send me the pep file you are using, the ones i have are not game accurate and those ones look like they will work better for my foam parts.
 

Attachments

  • Phazon_Suit.jpg
    Phazon_Suit.jpg
    19.9 KB · Views: 325
  • Corruption_Federation_Trooper_rip.png
    Corruption_Federation_Trooper_rip.png
    218.3 KB · Views: 338
  • PED_Trooper_Render.jpg
    PED_Trooper_Render.jpg
    82.1 KB · Views: 383
Status
Not open for further replies.
Back
Top