Did you have much issue with your scaling for the forearm? I had a few issues where the inner part slots into the actual forearm itself
You are using an out of date browser. It may not display this or other websites correctly.
You should upgrade or use an alternative browser.
You should upgrade or use an alternative browser.
Yet another ODST Build
- Thread starter r73
- Start date
-
- Tags
- 3dprinted odst armor
- Status
- Not open for further replies.
r73
New Member
So I swapped the nozzle out, trying a .6 mm one now. I dusted off the drive gear but Ill take a look tomorrow to see if the teeth are warn off, thank you for the advice!Usually thats a sign of a nozzle clog or extruder drive gear being messy or worn out teeth causing it to slip when pushing filament in. Looks amazing do far, love it!
r73
New Member
Ill have to look into the all metal extruder, I replaced my Ender 5 with an all metal a few years ago, probably should do the same for the CR6Pretty much this.
Running PETG I am more or less swapping a nozzle after every other full spool run through.
The all metal extruder replacement for the CR6 is a game changer over the stock plastic one.
r73
New Member
I guess I got lucky as far as now the forearms are looking to be okay. I haven't finished painting the left one, but so far the plate thing seems to fit well into the main body. I haven't tried locking it in with the locking key though, and I haven't put the straps into it yet either, so I will have to see if everything is well with that.Did you have much issue with your scaling for the forearm? I had a few issues where the inner part slots into the actual forearm itself
Also to this, I yolo'ed it and haven't scaled anything yet and its come out fine so far, but I know for sure that I will have to scale the thighs and leg armor
r73
New Member
Thank you, yah I will probably see if I can strengthen any of the high stress points, and very good advice for having some stuff to repair at a con!It's always a good idea to back prints with something. Whether that's fiberglass and resin or epoxy and strapping backing prints that'll take high stress, like thighs, backplates and chest pieces, will save you some heartache at conventions. I recommend having some sort of epoxy and strapping with you at cons to fix layer cracks when they happen, as well as some black acrylic paint and a sponge to blend the front of the crack. At the end of the day prints can still fracture at high stress points no matter how many perimeter walls you slap on, layer delamination is the nature of the beast for 3D prints.
Also r73 great detail on the forearms, those are always my least favorite part to finish!
Also Thank you, yah they are not that fun, and that's kind of why I still haven't finished painting the other forearm still
r73
New Member
Not much of a build update, my wife's cosplay is exponentially more difficult to try and make because the files weren't really made with 3d printing in mind. Just goes to show how good AguilarWorkshop's files are and really how much time was put into making them 3d printable. I haven't painted anything since the last post, but I was able to sneak a few of my waist armor pieces into the print schedule in-between my wife's parts.

I have the cod piece, the tail plate and one hip armor printed. Reprinting a second hip armor because I risk it with octoprint, and I had a momentary power outage this morning, just long enough to kill octoprint. Sure I could have gotten the z height and just printed from there and epoxied the pieces together, but I want this to be good, so I am reprinting the whole piece.
I also switched my Ender 5 to a .6 mm nozzle and it is so much faster. Toying around with the idea of switching the CR-6 MAX to a .6 as well but we will see. I'm currently crunching the numbers right now and will probably post below how much I have spent so far for this, because it is all adding up
r73
New Member
So crunching the numbers, I have used the following amount of PLA, with the bulk being printed with a .4 mm nozzle at .2 mm layer height, 15-20% gyroid infill, and as minimal supports as I can comfortably print with:
(All numbers are from the slicers, assuming a successful print every time, and including a few pieces I have not printed off for the waist yet)
Chest Armor: 1048g over 121 hours
Shoulders: 666g over 80 hours
Forearms: 656g over 88 hours
Waist: 1023g over 75 hours
Giving me a grand total of 3393 grams of PLA and just a little over 15 days of print time!
Cost waist where I am at for the armor from the waist up (minus the helmet):
Files: $100 (Got the bundle with all the weapons and shoulders)
Filament: $67 (Roughly $20 a 1 kg roll)
Paint: ~$60 (this one is tough as I used a number of rattle cans I had left over, on top of buying more that were used in other projects too)
Straps: $28 so far
All in I'm at $255... Wow when you don't look at the receipts it doesn't sting as bad. But this is a dream of mine and I'm going to see it through! There's probably places I could have saved some money, paint especially.
You've been very lucky then! I printed the gauntlets at the standard size and the locking lugs where the other part hinges off was cutting into my forearms, took me 2 attempts to get it right hahaI guess I got lucky as far as now the forearms are looking to be okay. I haven't finished painting the left one, but so far the plate thing seems to fit well into the main body. I haven't tried locking it in with the locking key though, and I haven't put the straps into it yet either, so I will have to see if everything is well with that.
Also to this, I yolo'ed it and haven't scaled anything yet and its come out fine so far, but I know for sure that I will have to scale the thighs and leg armor
I had to use armoursmith a heap to get the thigh and calf armour to fit, although I do have very solidly built legs which I knew was always going to be an issue
TechPriestMac
New Member
Yeah, I am in $200 in RPETG whether I use it or not. I bought 4 spools of IC3D 2.5kg coming into it, and I am fully prepared to use it.So crunching the numbers, I have used the following amount of PLA, with the bulk being printed with a .4 mm nozzle at .2 mm layer height, 15-20% gyroid infill, and as minimal supports as I can comfortably print with:
(All numbers are from the slicers, assuming a successful print every time, and including a few pieces I have not printed off for the waist yet)
Chest Armor: 1048g over 121 hours
Shoulders: 666g over 80 hours
Forearms: 656g over 88 hours
Waist: 1023g over 75 hours
Giving me a grand total of 3393 grams of PLA and just a little over 15 days of print time!
Cost waist where I am at for the armor from the waist up (minus the helmet):
Files: $100 (Got the bundle with all the weapons and shoulders)
Filament: $67 (Roughly $20 a 1 kg roll)
Paint: ~$60 (this one is tough as I used a number of rattle cans I had left over, on top of buying more that were used in other projects too)
Straps: $28 so far
All in I'm at $255... Wow when you don't look at the receipts it doesn't sting as bad. But this is a dream of mine and I'm going to see it through! There's probably places I could have saved some money, paint especially.
After looking at the print times, I am jumping to the .6 nozzle. The quality I am getting out of my .4 is absolutely amazing, but once I realized that I am covering up the layers via sanding, bondo, and paint, it's just something that is not worth the extra time.
I am also running a heavier build in terms of size and infill (25%) with thicker walls...
r73
New Member
I may still run into that issue as I haven't really worn the forearm armor for more than a minute or two, and not with the long sleeve shirt that I want to wear under the armor yet. This weekend I'm hoping to put a little more time into it this weekend so I will report back and possible ask for assistance.You've been very lucky then! I printed the gauntlets at the standard size and the locking lugs where the other part hinges off was cutting into my forearms, took me 2 attempts to get it right haha
I had to use armoursmith a heap to get the thigh and calf armour to fit, although I do have very solidly built legs which I knew was always going to be an issue
Fingers crossed I don't have a power outage with the storms down here in Texas tonight, I'm printing off the final 3 grenades for the waist. With that Ill have all the waist armor completed. Then onto the legs.
r73
New Member
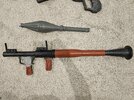
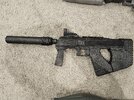
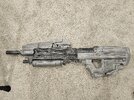
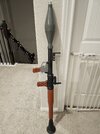
Its been slow going for me for a little while, life is starting to creep in and take all my time away, but I did manage to get all of the waist armor printed. I have almost everything painted up now too, the only remaining thing is the two hip plates need to be taped up and have the lighter metal color put onto them, but that will be for tomorrow. I printed off the grenades and got those painted up, though I ended up gluing them together so I cant use them as storage anymore. I will hopefully do a test fit tomorrow and can get some good update photos. I didnt even think about getting photos before while I was painting everything, and its all put away now so Im to lazy to get it all out. But I did want to post some photos in this update so I pulled all my Halo weapons out that Ill be using with this armor:

I have my two MA37s (one with detachable magazine, pending final paint job) a suppressed M7 with removable attachments and silencer, a M6H Magnum (I think, the Thingiverse post said it was the Halo 4 one, though I have not played Halo 4) and a SPACE RPG (Hey if it Halo tv series can have space AK's I can have a space RPG).
Looking at it all liked up like this I hope it looks like I am improving my painting. I started with the M& and its just a single Black Stainless steel. Then I did the first (less weathered) MA37 with two colors, and my first foray into weathering. Then came the magnum with me trying to blend colors and adding a little detail with the stripe. The RPG was an impulse print, because I mean I saw the files so I just had to print it. And then finally the top MA37, which got a little to much weathering.
If I can sneak it/beg for permission from my wife, I intend to print off a M41 SPNKr, but that defiantly is not set in stone, and is very very far down the road from this point in my build. I also want to make a MA5B from the first Halo because its just iconic in my opinion.
And finally just wanted to show off my Mark 5b helmet, it was really the first helmet I 3d printed, first one I painted (before I discovered how nice spray paint was, so this is all brush painted). Its really what got me into human scale props and is directly the reason I am on this ODST path now.
Attachments


r73
New Member
So I finally redid the strapping and it at least fits now. Need to tighten it. I also got my black digital camo uniform I ordered in, though the shirt is marked as XL but I could wear the sleeves as pants, so I need to get that changed for a smaller size. I got a test fit of the upper part of the upper body, and I'm worried the forearm armor might have to be reprinted. It is tight tight, and with the sleeves of the shirt I had, I couldn't get the plate part onto it. I also plan on reprinting the helmet because I think this one is just a tad bit to large for my liking. Hopefully I can finish up the painting of the waist armor tomorrow and get that strapped up as well.


Looks great! That yellow is still so amazing
- Member DIN
- S018
Looks awesome so far! The yellow is a real nice pop of colour
r73
New Member
Finally got a full fit test of everything I have printed now. I did run into the issue ReservedTaxo mentioned with the forearms, they were cutting into my wrist when I had them "fully assembled" with the plate and everything, and just generally restricted movement. While a future improvement could be reprinting them, I really like how the paint job came out on them and don't want to redo them right now, so I might just wear it without the forearm plates attached.


The only thing I have left with this is attaching the elbow guard to my right forearm armor. From here Im going to have to work up the confidence to print off the thigh and leg armor. I just ordered another .6 mm nozzle for my CR-6Max to cut down on print time. I have an gap week next week due to me getting a new job so I'm really hoping to get most of my stuff printed so I can paint it that week.
The only thing I have left with this is attaching the elbow guard to my right forearm armor. From here Im going to have to work up the confidence to print off the thigh and leg armor. I just ordered another .6 mm nozzle for my CR-6Max to cut down on print time. I have an gap week next week due to me getting a new job so I'm really hoping to get most of my stuff printed so I can paint it that week.
r73
New Member
Looks awesome so far! The yellow is a real nice pop of colour
Thank you, I am really happy with how it is coming out. I was worried it would clash a little with the mostly black and metal but I like the contrastLooks great! That yellow is still so amazing
Mate it's looking amazing!Finally got a full fit test of everything I have printed now. I did run into the issue ReservedTaxo mentioned with the forearms, they were cutting into my wrist when I had them "fully assembled" with the plate and everything, and just generally restricted movement. While a future improvement could be reprinting them, I really like how the paint job came out on them and don't want to redo them right now, so I might just wear it without the forearm plates attached.
View attachment 328832
View attachment 328833View attachment 328834
The only thing I have left with this is attaching the elbow guard to my right forearm armor. From here Im going to have to work up the confidence to print off the thigh and leg armor. I just ordered another .6 mm nozzle for my CR-6Max to cut down on print time. I have an gap week next week due to me getting a new job so I'm really hoping to get most of my stuff printed so I can paint it that week.
I upsides my gauntlets to 105% (also because I have very chunky forearms) and that does make it a bit more comfortable but im also thinking about just cutting the tabs off and using the strap on the outside of the plate
It definitely makes me want to add more of the green to my suit, instead of it mainly being greyThank you, I am really happy with how it is coming out. I was worried it would clash a little with the mostly black and metal but I like the contrast
r73
New Member
Well no real work done on the ODST suit. All that is left is the legs, but I have this horrible habit of measuring 4 times, but still having to cut 5 times. Never fails. My wife has been a little under the weather so I don't want to pester her to help me measure myself for Armorsmith right now either. Ive been messing around a little with scaling some pieces and then just printing a slice or two of them, but nothing concrete yet.
In the mean time though, I was looking around on this site and found a wonderful thread by MrJamin and how he designed a M41 SPNKr... Halo 3 SPNKr
Sometimes I hate myself for jumping in on to many things...

In the mean time though, I was looking around on this site and found a wonderful thread by MrJamin and how he designed a M41 SPNKr... Halo 3 SPNKr
Sometimes I hate myself for jumping in on to many things...
- Status
- Not open for further replies.