Form fitting Romeo goggles made for a different helmet to my current ODST helmet file in Meshmixer

High Court Seal

New Member
Looking for some resizing assistance if possible!
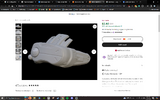
I started out with the Galactic armory helmet (So I can get a proper visor from their store), and I would love to use these Romeo goggles by Titlewavedesigns. However, they're made to form fit a different helmet. They're a close fit but not quite there.
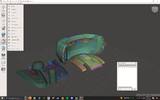
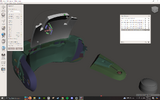
Has anyone else put these together before? Being able to form fit the files to my helmet would be great, but I'm lacking the skillset. The goggles files themselves aren't a big help either for this purpose. I've been trying to set the pieces perfectly together in meshmixer to boolean them from my helmet to make sure they're a perfect fit. I've done my best but this is out of my area of expertise. Pictured below are the faces I was attempting to perfectly join, and how the model comes in the files.
Help of any kind is greatly appreciated!
 

Attachments

  • Screenshot (2).png
    Screenshot (2).png
    365.5 KB · Views: 30
  • Screenshot (3).png
    Screenshot (3).png
    302.1 KB · Views: 25
  • Screenshot (5).png
    Screenshot (5).png
    415.9 KB · Views: 27
  • Screenshot (4).png
    Screenshot (4).png
    338.7 KB · Views: 24
Hello there,
I would love to be of assistance, but I am slightly confused. Are you trying to piece the file together, fit it to the other helmet, or both?
 
Sorry I don't know if I can reply directly to your response or if you'll just see my response on the thread, I'm brand new to the forums

I'm actually trying to do both. My thought was that once the larger pieces are perfectly fit together, I would lay them over the helmet and then subtract the overlapping geometry of the helmet to ensure its a perfect fit before I send the print (I know very little about the 3d modeling world, apologies if that doesn't make sense). The first picture of the files is how they come by default, with the numbers showing how the piece goes together. The second is myself doing my best to perfectly line them up. The side mounts are a massive pain to perfectly line up, I was hoping I could match the faces together somehow in MM, but I couldn't figure that out.
I printed off the "mount" piece and it's a little off from my helmet; doesn't quite fit right. I could also just heat it up and bend the plastic, but I thought this would be a better option to try first.
Thank you!
 
Hello there,
I would love to be of assistance, but I am slightly confused. Are you trying to piece the file together, fit it to the other helmet, or both?
Just saw the "reply" button, sorry if this comes across as spam!

I'm actually trying to do both. My thought was that once the larger pieces are perfectly fit together, I would lay them over the helmet and then subtract the overlapping geometry of the helmet to ensure its a perfect fit before I send the print (I know very little about the 3d modeling world, apologies if that doesn't make sense). The first picture of the files is how they come by default, with the numbers showing how the piece goes together. The second is myself doing my best to perfectly line them up. The side mounts are a massive pain to perfectly line up, I was hoping I could match the faces together somehow in MM, but I couldn't figure that out.
I printed off the "mount" piece and it's a little off from my helmet; doesn't quite fit right. I could also just heat it up and bend the plastic, but I thought this would be a better option to try first.
Thank you!
You're all good!

I don't know much about MeshMixer, I normally join and alter 3d printed in a program called Blender. I am unsure if Blender has an "align face" feature (I'm sure it does) but I just zoom in and manually align the mesh together, letting it overlap slightly so it won't disconnect on the print bed. You can also alter print files/mesh in Blender, that would be the best way to alter the goggles to fit the helmet you want. I would be willing to help you learn through the process if you are in the 405th Discord and would be willing to jump in a voice call and share your screen. Please let me know if I need to explain things more in-depth.
That would be an absolute godsend! I tried to learn some Blender a bit ago but hit a wall. I believe I properly joined the Discord (not well versed in Discord), my username would be highcourtseal. I'm assuming I would show up under the members list on the side? Let me know if you'd need anything else from me! Looking forward to learning some valuable Blender tricks
 
Kae's on the right path for lining things up. Blender does have a snapping system, but with complex geometry it can be hit or miss. What I'd do is put the goggles on the helmet in Blender where you want it, making sure the two meshes slightly overlap. Then add a Boolean modifier to the goggles (the subtraction which you mentioned earlier), set it to Difference, and if you need to, play with the two togglebox settings under Solver Options in the modifier panel. When you're happy, you can apply the modifier and delete any straggling parts of the mesh which may not be connected to the main mesh, if there are any.

That's quite a simplification of the process, as Booleans can be as fun to deal with as saying the word "Boolean" is. But hopefully it's a step in the right direction! Otherwise, you may be looking at modifying the goggles mesh yourself by sitting it in place in Blender, and moving points around until things look like they fit (I'd recommend using proportional editing to help speed up the process).

Either way, do a low quality test print of just the surface of the goggles that attach to the helmet before doing a full high quality print, just to be safe.
I'll do my best to give that a go when I can! I did run a test print do I know what needs to be changed around. Thank you!
 
I might sounds a bit silly on this but trust me, it works.

Try using a program called 3d builder, it should be both free and already on your computer. You can load all the models you want to modify and then use the "subtract" feature to modify the goggles to properly fit the helmet. I've used this on numerous projects for anything from magnet placement to fitting fans & speakers!
Was going to suggest this! I've done the same process several times with Microsoft 3D Builder. High Court Seal using this software, you can load in the models you want to use, line up the goggles how you would like them to sit on the helmet, then click on the goggles and hit "subtract" under the "edit" section (I think it's the edit section). The program will then cut out the overlapping bits like you were looking for and create the perfect fit!
 
I've been busy with some other projects so I haven't had the time to try these out, but I sincerely appreciate the help! I'll start going down the list of tips you guys left me as soon as I can
 
I might sounds a bit silly on this but trust me, it works.

Try using a program called 3d builder, it should be both free and already on your computer. You can load all the models you want to modify and then use the "subtract" feature to modify the goggles to properly fit the helmet. I've used this on numerous projects for anything from magnet placement to fittinout 3d builder, but it wont;
Tried out 3d builder, but I dont think i can get it to work for me. The subtract feature is greyed out no matter what I do. Any suggestions?
 
Tried out 3d builder, but I dont think i can get it to work for me. The subtract feature is greyed out no matter what I do. Any suggestions?
Select the item you want to subtract then select the item you want to have the modification done to!
 
Tried out 3d builder, but I dont think i can get it to work for me. The subtract feature is greyed out no matter what I do. Any suggestions?
If 3D builder says that your files need to be repaired, let it do that. Sometimes the program just needs to get the file up to its specs, and some features won't work until it does.
 

Your message may be considered spam for the following reasons:

If you wish to reply despite these issues, check the box below before replying.
Be aware that malicious compliance may result in more severe penalties.
Back
Top