Halo master chief build

Status
Not open for further replies.

Voren Marr

Member
Member DIN
S212
Evening all.
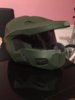
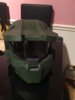
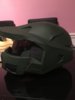
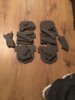
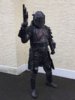
I'm new to the halo scene but not to the cosplay world. But I'm starting my first master chief armour.

Can't wait......

Being a newbie, just some clarity needed on my kit once made. Is there an approvals process?

I live in Northern Ireland. I'm keen to know if there are any fellow 405th members here too..

Oh and do I need to have a wip thread?

Thanks
 
Not sure what you mean by an approvals process, but I can answer your question about the wip thread. No, you don't need to have a wip thread, but most people do, especially for their first post. Good luck, and welcome to the 405th!
 
a WIP thread is for your benefit. I agree w/ StayFrosty, you don't need it but it give us a chance to see what you are doing and if you have any questions it's easier to answer if we can see what the problem is.....also to admire what ever you have done. ;)
 
Thanks guys.
I'm already in the throws of sizing mkvi master chief armour to my size using pepakura designer.
Foam in hand and ready to rock.
 
And i'm back. lots of work done in the past couple of weeks.Pics to follow
Sizing of the armour - complete
Armour pieces cut and labelled - complete
Template for railgun - complete
Countless tutorials watched - definitely complete

researching an under suit also. I have seen a Zentai halo under suit, good detail with hex patterns. has anyone used one or can recommend using one as a base?
 
So here is my 80% completed helmet :)
I have to add a new hex visor. The one I have in is temporary and held in place with a small dab of hot glue.
I'll be adding leds at both sides of the helmet, with a hidden switch.
I've a couple of micro fans to Install and some slick cable covers
Lastly to install some helmet padding.

I've a base colour of green at the moment. May change this.....

I've all my armour pieces cut out now. I'll post some pics in the next day or so.
 

Attachments

  • IMG_2373.JPG
    IMG_2373.JPG
    724.2 KB · Views: 233
  • IMG_2374.JPG
    IMG_2374.JPG
    687.7 KB · Views: 204
  • IMG_2375.JPG
    IMG_2375.JPG
    674.9 KB · Views: 195
Your helmet looks great. What material did you use for the visor?
Can't wait to see your next set of pics.
 
Nicely done.....you are well on your way of a great build. Clean lines and your seams look straight and neat. (y)
 
Yay! Another Mark VI!

Welcome to the community.

Really nice work on your helmet. The lines are very clean.

Can't wait to see the rest!
 
I'm not new to costuming lol. Been making kits for quite a while now.

The visor is one I made as a template. I'll be changing this for a hex pattern visor. It makes life a little easier if I know the exact sizes to cut.

It will be well weathered when I'm done. Battle scarred and black washed. Just like my mando.

So onto the kit. Boots are first.
I have a pair of comfortable boots to use and sized the templates accordingly. I will assemble the boots and then remove the bottom centre so my boot sole will be my boot sole.

I didn't want to walk in the foam..

I'm also building a railgun, from a base of a nerf stampede. I've sized the gun a little larger as bigger is always better ;)

Still uncertain about my undersuit.

Lastly for me will be the butt plate and cod. I'm going to attach them custom belt, armoured and then attached to a harness..
 

Attachments

  • IMG_2381.JPG
    IMG_2381.JPG
    1.2 MB · Views: 191
  • IMG_2238.JPG
    IMG_2238.JPG
    265.2 KB · Views: 183
Yay! Another Mark VI!

Welcome to the community.

Really nice work on your helmet. The lines are very clean.

Can't wait to see the rest!


Thanks buddy.

I've been a voyeur on the 405th for such a long time. Have watched countless angelegend YouTube videos and had to get stuck in.

It will be a 3 month max build.
 
  • Like
Reactions: Jme
So here we go. Been busy in the past couple of weeks getting a couple of mando upgrades done.

Anyway back to my master chief.

I have found myself a decent pair of boots that I will use. Changed the templates up a little to wrap round the front of the boot.

Also cut away the flat base of the shoe so I can position over the top and allow the sole of my boot to be the sole not the eva foam.

Added some hex detail on top. Also will be adding metal hex cap screws across all of the build. Going for a more heavily armoured Master chief now.

Made a start to the biceps and shoulders. Added some additional detailing to the top curve.

I'll be attaching them together and adding some additional armor pieces. :)

Onto the cod (random order I know). I'm a tall chap 6'2" and carrying a little more weight than I'd like lol. So with that in mind, having a single floating cod piece won't work for me.
I'm adding a belt to go all the way round. Attaching both cod and butt plate together.
So I sized the cod a little short. Cut and added an additional piece at the bottom .
I'll add extra pieces to the top when attaching to a belt.

The armor will be attached to a black suspender kit and sit under a motocross top.

Going to use a black undersuit. Toying with the idea of having some foam attached to the undersuit. Not sure how this will work as I'd imagine fixing them in place whist on me will be spot on placement wise, I'd say they may bunch up when the suit is removed?? Thoughts anyone?
 

Attachments

  • IMG_2748.JPG
    IMG_2748.JPG
    826.4 KB · Views: 178
  • IMG_2743.JPG
    IMG_2743.JPG
    766.3 KB · Views: 163
  • IMG_2744.JPG
    IMG_2744.JPG
    630.5 KB · Views: 237
  • IMG_2745.JPG
    IMG_2745.JPG
    737.4 KB · Views: 175
  • IMG_2746.JPG
    IMG_2746.JPG
    336.7 KB · Views: 171
Your foam work is very good. So your building H4 armor with an H3 helmet? Am I getting that right?
 
I was going with H3 mkvi armor and changed at last minute.

I'll keep the H3 helmet for now. Likely will get a raw cast H4 helmet
 
Ok gotcha I was just a little confused with the newest pics you posted. Anyway everything looking good (y)
 
So various bits n pieces done now.
Boots have been beefed up with some additional armor coverage on the front and the lower shin.

My boots inside are fully enclosed allowing me still to walk and move easily on their own soles :)

All other armor pieces have had hex nuts added for additional depth and aesthetics.

Onto the calves next.
 

Attachments

  • IMG_2757.JPG
    IMG_2757.JPG
    881.1 KB · Views: 159
  • IMG_2758.JPG
    IMG_2758.JPG
    780.1 KB · Views: 177
  • IMG_2759.JPG
    IMG_2759.JPG
    943.5 KB · Views: 173
  • IMG_2760.JPG
    IMG_2760.JPG
    703.8 KB · Views: 169
  • IMG_2761.JPG
    IMG_2761.JPG
    884.1 KB · Views: 169
  • IMG_2762.JPG
    IMG_2762.JPG
    808.2 KB · Views: 179
Great work. Now you need some update pictures with you wearing the parts as it comes along.
 
Absolutely. Shin 1 is done onto the other one now. I'll get some pics up tomorrow with shin and boots :)
 
Status
Not open for further replies.
Back
Top