ODST for my kids WIP Completed (more photos Page 13)

Status
Not open for further replies.
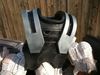
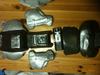
hey, i bought these for an older odst costume i did. they look very good for the price of ten bucks and are comfortable, i am assuming you will need them in a smaller size for your kids. you may have to browse but its worth it.

http://www.amazon.com/Half-Finger-Paintball-Gloves-Medium/dp/B001R1LHBC

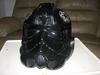
heres a picture if people dont feel like clicking
41MK43CCN3L_SL500_AA300_.jpg

Thanks. That is a good suggestion. I ordered two pairs and will let everyone know how they turn out. Wish I could afford the Fox Racing gloves though.
 

Attachments

  • 41MK43CCN3L_SL500_AA300_.jpg
    41MK43CCN3L_SL500_AA300_.jpg
    18.9 KB · Views: 167
Thanks. That is a good suggestion. I ordered two pairs and will let everyone know how they turn out. Wish I could afford the Fox Racing gloves though.

No problem. you are definitely right about those racing gloves though those look amazing!
 
Today's weather is warm. So I take the opportunity to do some resin. I used the leftover from last year. Surprisingly it still works.

I was able to resin 4 helmets.
30bbad48.jpg

e5ec7f4f.jpg


I don't have a workspace, so I used an old table that I used last year.
f63b7448.jpg


I tried rondo on the hip plate. The "mud" works really well.
5e9f9029.jpg


Here is Carter's helmet. And I'm loving the rondo. It is a lot easier than fiberglass.
5e742577.jpg
 

Attachments

  • 30bbad48.jpg
    30bbad48.jpg
    78 KB · Views: 160
  • e5ec7f4f.jpg
    e5ec7f4f.jpg
    80 KB · Views: 163
  • f63b7448.jpg
    f63b7448.jpg
    100.8 KB · Views: 163
  • 5e9f9029.jpg
    5e9f9029.jpg
    87.2 KB · Views: 175
  • 5e742577.jpg
    5e742577.jpg
    87.1 KB · Views: 160
Work has been busy and weather was cold and rainy. Finally found some break in the weather and was able to do some work. I resined all the pieces yesterday and I laid all the pieces on my driveway.

I was surprised to see so many pieces for just one suit. Here is a photo of both suits.
ee5cd48f.jpg


Here is the suit for my 10 year old son.
5d6fb04c.jpg


This suit is for my 7 year old son.
2e6086f9.jpg


After seeing these suits, I cannot imagine how much work left to be done. Need to put some rondo on some pieces. I will be using fiberglass on the thighs and shins because they take the most abuse. After that, I need to bondo, paint and strap every pieces. Hopefully I can finish them in 2 months.
 

Attachments

  • ee5cd48f.jpg
    ee5cd48f.jpg
    104.7 KB · Views: 158
  • 5d6fb04c.jpg
    5d6fb04c.jpg
    99.2 KB · Views: 154
  • 2e6086f9.jpg
    2e6086f9.jpg
    93.6 KB · Views: 166
you realise that next farthers day your kids are going to buy you a porche, thats how awesome you are
worlds luckiest kids and worlds coolest dad? most likely.
 
you realise that next farthers day your kids are going to buy you a porche, thats how awesome you are
worlds luckiest kids and worlds coolest dad? most likely.

Thanks. Just want my kids to be happy. Plus I wouldn't mind having them to be the coolest kids on the block. I may submit them to our YMCA costume competition this Halloween.

I bought some resin and bondo last week; I also had to buy another palm sander yesterday because my old sander broke. I spent close to $200 the last two weeks.

Been busy the last few days. I spent a day getting a few pieces painted. I will upload some photos later today.
 
this is an incredible build! i can only imagine what the finished suits are going to look like.

off topic, but where in the northeast do you live?
 
this is an incredible build! i can only imagine what the finished suits are going to look like.

off topic, but where in the northeast do you live?

Thanks. I live in the Garden State, only that there are not alot of gardens.

As promised, here are some updates. I did some bondo, sanding and painting on Memorial day.

My older son wants to be a different ODST. Instead of the standard gray, silver color scheme, he wants to be red and blue. Probably inspired from his armor color on Halo Reach.

These are all painted. Once I'm done with the entire suit, I will weather every piece.
384b9915.jpg


My younger son will be gray. I noticed that the chest piece and the side plate are warped after I apply resin. Hopefully they are not noticeable once my son suit up.
298b5515.jpg


I was halfway done with the helmet when my hand sander broke. I bought a new sander and was able to do some sanding yesterday. I need to apply more bondo on some areas. Hopefully I can get this helmet complete this weekend.
0f9c4253.jpg

09f873a6.jpg

364b2d67.jpg


That is all for tonight.
 

Attachments

  • 298b5515.jpg
    298b5515.jpg
    110.6 KB · Views: 158
  • 384b9915.jpg
    384b9915.jpg
    123.8 KB · Views: 160
  • 09f873a6.jpg
    09f873a6.jpg
    94 KB · Views: 172
  • 0f9c4253.jpg
    0f9c4253.jpg
    111.1 KB · Views: 159
  • 364b2d67.jpg
    364b2d67.jpg
    109.9 KB · Views: 170
Helmet's looking good as well as the rest of the pieces! Can't wait to see all this done you've taken on quite a project sir.
 
I'm continually impressed with not only the quality of your work, but also the quantity! One suit was enough for me, I can't imagine doing a 2nd pair for the kids. I really enjoy your builds and I pick up useful tips and tricks from them. Keep up the great work!
 
I've been busy taking of family and my full time job. Slowly but surely I'm going to continue to complete this project. Here is some of the things I've done.

The bondo is taking too long. Finally I partially finished the helmet. I decided not to create the lines for the ODST. I opt to go with smooth surface.
IMG_1133.jpg


The top of the helmets. The recon helmet need some black. If you notice, I drilled some holes on the cheeks to help with the venting. I plan to put in a fan inside.
IMG_1134.jpg


On a different subject, I want to show you a treasure of mine. I bought this in the 80's through mail order. I believe I was in my teens when I learned Star Wars. I was able to bought this Tie Fighter helmet relatively cheap. It is made of some plastic (not sure what kind) out of a mold.

IMG_1135.jpg


Here is a different view.
IMG_1136.jpg


My younger son intentionally hid his eyes. Tie fighter helmet is very large even for me.
IMG_1131.jpg


I have thigh, shins and shoulders to finish. Let me know what you think.
 

Attachments

  • IMG_1133.jpg
    IMG_1133.jpg
    64.1 KB · Views: 150
  • IMG_1136.jpg
    IMG_1136.jpg
    69.9 KB · Views: 146
  • IMG_1135.jpg
    IMG_1135.jpg
    65.4 KB · Views: 164
  • IMG_1134.jpg
    IMG_1134.jpg
    70.3 KB · Views: 152
  • IMG_1131.jpg
    IMG_1131.jpg
    109.7 KB · Views: 150
helmets are coming out great! and the TIE Pilot helmet has to be one of the finest keepsakes from the 80's Star Wars era. makes me wish i held onto the action figures i used to have...

helmets look sick though!
 
It is really tough finding the time to complete this project when I have to work full-time. Wish I can take some time off and get these 2 suits completed.

I decided to do as much as I could at night. I took the helmet and finished painting it.

Got some acrylic black and water it down. I also took out some enamel silver to dry brush the helmet.
dffbb19c.jpg


Helmet weathered and looking good.
1dd6ad8c.jpg


Front view. Now need a visor and a fan.
623a5d18.jpg


Edit: I decided to continue with the installation of the fan. I used the same fan and same method as I used last year. Here is a simple wiring of the fan I bought from Radioshack.

dfa51d49.jpg


Here is the inside of the helmet with some holes drilled to allow air circulation.
973876f8.jpg


The fan glued slightly above the holes. I also stick a velcro next to it. The battery will go here.
d966d157.jpg


The finished fan with the push on/off switch.
db267910.jpg


Unfortunately I can't do any costuming this weekend. Need to some housework and attend a birthday party. Hopefully I can get more done next week.
 

Attachments

  • dffbb19c.jpg
    dffbb19c.jpg
    120.7 KB · Views: 151
  • 1dd6ad8c.jpg
    1dd6ad8c.jpg
    127 KB · Views: 147
  • dfa51d49.jpg
    dfa51d49.jpg
    120.5 KB · Views: 164
  • 623a5d18.jpg
    623a5d18.jpg
    118.2 KB · Views: 169
  • 973876f8.jpg
    973876f8.jpg
    101.3 KB · Views: 145
  • d966d157.jpg
    d966d157.jpg
    108.1 KB · Views: 144
  • db267910.jpg
    db267910.jpg
    87.2 KB · Views: 162
No two ways about it. This looks great. I like the idea of recon helmet and odst armour. Sort of a take on Dare. The pep work was great,but the resining and bondoing job was impressive.
Keep up the great work.:):)
 
No two ways about it. This looks great. I like the idea of recon helmet and odst armour. Sort of a take on Dare. The pep work was great,but the resining and bondoing job was impressive.
Keep up the great work.:):)

Some of the finishing work is a little rough, especially the bondo. Since these are my kids' costumes, they will unlikely to wear them again after this year. I decided not to spend too much time on it. Just need to finish them up for NY Comic Con and Halloween.
 
I've painted the torso a while back. The torso is made from foam. I sprayed Plastic Dip and then painted it in two-tone color. The paint seems to hold well. I did not see any crack on the paint at all.
82c0a309.jpg


And here are the shins glassed/rondoed over the weekend. Need to cleaned it up and apply bondo. Hopefully I can finish them this week.
1bc88a33.jpg
 

Attachments

  • 1bc88a33.jpg
    1bc88a33.jpg
    124.7 KB · Views: 157
  • 82c0a309.jpg
    82c0a309.jpg
    127.5 KB · Views: 152
Status
Not open for further replies.
Back
Top