greeter
New Member
Hey y'all, first time posting on here after many months of lurking and generally being curious.
I've been in the 3D printing space for a while, but have only been interested in the cosplay scene since around 2024 when a good friend of mine gave me the idea to repair an Ender 3 Pro my brother bought at the end of 2020. I fixed it and I printed two helmets, a Mark V MJOLNIR helmet and an NCR Ranger helmet (which i gave to my friend), then I bought a P1S and things have been great thus far.
On May 26 of this year, after considerable thinking and planning involving scaling pieces in Armorsmith, organizing those pieces in the slicer, calculating print times and costs, and a lot of contemplation on whether I could/should go ahead with the project, I decided to begin printing a full suit of ODST armor from Galactic Armory. I've done several helmets and other props up to this point and have learned a lot from those experiences, but never a full suit of armor, so this will be quite the challenge for me. On top of never having done armor, I also have about two months before I have to pack my things and leave home for university, so time is going to be valuable too. I've considered the possibility of shipping it before leaving, but still haven't figured that out.
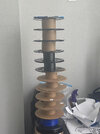
Over fourteen days of printing later and here's what I got (the helmet was already done beforehand). I am planning on making the chest (under the plate carrier) out of EVA foam from the templates provided in the armory here.

(also here's all the spools that were used up in the making of this thing lol. in actuality, i used 8 spools, or 8kg of filament. i printed almost everything at 5% gyroid infill.)
View attachment 363030
I've been in the 3D printing space for a while, but have only been interested in the cosplay scene since around 2024 when a good friend of mine gave me the idea to repair an Ender 3 Pro my brother bought at the end of 2020. I fixed it and I printed two helmets, a Mark V MJOLNIR helmet and an NCR Ranger helmet (which i gave to my friend), then I bought a P1S and things have been great thus far.
On May 26 of this year, after considerable thinking and planning involving scaling pieces in Armorsmith, organizing those pieces in the slicer, calculating print times and costs, and a lot of contemplation on whether I could/should go ahead with the project, I decided to begin printing a full suit of ODST armor from Galactic Armory. I've done several helmets and other props up to this point and have learned a lot from those experiences, but never a full suit of armor, so this will be quite the challenge for me. On top of never having done armor, I also have about two months before I have to pack my things and leave home for university, so time is going to be valuable too. I've considered the possibility of shipping it before leaving, but still haven't figured that out.
Over fourteen days of printing later and here's what I got (the helmet was already done beforehand). I am planning on making the chest (under the plate carrier) out of EVA foam from the templates provided in the armory here.
(also here's all the spools that were used up in the making of this thing lol. in actuality, i used 8 spools, or 8kg of filament. i printed almost everything at 5% gyroid infill.)
View attachment 363030