3D Printed reach odst

TooTall

New Member
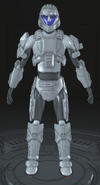
Alrighty folks. Adding another build thread for the works. This time it’s a “full” reach marine armor odst. Well my version of a reach odst. Files are Titlewavesdesign and the helmet is nerdforgedesigns. I’m using a ranger green/black (there’s black areas on the clothing) clothing as an undersuit. Some black tactical boots. Black tactical gloves. Black knee pads that the shin/knee armor will go over. And some other elements that resemble close to the gear they have that I will show. Armor colors is gonna be a base color of Montana gold Basalt (which is a grey), black details. And the “stripes” odsts have are gonna be a Montana gold curry (yellow). This picture I was just messing around with other parts so this is what it’ll kinda look like
 

Attachments

  • Screenshot_2023-05-05_123938.png
    Screenshot_2023-05-05_123938.png
    325.8 KB · Views: 155
Here is a picture of my soft parts put on that I have now. The pants however came a different shade of ranger green than how it looked in the picture but I gotta say these fit very nicely to me. The top is a tactical hoodie shirt from AliExpress. The pants are truspec 24-7 Xpedition pants. The deltoid armor I’m gonna maybe or maybe not use to hold my shoulder armor are from AliExpress. My plate carrier is a Russian military plate carrier called “Defender” I got from greyshop. They have 2 versions of this plate carrier. The groin attachment on my carrier is also form grey shop. My tac belt I got off of evike. And boots are from academy store. That’s it for now. Will be printed armor soon
IMG_3307.jpeg
 
These are the armor colors I’m going with. The base armor is all basalt (grey). Black details. And the yellow is the “stripe” or the accent. And my visor is gonna be silver. I have no idea how I’m gonna do it. Either order one online or commission someone to vac form one for me
IMG_3136.jpeg

IMG_3119.jpeg

IMG_3313.jpeg
 
Paints have been ordered. Now we wait for those. I have my helmet fully printed and now it’s time to work on printing the rest of the armor. I am gonna have a vac formed visor done by a buddy so that’s also good news!
 
Yeah I just ordered some PETG filament for my helmet xD Texas be hot so something heat resistant would be a necessity it all depends what it’s made out of and I doubt PLA would work well…
 
These look like a lot but they serve a good use. I resin printed most of these buckles and strapping guides and gonna try to figure out how they would be rigged. I think 1 inch wide straps might be my best choice to use and the center chest area might be a 2 inch wide strap. Which depends if I end up using them with the odst core plate
IMG_3859.jpeg
 
Today I worked on the gauntlets. I had used these before in the past so I stripped the paint I had on it previously. Hit it with filler primer and the silver base layer and boom. Gonna wait for this to dry and then use some liquid latex for paint chipping and then throw on my colors.
IMG_4117.jpeg
 
Today I worked on the gauntlets. I had used these before in the past so I stripped the paint I had on it previously. Hit it with filler primer and the silver base layer and boom. Gonna wait for this to dry and then use some liquid latex for paint chipping and then throw on my colors.
View attachment 333799
these look suspiciously like Mandalorian gauntlets
1690284718036.png


Nice work tho!
 
After a long while I finally was able to kick back up this project. Wondercon is coming up so I said “hey! I know halo cosplayers at wondercon. I’ll finally start this again!”

I had all my armor pieces finally printed. Not of course with a few complications but we’ll take care of than in sections of this forum.

Starting off with the helmet, I picked up galactic armories odst casted helmet and dyed visor bundle. Unfortunately USPS damaged my package during shipping but that’s okay. GA had sent me a replacement. This didn’t take long at all. Cutting out the visor. Minor sanding and of course painting the thing.

IMG_7253.jpeg

IMG_7340.jpeg
 
This is one more like a tip. I had to split up this back armor in different pieces cuz it’s one big unit with wings on the sides. I had the idea of separating the sides and attach them with latches or hinge but I decided to glue all of them together for how it should be. To make sure it doesn’t break I reinforced my seam lines with fiberglass resin and mat and boy this thing is tough. Putting it on wasn’t hard at all. You simply slide it over your head like a shirt and you’re ready to go. Rigging it was easy but I did my own way that I’ll show later on in the forum. Also if you’re wondering the size of the slots for the straps. It’s 1.5 inches at 100% scaling the ab armor and two buckles are 2 inche strap slots.
IMG_7317.jpeg
IMG_7318.jpeg
 
We’re back again! Starting from the bottom we have the shins! The files came with strap guides or fake buckle. These don’t glue directly onto the shin so what you have to do it glue the specific sized strap, I think it might be a 2 inch wide strap slot or a 1.5 inch I can’t remember, to the side of the shin and slide the buckle on, you have a choice to leave it loose or glue it in place. I however, did not do that lol. I glue one elastic strap at the bottom that wraps around the ankle so it can stay in place. I also added padding on the inside where you slide your leg through. This did make it a bit harder to slide your leg through. The knees you have the option to glue them in OR just slide them on and they don’t really come off. I do suggest gluing them. Please god glue them on LOL.
IMG_7349.jpeg

IMG_7399.jpeg
 

Your message may be considered spam for the following reasons:

If you wish to reply despite these issues, check the box below before replying.
Be aware that malicious compliance may result in more severe penalties.
Back
Top