Would be cool if you could make a mold of the final positive and cast it in clear resin. You could tint it Orange as well as add paint to inside of mold on the square pieces.
BTW are you going to add a pulse blinking effect?
I have to agree, and I may do that in the future... but for now, I will keep this as a "one off". As far as the blinking bit, I don't think so. I didn't see it doing that in the videos, but then again, it was only visible for a couple of frames. Does it pulse when you see in on another player in game? If so, I may have to do a bit of alteration to my circuitry. I know it goes from yellow when held to orange when thrown, but I am passing on that effect since this will never be thrown
")
i hope it goes quickly, assembling seems very tricky... i dont really have any ideas for that one...
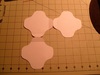
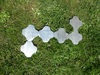
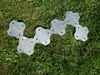
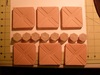
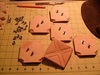
Thanks! Since my last post, I have completed two more. This part is moving along nicely. Also, I have some "ideas", but nothing has jumped out at me as a solid answer yet. I have to keep in mind that whatever I use, it has to be out of the way of the electronics too.
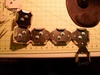
Those look fantastic! Would you mind going into detail a little more about your glycerin and caulking technique? Forgive me if you already have, I readily admit to not having read most of your thread and just enjoying the pictures.
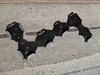
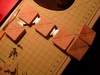
Sure thing. I use 100% Silicone (a must) and probably WAY more glycerin than required. From the research I have done, it is supposed to be around 10 drops of glycerin per 2 ounces of caulking. I just squirt a bunch in and mix with about 8 oz. at a time. You must mix well too. Now for the info on it: The glycerin aids in speeding up the curing process by forcing the liquid (I believe it is vinegar, but not positive) out of the silicone. I usually go about 1/2" thick on my first pass over my buck, doing my best to make sure it does not have any air bubbles or missed gaps. I typically apply it with my fingers,using a bowl of warm soapy water to keep it from sticking to me . Also, I always use Vaseline on my pieces to get a good release. It only takes about an hour to cure for me where I am. This time will be longer if you are in a dry and cold area, faster if you are in a hot and humid location. BTW, I live in a cooler humid area (around 55F and 60% Humidity). Depending on the piece, I generally do at least one more coat, and it usually ranges between 1/2" to 1" thick. I leave that to cure overnight. Then it is as simple as popping out your buck, coating the inside of the mold with a VERY thin layer of Vaseline and pouring what ever medium you are working with (I hear it will withstand certain molten metals too, but don't quote me on that!). There are a ton of videos on this process, and it seems they all use different techniques. You just have to choose one that works for you. The nice part is, it is an extremely inexpensive and easy to find alternative to Smooth-on products.
Caulking - Hardware store - around $5
Glycerin - Drug Store/Pharmacy/Some Grocery stores in the First-Aid area - around $10-15 for what seems to be a lifetime supply
Acrylic Paint - Craft store (optional - used to color the caulking - Just a couple of drops - handy if you are doing multiple thin layers so you can see where you have been) - around $1 - $2 for the cheap stuff.
Hope this helps, and if/when I make another mold, I will be sure to do a video on it so that I can add my technique to the mess