You are using an out of date browser. It may not display this or other websites correctly.
You should upgrade or use an alternative browser.
You should upgrade or use an alternative browser.
Aztlan's Halo 4 Rogue + Binary Rifle + M6H + Exo-suit WIP, PIC HEAVY!
- Thread starter EVAkura
- Start date
- Status
- Not open for further replies.
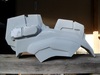
Another 6 hours down! I can see how these armor suits take so long to get to completion. After a day of applying bondo, trimming back the excess, and tons of sanding, it seems like I did so little! It is a good thing I am so patient ")

I think tomorrow I should finish this side and maybe one of the ends. I figure a week per piece is a decent pace, but realize that the larger and more intricate pieces will take longer... especially the center back... that one is getting a major overhaul of detail

I think tomorrow I should finish this side and maybe one of the ends. I figure a week per piece is a decent pace, but realize that the larger and more intricate pieces will take longer... especially the center back... that one is getting a major overhaul of detail
Attachments
Looking really good, glad you are back to your rogue... Believe me, a week is an extremely short amount of time per piece, ive been at my helmet for multiple months, and slowly progressing..., that may have something to do with i can only really work 1-2 hours a night, hopefully that willl change during the summer which is 1 day away Hope it works out.
Hope it works out.Looking really good, glad you are back to your rogue... Believe me, a week is an extremely short amount of time per piece, ive been at my helmet for multiple months, and slowly progressing..., that may have something to do with i can only really work 1-2 hours a night, hopefully that willl change during the summer which is 1 day away
Thanks! I usually get no less than 4 hours a day in, and usually more like 6-8. It does feel good to be getting back to the Rogue though
I also have to say that I am using the technique I picked up from you, but instead of using foamies, I am using balsa. Same concept, just different material.Hey thanks for the tip about molding you left me over in my thread. I was stopping by to say that your build here is progressing unbelievably well. I've been trying to keep up watching each step forward you make here and will continue to do so till completion for sure! Keep up the awesome work fellow spartan.
Thanks! I usually get no less than 4 hours a day in, and usually more like 6-8. It does feel good to be getting back to the Rogue though
Wow, you have shared so many of your techniques with me, i feel really good that i have finally been able to show you something new. Good to see you are going to be able to get a lot of work done. Im interested on how you are using the balsa and how you are sticking it to the bondo area. The reason i like foamies, is that i dont have to worry about wood grain(like balsa) and that it is flexible so it works for curved surfaces. Cant wait to see more.
- Member DIN
- S980
Amazing results on the Pulse Grenade, Light Rifle and Needle Rifle. I've been heads down for the last three weeks running around the country doing the graduation circuit. You have made some great achievements in that time. Can you add in more photo shoots of those finished weapons and their detailing? The Rogue costume bits are definitely hitting the quality mark you aim for.
Redshirt
Redshirt
Okay, something that has been on my mind for quite a while now and I am finally ready to demonstrate it.
I know that weapon mounting, especially side arms, are a particular hurdle. I have seen many options, including Velcro, magnets, holsters, and slide locks.
The slide lock mechanism is my favorite for the reason that it is very low profile and also very secure. The only downside to it for me was the bolt portion showing on the weapon.
So I decided to try to alter that portion. Granted, the part that I am using is a bit long for my pistol, but I am certain I can either get a smaller one, or simply fabricate my own. The mechanism is pretty much the same that is used in retractable ball point pens.
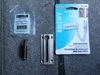
Here are the parts and what I have done to make them work with each other.
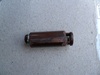
In this picture, I have taken the magnet and two metal pieces out of the end of the Single Touch Latch and have also filed the entry hole on the Chain Door Guard

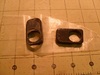
Next, I used my Dremel with the barrel sander to sand off one of the mounting portions.

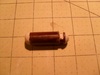
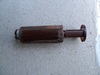
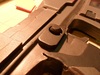
Now the other side. This leaves me just a barrel that would be inserted into the weapon to be mounted. Also, this shows the portion that goes into the slide in its extended position.

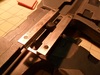
Here it is retracted. This is how it would be when not in use.

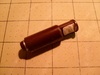
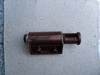
Here, I have used epoxy putty to fill the gap where the magnet and two metal pieces were. I made is just a bit wider to fit more snugly on the slide.

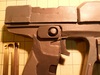
And lastly, I then added epoxy putty to the ends to replicate a more "button" look.

Next would be to drill a hole through the weapon and install the retractable Single Touch Latch, then mount the Slide lock mechanism to leg armor where the gun would go. All of this is a WIP, but I wanted to share it with you all.
I know that weapon mounting, especially side arms, are a particular hurdle. I have seen many options, including Velcro, magnets, holsters, and slide locks.
The slide lock mechanism is my favorite for the reason that it is very low profile and also very secure. The only downside to it for me was the bolt portion showing on the weapon.
So I decided to try to alter that portion. Granted, the part that I am using is a bit long for my pistol, but I am certain I can either get a smaller one, or simply fabricate my own. The mechanism is pretty much the same that is used in retractable ball point pens.
Here are the parts and what I have done to make them work with each other.
In this picture, I have taken the magnet and two metal pieces out of the end of the Single Touch Latch and have also filed the entry hole on the Chain Door Guard

Next, I used my Dremel with the barrel sander to sand off one of the mounting portions.

Now the other side. This leaves me just a barrel that would be inserted into the weapon to be mounted. Also, this shows the portion that goes into the slide in its extended position.

Here it is retracted. This is how it would be when not in use.

Here, I have used epoxy putty to fill the gap where the magnet and two metal pieces were. I made is just a bit wider to fit more snugly on the slide.

And lastly, I then added epoxy putty to the ends to replicate a more "button" look.

Next would be to drill a hole through the weapon and install the retractable Single Touch Latch, then mount the Slide lock mechanism to leg armor where the gun would go. All of this is a WIP, but I wanted to share it with you all.
Attachments
You sir, are a genius. Thats all that i can comprehend right now Now whats left for me is to make the pistol...
Now whats left for me is to make the pistol...Thanks guys!
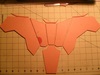
Continuing on with the mechanism...
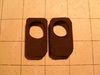
Using 1/4" foamies, I cut out the buffer part to adapt for the width of the retractable mechanism

Then I cut a hole in the pistol... <GASP!!!>

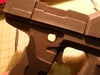
Test fit of the mechanism.

And test fit with the foamie buffer piece.

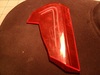
Coated with PVA and then painted and clear coated

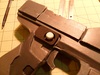
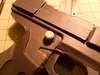
Finished piece mounted

With the slide lock

From an angle and retracted

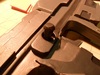
Same angle and extended

Continuing on with the mechanism...
Using 1/4" foamies, I cut out the buffer part to adapt for the width of the retractable mechanism

Then I cut a hole in the pistol... <GASP!!!>

Test fit of the mechanism.

And test fit with the foamie buffer piece.

Coated with PVA and then painted and clear coated

Finished piece mounted

With the slide lock

From an angle and retracted

Same angle and extended

Attachments
-
 SAM_1350_zps3c482061.jpg168.8 KB · Views: 283
 -
 SAM_1349_zps8c1e86a0.jpg177.5 KB · Views: 300
 -
 SAM_1348_zpsa412dfd4.jpg192.2 KB · Views: 273
 -
 SAM_1347_zps694666a1.jpg153.8 KB · Views: 288
 -
 SAM_1346_zps8fbfb799.jpg169 KB · Views: 287
 -
 SAM_1355_zps469b9735.jpg183.8 KB · Views: 283
 -
 SAM_1358_zpsa840c6e1.jpg174.6 KB · Views: 310
 -
 SAM_1356_zpscfc8fd36.jpg180 KB · Views: 270
 -
 SAM_1357_zpscb44d9b2.jpg174.6 KB · Views: 284
Loving it, i always look forward to when you post again, to see the amazing progress you do, if only i could do that with my thread, i feel like im posting to myself 75%of the time... Nonetheless, this concept that you have put into action is astonishing, cant wait to see it mounted on your suit.
Nonetheless, this concept that you have put into action is astonishing, cant wait to see it mounted on your suit.Thanks!!!!!
Jen-A266, foamies are simply craft foam that comes in varying thicknesses... usually 1MM and 6MM
Also, just because I am soooooo excited to update on this...
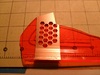
I finally decided to take a leap break out my EXTREMELY hard to find orange acrylic sheet and do some testing.
Using a piece of scrap off the main piece...
First was the bend test, follow by finding the best way to carve in detail lines. I found that a quick score with my Dremel wood carving bit, then a round file and finally 220 grit sandpaper worked the best for me.

Then I used the inside hex pieces from the painter's mask that I had custom cut

And then, the gold paint.

Finally, back to the bandsaw to cut out all the visor pieces required. They are still covered in their protective coating

A lot more ahead of me on this project, but once again... slow and easy!
Jen-A266, foamies are simply craft foam that comes in varying thicknesses... usually 1MM and 6MM
Also, just because I am soooooo excited to update on this...
I finally decided to take a leap break out my EXTREMELY hard to find orange acrylic sheet and do some testing.
Using a piece of scrap off the main piece...
First was the bend test, follow by finding the best way to carve in detail lines. I found that a quick score with my Dremel wood carving bit, then a round file and finally 220 grit sandpaper worked the best for me.

Then I used the inside hex pieces from the painter's mask that I had custom cut

And then, the gold paint.

Finally, back to the bandsaw to cut out all the visor pieces required. They are still covered in their protective coating

A lot more ahead of me on this project, but once again... slow and easy!
Attachments

The visor test looks awesome, but i dont understand what the painters tape thing is, is it something they cut and then you peel up and it leaves the hexagons? or what?
The painter's mask is made from a vinyl based material that is adhesive. It comes on a 28" wide roll. I had my local sign shop used their plotter to cut out a 28" x 28" design of 1/4" hexagon with 1/16" "spacer". Cost me $50, but was well worth it.
Since I don't really need the inside hexagon pieces, I decided to use them for the helmet's visor. It is very time consuming sticking them in position, but is certainly worth it. Also, this way I can make it around bends, corners, and detail lines with ease... something that the "spacer" part would have difficulty doing. BTW, that spacer part is for the Needle Rifle
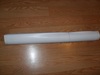
Here is a pic close-up so you can see all the hex pieces... the ones I removed and the ones still in place.

And here is the overall roll

Since I don't really need the inside hexagon pieces, I decided to use them for the helmet's visor. It is very time consuming sticking them in position, but is certainly worth it. Also, this way I can make it around bends, corners, and detail lines with ease... something that the "spacer" part would have difficulty doing. BTW, that spacer part is for the Needle Rifle
Here is a pic close-up so you can see all the hex pieces... the ones I removed and the ones still in place.

And here is the overall roll

Attachments
I want!!!!!!!!!!
blueofhills
New Member
Dude your costume is scary good. You have any fancy plan to conceal the metal slider that the gun will attach to? Cant wait to see next post.
That slider idea is pure genius! Mind if I steal it and start plotting ways to do this on my suit?
And as always, keep up the great work! You're doing an amazing job, and I seriously hope to get the opportunity to see the finished suit in person, some day
And as always, keep up the great work! You're doing an amazing job, and I seriously hope to get the opportunity to see the finished suit in person, some day
- Status
- Not open for further replies.
Similar threads
- Replies
- 2
- Views
- 467
- Replies
- 2
- Views
- 1,409