BillBill Builds A Noble Six Suit

Billbill36

Member
Hey Everyone!

It’s time for my bi-yearly suit build. I’ve started and stopped a couple builds over the past five years, and made a few helmets as well but never finished a full suit. Life and cross country moves kept getting in the way, but now that we’ve settled into our own house I can’t see myself leaving anytime soon.

So I’m sticking my stake in the ground, I will finish my Noble Six suit by December… Probably!

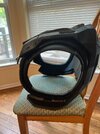
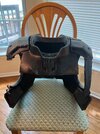
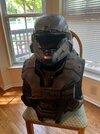
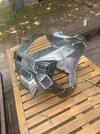
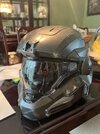
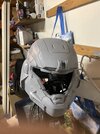
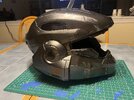
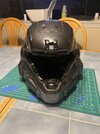
The plan is to have a full default Noble Six, I want this to be as accurate to the game as I canon, full 3d printed armor and casted undersuit.

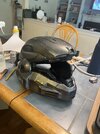
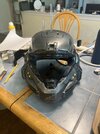
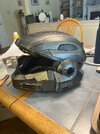
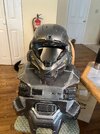
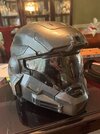
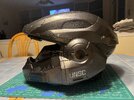
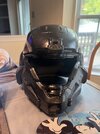
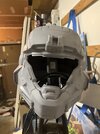
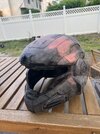
So far I’ve printed the Mark V from NerdForge Designs, and gotten it painted and started decaling it up.

Appreciate any help, ideas and feedback!
 

Attachments

  • EF83F7BF-8D98-42D1-A0B9-2E31B9FD39A3.jpeg
    EF83F7BF-8D98-42D1-A0B9-2E31B9FD39A3.jpeg
    1.6 MB · Views: 284
  • 76C48D5D-DE9A-4952-9DAC-27E541649F81.jpeg
    76C48D5D-DE9A-4952-9DAC-27E541649F81.jpeg
    3.6 MB · Views: 292
  • CF48B954-532C-443D-ACF4-C0E0BBD6C455.jpeg
    CF48B954-532C-443D-ACF4-C0E0BBD6C455.jpeg
    1.8 MB · Views: 274
  • 64A4A0B7-BF8C-41BC-84F9-F22FFC292ADA.jpeg
    64A4A0B7-BF8C-41BC-84F9-F22FFC292ADA.jpeg
    3.4 MB · Views: 280
  • E41A1D65-6436-43DA-BED4-57F851ECDF89.jpeg
    E41A1D65-6436-43DA-BED4-57F851ECDF89.jpeg
    1.7 MB · Views: 244
  • E561090E-5BE5-4DF1-9E3E-4CDC96379385.jpeg
    E561090E-5BE5-4DF1-9E3E-4CDC96379385.jpeg
    1.7 MB · Views: 275
  • 7582FDA5-29A9-4176-B932-14CEEA53B0EC.jpeg
    7582FDA5-29A9-4176-B932-14CEEA53B0EC.jpeg
    1.3 MB · Views: 239
  • 553B485F-9BFB-42DD-AA61-E3271CF6328A.jpeg
    553B485F-9BFB-42DD-AA61-E3271CF6328A.jpeg
    1.7 MB · Views: 274
This looks really good! What color paint did you use? I was just planning to get a generic grey, as the in-game color just says "Steel"
 
Thanks!

All the paint besides the primer are Duplicolor. I did a base coat of Universal Chrome, and then Storm Gray for the main parts, and Brilliant Black Pearl for the area around the visor and details.
 
Update Time:

Helmet is detailed up and clear coated with a semi gloss finish. I may still weather it further with a black/brown wash but I'm happy with how it looks for now.

I've also made major progress on the chest. It's two main sections, back and sides and then the front chest plate. The front chest is held in place by friction, it takes a good bit of force to put it in and to remove it, so I'm not too worried about it coming loose while being worn.

The biggest problem I ran into was the shoulder gasket/undersuit seal, whatever you want to call it. In hindsight I probably should have printed this separately, but I was worried about it all fitting together because of the tight tolerances. So I printed it partially merged to the chest. This guaranteed that it'd fit properly, but has two minor/major issues that needed/need addressed.

1. How do I get in? I was worried about actually fitting in the suit, so I made a magnetically detachable section that you can see in the second image. I can slide into the suit while they're off, and then the snap back into place. Once attatched they're in decently well, I'm not worried about them coming lose when I move my arms.

2. How do I paint these? This is my bigger issue, but I have time to figure it out. What's the best way to get a different look from the rest of the suit? I was thinking plastidip, but I'm not super familiar with how to use that. Years ago I used it on another suit I started and never finished, and the looks turned out good but it did not last over time. It started to peel and chip in places where it made contact with the rest of the suit in movement. Also, can you mask off plastidip? Would it be better to paint the rest of the chest, mask of the normal paint and then paint the undersuit, or plastidip the undersuit first while masking off the rest of the suit, then mask off the undersuit and paint the rest?

Probably should have thought this though earlier but by the time I realized I was too far in and didn't want to turn back....
 

Attachments

  • image3.jpeg
    image3.jpeg
    1.7 MB · Views: 272
  • image2.jpeg
    image2.jpeg
    1.6 MB · Views: 253
  • image1.jpeg
    image1.jpeg
    1.8 MB · Views: 266
  • image0.jpeg
    image0.jpeg
    1.6 MB · Views: 264
I've got a lot of progress to post soon, just need to finish some sanding and bondo. But in the meantime, does anyone have a Pepakura file for the Reach Ab Wrap? I couldn’t find one in the Armory.

I still plan to do a urethane cast at some point but I want to try foam in the meantime, it'll be more feasible and allow me to have a more "finished" product sooner.

Thanks in advance!
 
Last edited:
I've got a lot of progress to post soon, just need to finish some sanding and bondo. But in the meantime, does anyone have a Pepakura file for the Reach Ab Wrap? I couldn’t find one in the Armory.

I still plan to do a urethane cast at some point but I want to try foam in the meantime, it'll be more feasible and allow me to have a more "finished" product sooner.

Thanks in advance!
Not sure if there are any files out there, but check out this thread if you haven't. May give some inspiration:
 
I ended up purchasing WandererTJ's Reach set from Etsy. He let me know that they're included in that file set. I've got my EVA foam and tools, ready, just need to get the time to build it : )
 
Minor/major update time. I’ve gotten the initial coats of paint into the chest. I ended up reprinting the chest do to major structural issues. The new chest has metal dowels reinforcing the joints, metal staples, stronger super glue and additional plastic welding on the outside of joints.

Keeping with the same general paint scheme as the original helmet (which is also being reprinted, scaled down about 3% to better match the game scale), this uses Duplicolor Storm Grey Metalic, over a universal chrome under coat. I’m using a new matte black since the old one was too shiny for my liking.

Hand painted the grey details around the side of the chest, on the front control panel and by the shield emitters on the front, and added a metallic silver on the first of the chest “ribs” or what ever you want to call the segmented sections of the abs, as well as on the back along the spine area.

I’ve got water slide decal paper that I’m going to test on the old helmet to work on my blending skills, and once I’m confident enough I’ll add the UNSC logo and other decals.

I don’t have good pictures but the waist, shoulders, biceps, forearms, thighs and shins are all printed and glued together. I still need to work on the boots, I want to find a way to add just another 2 inches to get me to my ideal height of 6’8” in armor.

This paint scratches like no other though, so the sooner I get the decals on and the sooner I can seal it the better. I’ve tried to dry brush silver where I could to alleviate it lol
 

Attachments

  • 5933A84D-C88F-47DA-948F-DA67006271E5.jpeg
    5933A84D-C88F-47DA-948F-DA67006271E5.jpeg
    2.2 MB · Views: 223
  • 2DE0E8E2-F8DF-467D-8429-E2B79A5D1D34.jpeg
    2DE0E8E2-F8DF-467D-8429-E2B79A5D1D34.jpeg
    1.9 MB · Views: 239
  • 4C19422C-B66D-4E32-A174-F8324386229F.jpeg
    4C19422C-B66D-4E32-A174-F8324386229F.jpeg
    1.5 MB · Views: 231
I'm planning on using SpecialOpsJoe's/Random Ranger's from this thread here, I saw someone post a method on doing it but I can't find it atm, but basically, my understanding is I print it out on decal paper I got from Amazon, soak in water till the backing comes off, and then apply. Kind of like Gunpla decals which I have a little experience with.
 
New Helmet is printed and painted. Sized down about 4% compared to the previous one. Not as happy with the finishing job as compared to the previous one, missed a few places like the front of the ear/cheek/whatever parts on the side of the helmet when removing layer lines. But I made up for it in my mind with a better result in the UNSC stencil on the sides.

Overall it’s matches the torso a little better which was slightly lighter than the original helmet and I'm happy with how it's all coming together.
 

Attachments

  • 47DDFE29-4093-4998-9799-F2B93A281383.jpeg
    47DDFE29-4093-4998-9799-F2B93A281383.jpeg
    1.6 MB · Views: 220
  • AECA7B9B-F140-4498-AA7B-1DFCD12F3EDE.jpeg
    AECA7B9B-F140-4498-AA7B-1DFCD12F3EDE.jpeg
    1.7 MB · Views: 228
  • 5ED5030F-7A31-4FCD-AC66-551612A24357.jpeg
    5ED5030F-7A31-4FCD-AC66-551612A24357.jpeg
    1.8 MB · Views: 232
  • D5E3F7A0-26BF-41DB-8ECE-2BB89763EC66.jpeg
    D5E3F7A0-26BF-41DB-8ECE-2BB89763EC66.jpeg
    2.1 MB · Views: 217
WOW! Looks amazing so far! Can't wait to see the rest! Those files look familiar. Are they Titlewaves?
 
I want to say it’s Nerdforge Designs, modified slightly to have indents for the triangles. I know I did have Titlewaves file at some point, but I had some issue with it that made me look around at other files. I think it was the default scaling.

My previous helmets were Nerdfore so I knew how his helmets scaled vs my head lol

I ended up with NerdForge, Titlewave, and Galactic Armory’s files for the helmet.

The chest and the rest of the body were from Instinct Creative over at Wireframe 3D. He’s a super nice dude who makes great files, I’ve used his stuff for a TV Show Chief helmet I made and a EOD I started but never finished.
 
Last edited:
Got one of the thoughts painted up. Had a bad case of paint failure so I had to strip this down to primer and repaint. I think the chrome base coat was on its way out, and the solvent left in there ended up eating the grey and black paints after.

Went back to primer and redid the silver and grey, ended up hand painting the black.

I have neodymium magnets inside that’ll hold the magnum I printed. They're placed into a divot I cut out in 3D Builder, so the distance between magnets is minimized as much as possible. With the four magnets on the thigh and three in the pistol it holds up to just about anything short of running.

I’ll probably end up brush painting the inside part of this and the rest of the armor black or something to blend it in to the undersuit, but that’ll be for another day
 

Attachments

  • 28507451-E595-4713-94D0-D38A1997B113.jpeg
    28507451-E595-4713-94D0-D38A1997B113.jpeg
    1.7 MB · Views: 226
  • 722EB69A-DFC0-44CF-8C15-2CAFF50886D4.jpeg
    722EB69A-DFC0-44CF-8C15-2CAFF50886D4.jpeg
    1.7 MB · Views: 207
  • 3EE64FEE-21BE-42D4-BA13-DDDDC6F2D544.jpeg
    3EE64FEE-21BE-42D4-BA13-DDDDC6F2D544.jpeg
    1.7 MB · Views: 223
  • 1B8CF844-4F45-443B-8E6E-1A06A385B197.jpeg
    1B8CF844-4F45-443B-8E6E-1A06A385B197.jpeg
    2 MB · Views: 226
Last edited:
Added the gasket/undersuit components to the chest, was worried it’d raise the chest a bit too high but the gap between the waist and chest isn’t too bad I think. With the thighs on and less droopy sweats/an actual morph suit or something I think the proportions will work out nice.

Arm mobility is a little limited when wearing the bicep armor, but there’s only so much that can be done there, it wasn’t great without the gaskets so it’s no big loss
 

Attachments

  • 57D10D64-556C-4E67-B620-54D26E9CE527.jpeg
    57D10D64-556C-4E67-B620-54D26E9CE527.jpeg
    1.6 MB · Views: 206
Weird, could have sworn I posted an update last week. Wonder what happened there lol

Since my last post I’ve been working on vacuum forming a visor for the helmet, painting the legs and getting a harness set up.

Harness goes from out from the waist, up to the shoulders, and with straps for the legs going down.

For the lower legs I’m trying to get a dirtier look as you get lower down, like they’ve trekked though mud and water. I’ll try to keep getting darker and dirty for the boots once I get some height boosting shoes and get those ready to go.

(I did botch the angle on the black section of the lower leg, gonna maybe have to adjust it however I can )
 

Attachments

  • C3DDABEC-EF90-41D5-AB5A-362F5887DA48.jpeg
    C3DDABEC-EF90-41D5-AB5A-362F5887DA48.jpeg
    1.5 MB · Views: 196
  • 7645520E-0B03-4A5C-9DA0-B69871126CD9.jpeg
    7645520E-0B03-4A5C-9DA0-B69871126CD9.jpeg
    1.6 MB · Views: 213
  • A794A695-394D-4EF5-97A5-A8F074FD0643.png
    A794A695-394D-4EF5-97A5-A8F074FD0643.png
    13 MB · Views: 188
  • E7F4FB0E-E1BF-4C40-BCB5-208F6D4E8B49.png
    E7F4FB0E-E1BF-4C40-BCB5-208F6D4E8B49.png
    11 MB · Views: 229
  • A987A2F3-5606-4FA7-93FB-2B160D4CA694.jpeg
    A987A2F3-5606-4FA7-93FB-2B160D4CA694.jpeg
    1.5 MB · Views: 192
  • 10BAB54A-E906-44FB-8601-9E357AD677AA.jpeg
    10BAB54A-E906-44FB-8601-9E357AD677AA.jpeg
    1.2 MB · Views: 204
Last edited:

Your message may be considered spam for the following reasons:

If you wish to reply despite these issues, check the box below before replying.
Be aware that malicious compliance may result in more severe penalties.
Back
Top