Sorry yall, I'm kinda terrible at doing consistent updates but I'm doing one now, so better late then never right?
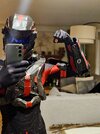
The main thing I've been working on is my new BR. I have a magnum but I didn't have a primary weapon so I decided to print a DMR. That is, until I remembered a very durable and cheep Foam BR a fellow 405th member suggested.
Amazon Link: That said, the paint job didn't look that great, and I wanted to make it look specialized for assassination's and general head hunter shenanigan's. I Saw post on Instagram by a 3d artist and a flood of ideas came rushing in.
So I bought the foam BR, modeled all that attachments, printed them off and got to work. The first step was clean up and prepare the foam BR for paint. Such as filling in seams and imperfections and cutting off the old scope.
Then I did some test fitting with all the attachments it looked awesome! So I put on a couple coats of silver paint, then after some clean up I gave it round of gun metal gray. This was quickly becoming one of the coolest things I've ever made and there was nothing that was going to stop me from finishing it.
The next step was to paint on the red and black which took an excruciating amount of time. Then I did all the details and the base colors/paint was done!
Finally, it was time for the best part, weathering. This was also my first time using oil paints for the dirt and grime and I'm super proud with how it came out.
This was one of, if not than my favorite builds I've ever made. I would have made a whole forum for it but by time I realized I should make one I was well over halfway done because I was too exited to finish it.
Now as far as the armor itself goes, I've mostly been doing tests on the new undersuit. The neck being sewn on backwards was a blessing in discise because I reached out to them and they sent me another suit for free. This meant I could test and try all sorts of stuff with the "bad" suit without any worry of ruining a good suit. Some of the tests I've been doing are, making the lines pop more, Adding 3d elements, attachment points for the armor, airbrushing shadows/highlights, etc etc... Here's how its looking so far.
Its a massive improvement to the original and hopefully it will only look better from here.
The next things I will be doing is continuing to do tests with the new undersuit to make it look as photo real as possible. I'm going to redo the weathering on my armor. I need to remake the bicep/shoulder armor. Finally I will continue to make minor improvements throughout the suit.
It might be a bit until my next update because I'm moving and a lot of what I'm doing right now is researching and testing so there's not too much to talk about. Also sorry there's no pictures, it wasn't letting me add them for some reason.) Thanks for reading!