Saiyanberg
New Member
Hey! I used to be a part of the community years ago but made a new account.
I recently started my first build after getting familiar with my new ender 3 v2. I found quite a few files online for my armor, and even scaled some in armorsmith.
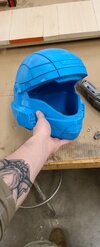
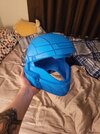
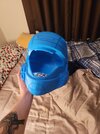
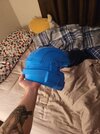
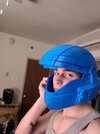
After spending a week printing my ODST helmet in overture pla+, I realized the helmet seemed pretty big. I was sure I measured the circumference of my head pretty well and tried my best to get the helmet as close as possible to my model's head within reason.
I know ODST helmets are kind of big ingame, but my helmet has quite a bit of wiggle room and will need a bit of padding. Is that normal? Like will it look even once I wear the rest of the armor? Would suck if I just wasted a week and $20 of filament.
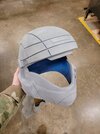
Also if anybody has any suggestions for epoxy's or more efficient ways to smooth/fill gaps on my armor from seams/print lines, i'd love to know! Currently just working with gorilla glue gel and sandpaper/dremmel.
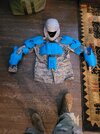
I'll post a picture of me wearing the helmet in a bit.
Thanks!
I recently started my first build after getting familiar with my new ender 3 v2. I found quite a few files online for my armor, and even scaled some in armorsmith.
After spending a week printing my ODST helmet in overture pla+, I realized the helmet seemed pretty big. I was sure I measured the circumference of my head pretty well and tried my best to get the helmet as close as possible to my model's head within reason.
I know ODST helmets are kind of big ingame, but my helmet has quite a bit of wiggle room and will need a bit of padding. Is that normal? Like will it look even once I wear the rest of the armor? Would suck if I just wasted a week and $20 of filament.
Also if anybody has any suggestions for epoxy's or more efficient ways to smooth/fill gaps on my armor from seams/print lines, i'd love to know! Currently just working with gorilla glue gel and sandpaper/dremmel.
I'll post a picture of me wearing the helmet in a bit.
Thanks!

")