Nothing wrong with wanting to have an awesome paint job over battle damage.
Hmmm. As usual having the best of both worlds would be nice
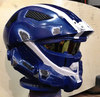
") . What would you guys recommend I do? I was thinking that during the wet sand I did earlier in this thread I created some nice looking scuff marks purely by accident - maybe I could take some 150 grit sandpaper and hit it one direction and see what happens.
. What would you guys recommend I do? I was thinking that during the wet sand I did earlier in this thread I created some nice looking scuff marks purely by accident - maybe I could take some 150 grit sandpaper and hit it one direction and see what happens.