Charlie117
Member
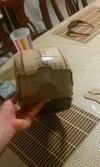
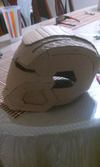
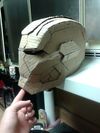
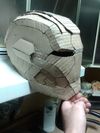
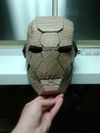
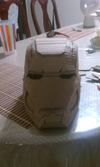
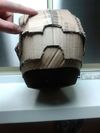
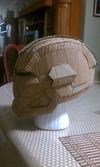
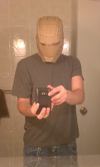
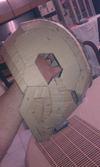
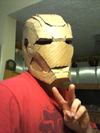
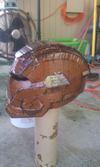
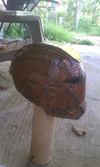
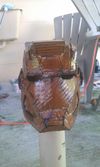
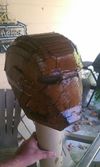
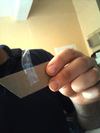
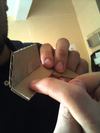
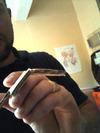
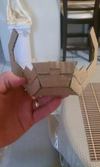
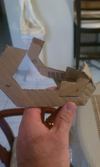
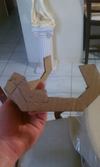
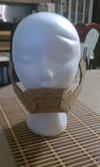
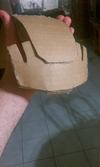
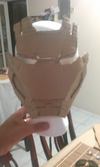
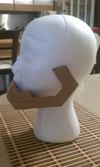
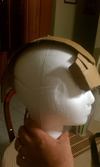
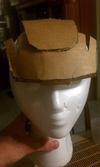
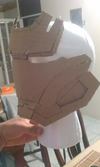
Hey guys, it's been quite some time since ive haven't been here. So i decided to practice with cardboard since it involves the same method as foam building , well not angle cuts but easy builds since you don't need flaps. So this is my first cardboard armor ever , ive never worked with it NEVER! and my first helmet made out of it too . I am quite happy with it , it turned out great and the scale too mmm yeah i love it. The plan is so i can get a hagn of it so i can keep making helmets out of cardboard instead of pepping because i hate flaps and sometimes numbers dont aligned quite well with other numbers or flaps get in the way and you get a messy helmet that doesn't resemble the pep viewer model and with cardboard it's easy to put them toquether and so on. I started doing this at 7 am and finished it on 9 pm long enough lol but it paid off. I had to do the top part again because it turned out funny looking because i forced too much the pieces and it got bent the wrong way but i managed to make it circular and it turned out perfect atleast for me since you guys have an amazing ability to spot imperfections but its ok since i need criticism for this. The helmet was also a little warped but i fixed it with heat using a heat gun, i heated the parts were they were warped and then hold them in place while they cooled down and they got fixed. The top part for those of you who dont know a little trick althoug i don't consider myself a pro but i learn something and i want to share with you guys that don't know is that when you have curved pieces lets say like this you can tape them and they will stay angled and instead of glueing the piece and waiting for it to cooled and then seal it on the inside with more glue you just tape them and glue them on the inside and when it cools down you dont have a mess of glue sticking out or ugly seems and you remove the tape. That works like a charm in foam too after you make your angle cuts specially if you have an ugly angle cut you do that and you can make it look perfect since its beign placed with tape while you glue it on the inside, ill show you guys a pic for an example. So yeah am in the process of hardening it from the inside and hopefully will start on bondo and sanding it ") . For those of you who want to know the scale is set to height 288mm and i did some modding since theres alot of files already for foam but remember that foam and cardboard dont have the same thickness, atleast the cardboard that i used was not thin but not thick. It was a Ronzoni Pasta box , a couple of them actually. The meaning of this proyect is i want to try and attempt to do a halo 4 masterchief helmet out of cardboard and then move on the suit for the halo 5 midnight launch that is next year ( thats my main focus right now ) so since this helmet came out pretty well for my first one and using the foam method wich you all know that foam helmets are insanely difficult specially for me well i love working with cardboard and i want to give it a go. Once i finish hardening it on the inside , while it hardens ill mod the chiefs helmet for cardboard and hopefully start there. Thank goodness i have a mentor too lol Caboose vs Grif for my foam armor . I know theres alot of time for me to do this but since i have 2 jobs well i barely had any time to make it so thats why i know that i will have the suit completed for that specific day so here are the pics , hope you all like the helmet , and feel free to tell me how i did since i need everyones help , its ok if the helmet sucks or if i need more practice etc because the chiefs helmet is not joke , is a hard hardddd helmet and well it will be a little harder in cardboard but i want to do it so bad lol. Also i decided to make the patriot since for me hes easy to make like hes foam or cardboard friendly and well because i like it , i prefer more war machine but i want to start with something "easy" .
. For those of you who want to know the scale is set to height 288mm and i did some modding since theres alot of files already for foam but remember that foam and cardboard dont have the same thickness, atleast the cardboard that i used was not thin but not thick. It was a Ronzoni Pasta box , a couple of them actually. The meaning of this proyect is i want to try and attempt to do a halo 4 masterchief helmet out of cardboard and then move on the suit for the halo 5 midnight launch that is next year ( thats my main focus right now ) so since this helmet came out pretty well for my first one and using the foam method wich you all know that foam helmets are insanely difficult specially for me well i love working with cardboard and i want to give it a go. Once i finish hardening it on the inside , while it hardens ill mod the chiefs helmet for cardboard and hopefully start there. Thank goodness i have a mentor too lol Caboose vs Grif for my foam armor . I know theres alot of time for me to do this but since i have 2 jobs well i barely had any time to make it so thats why i know that i will have the suit completed for that specific day so here are the pics , hope you all like the helmet , and feel free to tell me how i did since i need everyones help , its ok if the helmet sucks or if i need more practice etc because the chiefs helmet is not joke , is a hard hardddd helmet and well it will be a little harder in cardboard but i want to do it so bad lol. Also i decided to make the patriot since for me hes easy to make like hes foam or cardboard friendly and well because i like it , i prefer more war machine but i want to start with something "easy" .


. For those of you who want to know the scale is set to height 288mm and i did some modding since theres alot of files already for foam but remember that foam and cardboard dont have the same thickness, atleast the cardboard that i used was not thin but not thick. It was a Ronzoni Pasta box , a couple of them actually. The meaning of this proyect is i want to try and attempt to do a halo 4 masterchief helmet out of cardboard and then move on the suit for the halo 5 midnight launch that is next year ( thats my main focus right now ) so since this helmet came out pretty well for my first one and using the foam method wich you all know that foam helmets are insanely difficult specially for me well i love working with cardboard and i want to give it a go. Once i finish hardening it on the inside , while it hardens ill mod the chiefs helmet for cardboard and hopefully start there. Thank goodness i have a mentor too lol Caboose vs Grif for my foam armor . I know theres alot of time for me to do this but since i have 2 jobs well i barely had any time to make it so thats why i know that i will have the suit completed for that specific day so here are the pics , hope you all like the helmet , and feel free to tell me how i did since i need everyones help , its ok if the helmet sucks or if i need more practice etc because the chiefs helmet is not joke , is a hard hardddd helmet and well it will be a little harder in cardboard but i want to do it so bad lol. Also i decided to make the patriot since for me hes easy to make like hes foam or cardboard friendly and well because i like it , i prefer more war machine but i want to start with something "easy" .


Attachments
-
 IMAG0365_zpsb1be3701.jpg49.6 KB · Views: 206
 -
 IMAG0366_zps3f6b4944.jpg46.8 KB · Views: 200
 -
 IMAG0367_zpsb04a6369.jpg52.1 KB · Views: 185
 -
 IMAG0368_zpsccd98b55.jpg61.5 KB · Views: 187
 -
 IMAG0353_zps55635b81.jpg54.5 KB · Views: 199
 -
 IMAG0370_zpsf303f596.jpg40.6 KB · Views: 203
 -
 IMAG0369_zps3235a027.jpg75.2 KB · Views: 202
 -
 IMAG0357_zps6b7f6530.jpg49.3 KB · Views: 198
 -
 IMAG0355_zpsbdbebfdb.jpg41.5 KB · Views: 200
 -
 IMAG0372_zpsb744914a.jpg47.5 KB · Views: 219
 -
 IMAG0371_zps3f732620.jpg43.1 KB · Views: 200