LyGal DyAv
New Member
Hello everyone!
As the title says, this is my 1st ever cosplay build! This build is fully 3D Printed with a Bambu P1P, with the exception of the torso under suit, which was a combination of EVA foam and 3D printed materials.


A quick back story on me, I am a long time Halo fan, since me and my older brother played together when we were kids. Making a Halo cosplay has been a childhood dream of mine since I watched Andrew DFT's builds on YouTube. That was back in 2012, when I was a freshman in High School! Time has flown since then!. Around late February of 2025, my good friend from college Barbcelona helped persuade and hype me up to get a 3D printer! I have not seen too many Halo cosplays at this point. I have only seen his 1st cosplay build, Andrew DFT's cosplays, and Dat_Boi_Builds. Barbcelona explained his experience with me and encouraged me to become my own spartan. So huge shoutout to him! He helped me out with not only advice, but even aiding me to vacuum form my visor, rig, and weather my cosplay! The latter two being the night before my 1st con, Momocon 2025!
This build began on March 1st, 2025 and this first iteration was completed on May 25, 2025. I am very proud of what I was able to dish out in just under three months. It was a crunch, and I was unable to post an updated process throughout the build due to my full time job and lack of time. And one final time, I would have not been able to make the crunch without Barcelona's assistance! I plan to make adjustments and additions for Dragon Con 2025.
I will document my process on this in the future! As of posting this I am in the middle of unpacking and have not been able to set up my 3D printer at my new location.
Now that I have the back story out of the way I will start with my source material, planning, and process.
1) The Concept and Reference
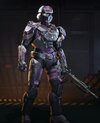
Halo Infinite - MJOLNIR Mark VII Armor Core Reference Details


I decided to go with with my Halo Infinite Multiplayer Mk VII Core. I have always loved 343's iteration of scout from Halo 4 and 5, and knew I would make this cosplay with the Celox helmet! I chose the colors based on my Twitch Channel colors and a character I have drawn over the years.
2) Initial Planning and 3D Files
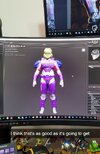
Before my 3D Printer arrived in late February, I did a ton of research on other builds and took a lot of direct advice from Barcelona. My main concern was properly scaling my armor parts to my body and avoiding reprinting parts. I watched a lot of videos from Frankly Built (Absolute GOAT Cosplay Channel) on YouTube to learn about 3D printing and how to scale armor parts using Armorsmith. At this point, I searched for the 3D files I would use and installed Bambu Studios, 3D Builder, Armorsmith Designer, and Blender.
I started off with obtaining the 3D files for the Celox Helmet and the MK VII Armor Core. I would later commission a 3D modeler I encountered over Instagram for the shoulder, knee, chest attachment, and gloves. Below are the 3D files I used with the creator and direct links to their respective Etsy page.
He also made my Corvan Gloves, but I was unable to print them in time for Momocon. He does have the file on his Etsy page!
3) Helmet Process
Scaling
.png")
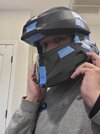
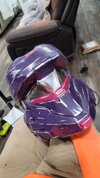
For scaling my helmet, I followed Frankly Built's YouTube Video on scaling helmets. I measured my head using cosplay calipers I got from UncleJessy on Thingiverse. I measured from the bottom of my chin to top of head, temple to temple, and from nose to back of head. Fortunately, Walsh3D made a very detailed, yet easy to use model. They made the helmet with multiple parts that fit together seamlessly, taking advantage of the actual seams of the helmet. Because of this, no splicing was required, which made scaling and printing this helmet very simple. Due to the in-game design of the Celox helmet, I knew it wouldn't fit over my head as one piece. So I chose to split the helmet into two portions (The back plate/neck seal and the rest of the helmet). This was also recommended and designed to be split this way by Walsh3D.
I ended up doing a uniform scale of the helmet to fit the largest measurement of my head inside the smallest measurement of the helmet (Which ended up being the side walls). I used 3D Builder's measure tool to measure the areas of concern and compared it to my head measurements. A uniform scale of 113% made the smallest inner dimension work to fit my head.
Printing, PLA Welding, and Magnets

It was recommended that I start off printing something small for my first print, like a Halo sidearm prop before diving into printing the helmet. Well, I printed a squishy turtle and decided to full send it with the Helmet! The helmet file consisted of 12 separate parts (not including the visor buck, which I didn't know what it was for at this moment), which I laid over 6 different build plates on Bambu Studios.
At this point I also began to track my filament usage on my 3D printed models, via google sheets. I will go into further detail on this spreadsheet towards the end of this post.
Once I had all the helmet parts printed. I put them all together, held by masking tape, to confirm everything would fit my head, which it did! The next step was to permanently attach the helmet parts together. From my research, PLA welding was the strongest method to attach these parts, so I used my soldering iron and went to work! I followed Frankly Built's Video for guidance on PLA welding. I would keep the parts held by masking tape then welded the parts from the inside of the helmet together, making sure to cross over and overlap the two parts with my welds. Once that was done I pulled the tape off and tugged the parts to confirm they were strong holds. Lastly I used 10x3mm disk magnets to hold the back plate to the front section of the helmet. The helmet had enough friction strength to not fall apart when it is worn, but the magnets kept it from shifting around. The model had indents for disc magnets built in.


Sanding and Priming

Here I will admit, I was not efficient on sanding and filler priming my helmet, at all. While it was very smooth, I did not have to spend the amount of time and resources for sanding/filler priming this thing. For the helmet, I started off with 80 grit, prime, 120 grit, prime, 220 grit, prime, 400 wet, prime, another 400 wet pass, followed by the final filler prime coat XD. Between pass overs I added Bondo Spot Putty to fill the deeper layer lines. When I told my fiends I used 4 cans of filler primer on my helmet alone, they were shocked lol. My inexperience also made sanding take a long time due to sandpaper clogging. I got more efficient with my sanding process down the road on my other armor parts, thankfully.
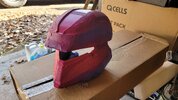
Primary and Secondary Colors


The armor consisted of a dark purple primary, a magenta secondary, and a rose gold tertiary color. The helmet only used the primary and secondary. I used Rust-Oleum spray cans for the purple and magenta colors. I started with the magenta color, masking off the areas that would be purple. I did a light initial coat, then followed up with two other coats, about 20 minutes apart. The next day I did the same process, but with the purple paint, masking off the magenta areas.
Weathering
For the weathering on the helmet, I used black and silver acyclic paint. I mixed the black acrylic paint with water then brushed it on, making sure to cover the crevices on the helmet. I then got a rag and wiped the excess paint off the helmet. I made sure to put an extra layer or 2 of blackwash on the magenta areas, since they were a bit too bright and made the helmet look like a toy. I immediately followed up with the silver paint, dry brushing scratch marks. I mainly wanted to make scratches come from shrapnel coming from the front side of the spartan. I did make a larger scratch mark on the back of the helmet, to make it seem the spartan took a big hit in the back. However, I am to this day split on this mark, lol.


Visor and Internals

Barcelona was a huge help on vacuum forming my visor. We had a bad 1st 5 attempts on the 1st day due to malfunctions on his setup. But the next day we attempted it, we were able to dish out 3 successful visors! I then got a Iwata Revolution Airbrush and a Timbertech Air Compressor to apply Spaz Stix Mirror Chrome. This was the 1st time I used an airbrush, and after a few sprays on some paper, I put two very light coats over the back section of the visor. I would then hold the visor over in place on the helmet and put it on to confirm my face could not be seen. The visor was then fixed into place using hot glue. For my helmet padding, I just started adding/super gluing upholstery foam at the top so the visor was level with my eyes, then added foam on the front and back sections to prevent the helmet from twisting/rotating around and to keep it centered from my side profile.
The helmet internals I had planned included headphones/microphones to amplify exterior audio, two internal fans for air circulation, and a microphone/speaker amplification setup. I was only able to install the former 2. I followed Crimson's tutorial on creating a helmet speaker system. I had difficulty picking a spot for the exterior microphones and keeping them subtle enough to not be noticed. I ended up putting them within the two rectangular notches on the bottom front plate of the helmet. I drilled the holes in my helmet and superglued the microphones in. I fortunately had enough space to make use of the shooting headphone's padding with my helmet. It made the helmet much more snug and allowed me to hear from the speakers much better. I was able to fix the volume dial and main board over the front neck seal, allowing me to adjust the volume while keeping my helmet on and keeping it concealed. Lastly, I placed the two fans above and below my visor to prevent fogging. All of these devices were powered by a small power bank that was placed underneath my chest armor.
Now, all of these internals worked as expected the night before the con. I was unable to properly solder the wires together, since I was at a hotel and didn't want to risk getting solder on the furniture and making the room stink up. So I ended up twisting the copper wires and using electrical tape. Unfortunately, the morning I was suiting up for the convention, my power bank fell out of my chest piece and it pulled the power wire for the speaker system and one of the fans. So I only had one fan for the con, and it was not enough to prevent fog from building up. As soon as I got inside the convention, I could not see or hear much lol. Great lesson I learned here.


4) Body Armor Process
Scaling and Slicing Armor Models

For the armor scaling I started to measure my body dimensions and input them onto Armorsmith, however, my avatar came out looking like the Beast Titan, from Attack on Titan... So I browsed around the 405th and came across @KaeSpoon's Tutorial on Importing a 3D Body Scan to Armorsmith. This was not only a very well made tutorial, but also made the scaling process much less daunting to me. Once I had my 3D Body Scan scaled properly, I did a combination of non-uniform and free scaling to get the armor properly scaled to it. I did make the forearms and thigh parts slightly too long, but was manageable enough to wear at the convention. I plan to scale these down and remake them for my next convention. I highly recommend getting your body 3D scanned to scale your armor parts.
Since the armor parts were not conveniently split like my helmet files were, I had to learn and experiment with splicing the body armor models to fit my print bed. I started with the forearms and did a simple splice making two separate prints for each forearm. The biceps did not require any splicing, so those were printed as a whole. I found out about dovetail splices on Bambu Studio and learned it would help line up armor parts for PLA welding. I used this method for the remaining body armor parts, if they required splicing. I wished I did some research or had the foresight to make the dovetail seams on areas of the model with low details. I ended up making these dovetails on the most hard to reach spots on my chest/back armor parts. Which made the sanding process on these areas more difficult. Once I had the files scaled and spliced on Bambu, I started to print the armor parts.


PLA Welding, Sanding, and Priming

As I stated before, the dovetail splices really helped with lining up the armor parts for PLA welding. I used masking tape to hold the parts in once they were lined up and PLA welded together. I originally wanted to use magnets and velcro straps to secure the greaves. I ended up PLA welding the two parts together and trimmed off enough of the lower sections so my foot could fit though the other end. I did not have to do any material trimming apart from the greaves.
Some dove tail areas needed to be sanded with 80 grit to slide into each other. It was at this point of the build process that I realized, I really did not like sanding lol. I invested in an orbital sander which helped a lot with the areas that were large and flatter. I still had to hand sand the more detailed areas, however. I did get more efficient with my sanding techniques and filler primer usage. Any parts of the armor that had bad seams or deep layer lines, I put Bondo Spot Putty on then used 80 grit sandpaper to level off the areas with extruding/uneven seams. Once I got the rougher areas evened out, I put two thick coats of filler primer on the armor, waiting 20 minutes between the coats. I then went to 220 grit wet sand, primed, and a final 400 grit wet sand. I would apply some spot putty on areas that I missed and sand those areas smooth, before putting on the final primer layer.


Painting and Weathering

I followed the same painting process as the helmet for the body armor. I used Rust-Oleum spray cans for the dark purple and magenta areas, masking off the sections that were already or soon to be painted another color. The main difference between the helmet and the armor painting was that I used an airbrush to paint on the rose gold tertiary color. I could not find a rattle can that matched the rose gold color I wanted. So I ended up using airbrush paints to mix my own desired color. I mixed a pink, mantellic silver, and white paint to achieve the desired rose gold color. For the chest attachments I used gray and metallic silver Rust-Oleum spray cans.
I got the final armor part painted the night before I traveled to Atlanta for Momocon. Me and Barbcelona did the weathering on my body armor the next night at the hotel. Barcelona actually did most of the weathering for me, while I was doing my helmet internals and rigging my boot armor. He did a great job on the weathering, and followed the weathering pattern I had on my helmet. The only body armor I weathered myself was the front chest piece and attachment. Barbcelona also has a sticker printer and printed my Story/Stream logo to act as my emblem on my chest plate.


Rigging
Most of the rigging took place before the weathering was applied to my body armor. Barbcelona practically did all the rigging for me and made adjustments to have it stay together on my body. We started with the harness that hung on my shoulders and held the thigh armor pieces to my leg. We used 2" nylon webbing and its respective buckles to attach the thigh armor parts. Additionally, 1.5" nylon webbing was attached between the front and back of the 2" webbing to prevent the harness from sliding off my shoulders. The harness he did for my armor was the same he did on his build. Here is a link to Barbcelona's build process for reference.
For connecting the torso and "space diaper" armor parts together, we simply used velcro straps attached via double side adhesive and additional super glue. We used two strips on each attachment point and it proved to work very well. Once the velcro straps were attached I super glued the torso buckles on the back torso plate.
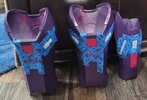
For the boot rigging, I originally wanted to use a pair of black hiking boots and harness them to the boots. However, the hiking boots were not shaped like my brown work boots, which was what I sized the boot armor to. The front ankle region of the boot stuck out too much to allow the greaves to practically fit under the thigh armor. So I made a rig setup centralized around my running shoes. I used two elastic straps at the inner side walls to connect the toe and heel portions of the boot armor. I then added an elastic strap on the bottom of the toe portion that goes under the shoe and a strap on the heel section that loops over the top of my shoe. This made the boot armor very snug with my running shoe and flexible enough to allow ease of movement. Lastly, I put a strap on the upper boot armor that would wrap around the back of my ankle. I did all of this based on intuition and logic, I am sure there is a better method for rigging boot armor. Other than the boots looking like deflated clown shoes, the rigging held up very well and stayed comfortable the entire time I had them on. I will look into methods to rig them to my boot next time.

5) Printing Filament/Time Totals and Equipment/Material Cost
Time for numbers! I am linking my google spreadsheet here. In summary, the running filament used and time spent printing for this build (not including the few failed prints I had and the MA5K Avenger) was 9,844.47 grams and 340 hours and 31 minutes! That is just under ten 1kg spools of filament and just over 14 days of total print times! Now, when we consider failed prints, I used about 12 spools in total for the armor alone.
Now for the total cost of this build. I had my receipts saved over the span of the project (mainly from Home Depot for spray cans and sandpaper), however, I started to move two weeks before the con and have misplaced those receipts. But based on my amazon orders, cost of the 3D printer, cost of additional tools, and the number of empty spray cans I have, the approximate cost of materials would be just under $2,500. This total includes a lot of tools that would not be considered if I did another build, as I would already have them. This total also does not include the commissions I issued or the models I purchased from Etsy.
6) Closing and Encouragement for Those Who Want to Make their First Build
I had a lot of fun with this project and the feeling of wearing the armor for the 1st time was unlike any other feeling I have had. I met a few Halo Cosplayers at Momocon and they were all very kind. This cosplay community is very welcoming, kind, willing to help, and extremely knowledgeable. I work as a field engineer for a Geotech firm, which consist of 50 to 60 hour work weeks. I typically put 2 to 4 hours each night into the project, when I could during the weekdays. Then 8 to 10 hours on the weekends. The week before Momocon weekend was my ultimate crunch and consisted of multiple all-nighters with 2 to 3 hours of sleep. I crashed out super hard on the second to last day of the con, and was only able to suit up on the last day haha. I do not recommend doing what I did during that last week and recommend getting enough rest.
For those who are considering starting their own cosplay journey, I encourage you to start! There is a lot to learn and a lot of work behind everything. But the outcome is very rewarding and worth every step you will make along the journey. As I said, there is so much experience and knowledge across the cosplay community, on YouTube and the 405th forums. Also, the connections you will make will be very cool as well. We are all Halo enjoyers here after all!
This is my 1st post, so I hope to make more in the future with my updated build for Dragon Con 2025!
LyGal Dyav
Michael Stallings


Edit Note: Made spelling corrections, spacing edits, and added a photo of the boot armor rigging.
As the title says, this is my 1st ever cosplay build! This build is fully 3D Printed with a Bambu P1P, with the exception of the torso under suit, which was a combination of EVA foam and 3D printed materials.
A quick back story on me, I am a long time Halo fan, since me and my older brother played together when we were kids. Making a Halo cosplay has been a childhood dream of mine since I watched Andrew DFT's builds on YouTube. That was back in 2012, when I was a freshman in High School! Time has flown since then!. Around late February of 2025, my good friend from college Barbcelona helped persuade and hype me up to get a 3D printer! I have not seen too many Halo cosplays at this point. I have only seen his 1st cosplay build, Andrew DFT's cosplays, and Dat_Boi_Builds. Barbcelona explained his experience with me and encouraged me to become my own spartan. So huge shoutout to him! He helped me out with not only advice, but even aiding me to vacuum form my visor, rig, and weather my cosplay! The latter two being the night before my 1st con, Momocon 2025!
This build began on March 1st, 2025 and this first iteration was completed on May 25, 2025. I am very proud of what I was able to dish out in just under three months. It was a crunch, and I was unable to post an updated process throughout the build due to my full time job and lack of time. And one final time, I would have not been able to make the crunch without Barcelona's assistance! I plan to make adjustments and additions for Dragon Con 2025.
I will document my process on this in the future! As of posting this I am in the middle of unpacking and have not been able to set up my 3D printer at my new location.
Now that I have the back story out of the way I will start with my source material, planning, and process.
1) The Concept and Reference
Halo Infinite - MJOLNIR Mark VII Armor Core Reference Details
- Helmet: Celox
- Helmet Attachment: N/A
- Visor: Sardonic
- Chest: UTIL/ENAV BEACON
- Left/Right Shoulder: SAP/LWAS-REV 3
- Wrist: N/A
- Gloves: CORVAN
- Utility: WATSMIL AMMON POUCH
- Knees: UA/TYPE DP
- Coating: Warped Sky
I decided to go with with my Halo Infinite Multiplayer Mk VII Core. I have always loved 343's iteration of scout from Halo 4 and 5, and knew I would make this cosplay with the Celox helmet! I chose the colors based on my Twitch Channel colors and a character I have drawn over the years.
2) Initial Planning and 3D Files
Before my 3D Printer arrived in late February, I did a ton of research on other builds and took a lot of direct advice from Barcelona. My main concern was properly scaling my armor parts to my body and avoiding reprinting parts. I watched a lot of videos from Frankly Built (Absolute GOAT Cosplay Channel) on YouTube to learn about 3D printing and how to scale armor parts using Armorsmith. At this point, I searched for the 3D files I would use and installed Bambu Studios, 3D Builder, Armorsmith Designer, and Blender.
I started off with obtaining the 3D files for the Celox Helmet and the MK VII Armor Core. I would later commission a 3D modeler I encountered over Instagram for the shoulder, knee, chest attachment, and gloves. Below are the 3D files I used with the creator and direct links to their respective Etsy page.
- Halo Infinite Celox MkVII Core Helmet 3D Model - Walsh3D; Halo Infinite Celox Mkvii Core Helmet 3D Model - Etsyref=yr_purchases
- Mk VII full suit 3d print files - TitlewaveDesigns; Mk VII Full Suit 3d Print Files - Etsy
- MA5K Avenger - MightyMarkProps; Unfortunately, Etsy recently removed any files related to weapons on their store front. I looked around to see if Mighty Mark had uploaded his file elsewhere, but did not find anything. I will instead link his YouTube video showcasing his MA5K model;
- Halo Infinite UA/Type DP knee pad - HGSmodels; https://www.etsy.com/listing/1879783368/halo-infinite-uatype-dp-knee-pad-3d?ref=shop_home_active_7&sts=1&logging_key=82596ced5fc366dfaa3cea613ef6a27fc074550e:1879783368
- Halo Infinite SAP/LWAS-Rev 3 Shoulder attachment - HGSmodels; https://www.etsy.com/listing/4316092978/halo-infinite-saplwas-rev3-shoulder?ref=shop_home_active_4&sts=1&logging_key=2cbbccdf6abc543f0c8f0c776b043ff8ad632278:4316092978
- Halo Infinite UTIL/ENAV Beacon - HGSmodels; I had this model scaled to my chest piece and MA5K magazines, so HGSmodels does not have this model on his Etsy, yet. I reached out to him and he said he plans to get it on his Esty page soon. Once he does, I will edit or reply to this thread with a link to it.
He also made my Corvan Gloves, but I was unable to print them in time for Momocon. He does have the file on his Etsy page!
3) Helmet Process
Scaling
For scaling my helmet, I followed Frankly Built's YouTube Video on scaling helmets. I measured my head using cosplay calipers I got from UncleJessy on Thingiverse. I measured from the bottom of my chin to top of head, temple to temple, and from nose to back of head. Fortunately, Walsh3D made a very detailed, yet easy to use model. They made the helmet with multiple parts that fit together seamlessly, taking advantage of the actual seams of the helmet. Because of this, no splicing was required, which made scaling and printing this helmet very simple. Due to the in-game design of the Celox helmet, I knew it wouldn't fit over my head as one piece. So I chose to split the helmet into two portions (The back plate/neck seal and the rest of the helmet). This was also recommended and designed to be split this way by Walsh3D.
I ended up doing a uniform scale of the helmet to fit the largest measurement of my head inside the smallest measurement of the helmet (Which ended up being the side walls). I used 3D Builder's measure tool to measure the areas of concern and compared it to my head measurements. A uniform scale of 113% made the smallest inner dimension work to fit my head.
Printing, PLA Welding, and Magnets
It was recommended that I start off printing something small for my first print, like a Halo sidearm prop before diving into printing the helmet. Well, I printed a squishy turtle and decided to full send it with the Helmet! The helmet file consisted of 12 separate parts (not including the visor buck, which I didn't know what it was for at this moment), which I laid over 6 different build plates on Bambu Studios.
At this point I also began to track my filament usage on my 3D printed models, via google sheets. I will go into further detail on this spreadsheet towards the end of this post.
Once I had all the helmet parts printed. I put them all together, held by masking tape, to confirm everything would fit my head, which it did! The next step was to permanently attach the helmet parts together. From my research, PLA welding was the strongest method to attach these parts, so I used my soldering iron and went to work! I followed Frankly Built's Video for guidance on PLA welding. I would keep the parts held by masking tape then welded the parts from the inside of the helmet together, making sure to cross over and overlap the two parts with my welds. Once that was done I pulled the tape off and tugged the parts to confirm they were strong holds. Lastly I used 10x3mm disk magnets to hold the back plate to the front section of the helmet. The helmet had enough friction strength to not fall apart when it is worn, but the magnets kept it from shifting around. The model had indents for disc magnets built in.
Sanding and Priming
Here I will admit, I was not efficient on sanding and filler priming my helmet, at all. While it was very smooth, I did not have to spend the amount of time and resources for sanding/filler priming this thing. For the helmet, I started off with 80 grit, prime, 120 grit, prime, 220 grit, prime, 400 wet, prime, another 400 wet pass, followed by the final filler prime coat XD. Between pass overs I added Bondo Spot Putty to fill the deeper layer lines. When I told my fiends I used 4 cans of filler primer on my helmet alone, they were shocked lol. My inexperience also made sanding take a long time due to sandpaper clogging. I got more efficient with my sanding process down the road on my other armor parts, thankfully.
Primary and Secondary Colors
The armor consisted of a dark purple primary, a magenta secondary, and a rose gold tertiary color. The helmet only used the primary and secondary. I used Rust-Oleum spray cans for the purple and magenta colors. I started with the magenta color, masking off the areas that would be purple. I did a light initial coat, then followed up with two other coats, about 20 minutes apart. The next day I did the same process, but with the purple paint, masking off the magenta areas.
Weathering
For the weathering on the helmet, I used black and silver acyclic paint. I mixed the black acrylic paint with water then brushed it on, making sure to cover the crevices on the helmet. I then got a rag and wiped the excess paint off the helmet. I made sure to put an extra layer or 2 of blackwash on the magenta areas, since they were a bit too bright and made the helmet look like a toy. I immediately followed up with the silver paint, dry brushing scratch marks. I mainly wanted to make scratches come from shrapnel coming from the front side of the spartan. I did make a larger scratch mark on the back of the helmet, to make it seem the spartan took a big hit in the back. However, I am to this day split on this mark, lol.
Visor and Internals
Barcelona was a huge help on vacuum forming my visor. We had a bad 1st 5 attempts on the 1st day due to malfunctions on his setup. But the next day we attempted it, we were able to dish out 3 successful visors! I then got a Iwata Revolution Airbrush and a Timbertech Air Compressor to apply Spaz Stix Mirror Chrome. This was the 1st time I used an airbrush, and after a few sprays on some paper, I put two very light coats over the back section of the visor. I would then hold the visor over in place on the helmet and put it on to confirm my face could not be seen. The visor was then fixed into place using hot glue. For my helmet padding, I just started adding/super gluing upholstery foam at the top so the visor was level with my eyes, then added foam on the front and back sections to prevent the helmet from twisting/rotating around and to keep it centered from my side profile.
The helmet internals I had planned included headphones/microphones to amplify exterior audio, two internal fans for air circulation, and a microphone/speaker amplification setup. I was only able to install the former 2. I followed Crimson's tutorial on creating a helmet speaker system. I had difficulty picking a spot for the exterior microphones and keeping them subtle enough to not be noticed. I ended up putting them within the two rectangular notches on the bottom front plate of the helmet. I drilled the holes in my helmet and superglued the microphones in. I fortunately had enough space to make use of the shooting headphone's padding with my helmet. It made the helmet much more snug and allowed me to hear from the speakers much better. I was able to fix the volume dial and main board over the front neck seal, allowing me to adjust the volume while keeping my helmet on and keeping it concealed. Lastly, I placed the two fans above and below my visor to prevent fogging. All of these devices were powered by a small power bank that was placed underneath my chest armor.
Now, all of these internals worked as expected the night before the con. I was unable to properly solder the wires together, since I was at a hotel and didn't want to risk getting solder on the furniture and making the room stink up. So I ended up twisting the copper wires and using electrical tape. Unfortunately, the morning I was suiting up for the convention, my power bank fell out of my chest piece and it pulled the power wire for the speaker system and one of the fans. So I only had one fan for the con, and it was not enough to prevent fog from building up. As soon as I got inside the convention, I could not see or hear much lol. Great lesson I learned here.
4) Body Armor Process
Scaling and Slicing Armor Models
For the armor scaling I started to measure my body dimensions and input them onto Armorsmith, however, my avatar came out looking like the Beast Titan, from Attack on Titan... So I browsed around the 405th and came across @KaeSpoon's Tutorial on Importing a 3D Body Scan to Armorsmith. This was not only a very well made tutorial, but also made the scaling process much less daunting to me. Once I had my 3D Body Scan scaled properly, I did a combination of non-uniform and free scaling to get the armor properly scaled to it. I did make the forearms and thigh parts slightly too long, but was manageable enough to wear at the convention. I plan to scale these down and remake them for my next convention. I highly recommend getting your body 3D scanned to scale your armor parts.
Since the armor parts were not conveniently split like my helmet files were, I had to learn and experiment with splicing the body armor models to fit my print bed. I started with the forearms and did a simple splice making two separate prints for each forearm. The biceps did not require any splicing, so those were printed as a whole. I found out about dovetail splices on Bambu Studio and learned it would help line up armor parts for PLA welding. I used this method for the remaining body armor parts, if they required splicing. I wished I did some research or had the foresight to make the dovetail seams on areas of the model with low details. I ended up making these dovetails on the most hard to reach spots on my chest/back armor parts. Which made the sanding process on these areas more difficult. Once I had the files scaled and spliced on Bambu, I started to print the armor parts.
PLA Welding, Sanding, and Priming
As I stated before, the dovetail splices really helped with lining up the armor parts for PLA welding. I used masking tape to hold the parts in once they were lined up and PLA welded together. I originally wanted to use magnets and velcro straps to secure the greaves. I ended up PLA welding the two parts together and trimmed off enough of the lower sections so my foot could fit though the other end. I did not have to do any material trimming apart from the greaves.
Some dove tail areas needed to be sanded with 80 grit to slide into each other. It was at this point of the build process that I realized, I really did not like sanding lol. I invested in an orbital sander which helped a lot with the areas that were large and flatter. I still had to hand sand the more detailed areas, however. I did get more efficient with my sanding techniques and filler primer usage. Any parts of the armor that had bad seams or deep layer lines, I put Bondo Spot Putty on then used 80 grit sandpaper to level off the areas with extruding/uneven seams. Once I got the rougher areas evened out, I put two thick coats of filler primer on the armor, waiting 20 minutes between the coats. I then went to 220 grit wet sand, primed, and a final 400 grit wet sand. I would apply some spot putty on areas that I missed and sand those areas smooth, before putting on the final primer layer.
Painting and Weathering
I followed the same painting process as the helmet for the body armor. I used Rust-Oleum spray cans for the dark purple and magenta areas, masking off the sections that were already or soon to be painted another color. The main difference between the helmet and the armor painting was that I used an airbrush to paint on the rose gold tertiary color. I could not find a rattle can that matched the rose gold color I wanted. So I ended up using airbrush paints to mix my own desired color. I mixed a pink, mantellic silver, and white paint to achieve the desired rose gold color. For the chest attachments I used gray and metallic silver Rust-Oleum spray cans.
I got the final armor part painted the night before I traveled to Atlanta for Momocon. Me and Barbcelona did the weathering on my body armor the next night at the hotel. Barcelona actually did most of the weathering for me, while I was doing my helmet internals and rigging my boot armor. He did a great job on the weathering, and followed the weathering pattern I had on my helmet. The only body armor I weathered myself was the front chest piece and attachment. Barbcelona also has a sticker printer and printed my Story/Stream logo to act as my emblem on my chest plate.
Rigging
Most of the rigging took place before the weathering was applied to my body armor. Barbcelona practically did all the rigging for me and made adjustments to have it stay together on my body. We started with the harness that hung on my shoulders and held the thigh armor pieces to my leg. We used 2" nylon webbing and its respective buckles to attach the thigh armor parts. Additionally, 1.5" nylon webbing was attached between the front and back of the 2" webbing to prevent the harness from sliding off my shoulders. The harness he did for my armor was the same he did on his build. Here is a link to Barbcelona's build process for reference.
For connecting the torso and "space diaper" armor parts together, we simply used velcro straps attached via double side adhesive and additional super glue. We used two strips on each attachment point and it proved to work very well. Once the velcro straps were attached I super glued the torso buckles on the back torso plate.
For the boot rigging, I originally wanted to use a pair of black hiking boots and harness them to the boots. However, the hiking boots were not shaped like my brown work boots, which was what I sized the boot armor to. The front ankle region of the boot stuck out too much to allow the greaves to practically fit under the thigh armor. So I made a rig setup centralized around my running shoes. I used two elastic straps at the inner side walls to connect the toe and heel portions of the boot armor. I then added an elastic strap on the bottom of the toe portion that goes under the shoe and a strap on the heel section that loops over the top of my shoe. This made the boot armor very snug with my running shoe and flexible enough to allow ease of movement. Lastly, I put a strap on the upper boot armor that would wrap around the back of my ankle. I did all of this based on intuition and logic, I am sure there is a better method for rigging boot armor. Other than the boots looking like deflated clown shoes, the rigging held up very well and stayed comfortable the entire time I had them on. I will look into methods to rig them to my boot next time.
5) Printing Filament/Time Totals and Equipment/Material Cost
Time for numbers! I am linking my google spreadsheet here. In summary, the running filament used and time spent printing for this build (not including the few failed prints I had and the MA5K Avenger) was 9,844.47 grams and 340 hours and 31 minutes! That is just under ten 1kg spools of filament and just over 14 days of total print times! Now, when we consider failed prints, I used about 12 spools in total for the armor alone.
Now for the total cost of this build. I had my receipts saved over the span of the project (mainly from Home Depot for spray cans and sandpaper), however, I started to move two weeks before the con and have misplaced those receipts. But based on my amazon orders, cost of the 3D printer, cost of additional tools, and the number of empty spray cans I have, the approximate cost of materials would be just under $2,500. This total includes a lot of tools that would not be considered if I did another build, as I would already have them. This total also does not include the commissions I issued or the models I purchased from Etsy.
6) Closing and Encouragement for Those Who Want to Make their First Build
I had a lot of fun with this project and the feeling of wearing the armor for the 1st time was unlike any other feeling I have had. I met a few Halo Cosplayers at Momocon and they were all very kind. This cosplay community is very welcoming, kind, willing to help, and extremely knowledgeable. I work as a field engineer for a Geotech firm, which consist of 50 to 60 hour work weeks. I typically put 2 to 4 hours each night into the project, when I could during the weekdays. Then 8 to 10 hours on the weekends. The week before Momocon weekend was my ultimate crunch and consisted of multiple all-nighters with 2 to 3 hours of sleep. I crashed out super hard on the second to last day of the con, and was only able to suit up on the last day haha. I do not recommend doing what I did during that last week and recommend getting enough rest.
For those who are considering starting their own cosplay journey, I encourage you to start! There is a lot to learn and a lot of work behind everything. But the outcome is very rewarding and worth every step you will make along the journey. As I said, there is so much experience and knowledge across the cosplay community, on YouTube and the 405th forums. Also, the connections you will make will be very cool as well. We are all Halo enjoyers here after all!
This is my 1st post, so I hope to make more in the future with my updated build for Dragon Con 2025!
LyGal Dyav
Michael Stallings
Edit Note: Made spelling corrections, spacing edits, and added a photo of the boot armor rigging.
Attachments
-
 Celox - Full Body Ref 1.jpg211.1 KB · Views: 158
 -
 Snapchat-1777823269.jpg649.5 KB · Views: 130
 -
 20250303_175638.jpg690.6 KB · Views: 139
 -
 20250312_105432.jpg2.2 MB · Views: 153
 -
 20250312_105432.jpg2.2 MB · Views: 140
 -
 20250523_153802.jpg1.2 MB · Views: 176
 -
 Screenshot_20250313_171051_Snapchat.jpg177.1 KB · Views: 127
 -
 20250427_213703.jpg2.5 MB · Views: 159
 -
 20250522_235057.jpg718.2 KB · Views: 172
Last edited: