Foam Armour Scaling and Construction

Status
Not open for further replies.

OJ102

Member
Hi There,

I was initially doing my project with 120gsm Card but I was finding that it was distorting during the resin stage, I was also not totally sure it was the right scale, but it was a good learning experience for building in 3D! I got all the way to fiber glassing several sections, discovering lots of Do's and Dont's along the way! I also chose the card method for detail, but found that during The hardening, the finer details where getting lost anyway.

Version 2 is now up. I managed to find a place online that sells 5mm Cosplay Foam in the UK! (that wasn't easy) in 1mx2m sheets. So While that's on the way, I'm preparing for the next attempt, The Iron Man Suit used in Avengers Infinity Wars!

Working with foam looks like a different kettle of fish however, mainly as the material is bendable and is 5mm thick!

Im hopefull that because ive got a single large bit of foam I can rotate the templates around and get the Max amount of parts from this first sheet, im hoping around 40% of the suit but that may be optimistic!

Now the things im not sure on..

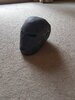
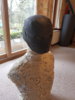
Scaling in foam. The picture I attached shows the current scale and dimensions, but I'm aware that's from soles of feet to tip of skull, Im not totally convinced my original method was that accurate. I added 3 Inches to my height and used that.

I am 1850mm tall, give or take a few mm (without shoes) I'm thinking for the feet I would get some Crocks and use them as the bases so they wont be heavy. This would add 20mm roughly to it. The foam is 5mm thickness, and I'm automatically thinking to just add 10mm on to my height and use that, but I'm also thinking the compound thickness effect may go up the suit and end up being quite a large difference when at full assembly.

How would some of you Pro's approach this scaling? I know i can increase the depth by adding bits later if I HAVE to, but the by build is uniform so keeping the even scale should work and the height is my issue.

Additionally, Ive not worked with foam before, I used Hot glue on the card version, would that work here? I was concerned it may melt the foam (unless that's a good thing for strength of course!)

I generally start with the Helmet as its got to fit in all directions and should be a good indicator of if I'm on the right track.

Any thoughts on the scaling and connection would be greatly appreciated, My house is looking like an iron man graveyard with random parts everywhere now !

Thanks

267430
 
Right, well here is the attempts so far! The first foam helmet took about 3 hours from print to putting on. It was too big.

I assumed I should add the foam thickness to all sides, but pepakura has no thickness so those measurements, while to the outside, assume a paperlile thickness, so when I added 15mm to accommodate 7mm foam.. it was too big...

So I thought to myself.. if only I could take my head off to measure it accurately point to point.. then it hit me! I CAN!

I bought a roll of cheap tin foil and masking tape, then with mirror, cast my face in tin foil for all the details, then layered it with tape to hold it firm.

Getting it off was... interesting.. as I was alone.. bit it worked! The cast is accurate to within a few mm and as its tin, I can bend it to fix any errors when removing.

I also did the collar and neck so it didn't roll away!

Once I check it all round I'm going to coat it in resin and then I'll have a hard frame to get measurement from and the beginning of an armour stand dummy!

Feel free to laugh or cry but it's not my worst idea on this project! Haha
 

Attachments

  • 20190325_082328.jpg
    20190325_082328.jpg
    2.4 MB · Views: 318
  • 20190325_162215.jpg
    20190325_162215.jpg
    1.2 MB · Views: 301
That is because this isn't a bad idea. It could be done with any malleable,soft material. Aluminum is one of the softest metals on the planet. Yes, it sucks doing it alone, but you have a good idea since buying Styrofoam heads not sized properly. In the future, you may have to consider creating a life size casting of your head. That way you have a more durable reference to depend on.
 
The head was my first attempt. That was entertaining as my wife called me while I was encased in foil haha.

After it dried I measured it's diameter and a few parts using my home made callipers and it's accurate to within a few mm!

Since then I've cast a hand, forearm, foot, shin, and codpiece. Each part overlaps so once they are dry I'll line them up, trip then add spikes to pin them together. I'll leave it in a way I can remove parts else I'll never get the armour on it!

I'll need to get help for the torso alass, I've got long arms but even I can't cast my own back! Once it's built I'll post some pics assuming it doesn't look like Frankensteins monster!
To get a copy of the torso, you are going to need some help there. Are you going through the same method for the head?
 
The resin hardened but without a weave like fiberglass through it, it was still too flimsy, and i didnt want to waste all that fiberglass!

Ive just finished the torso base now. Had to get help taping it up but it seems to have worked well. I did the Head on my own, but I couldnt reach my own back for the detail.

My foam gun just exploded however, the delivery pipe came loose. It was a mad dash for a plastic bag and out the window haha! Once it dries ill see if its fixable, if not ill need to order another.

The body is doing well tho, once its smoothed, ill PVA mache it to make it smooth and it should make a perfect model. Ive now done everything except the right Thigh and Bicep, entire left leg and left arm. Ive attached the right leg and its accurate in length to within a few mm.

Thankfully for some reason the foam doesn't bond do my skin well, when it dries it just falls off (usually about 5 minutes), sticks to everything else like superglue tho!
 
The resin hardened but without a weave like fiberglass through it, it was still too flimsy, and i didnt want to waste all that fiberglass!

Yeah, I can see what you mean now. I've went down the fiberglass route and traverse through "Rondo Road" before on my last attempt at making a costume. However, when it was all said and done in the end, all I have is a very strong paperweight that I can't fit my head through any more because it some how shrank later on. I don't know if it was still "curing" at a very slow rate or it was the cold weather, but that sucker is useless to me for now.
 
I've noticed that fiberglass seems to shrink or at least tighten too. My first helmet was too big. I'm using the head of my model to make a new one now. Using the exact measurements plus 3mm all round for working with. If it works I'll measure up each body part.

I bought plastidip and tested it on the first helmet but I couldn't see any hardening effect. Is it meant to harden it?

I'm loving working with foam but I HAS to go hard lol
 
Plastidip isn't suppose to harden at all. Normally, it's used to create a smooth layer on whatever object it coats. Normally, it's used on EVA foam after it's exposed to heat to shrink the microscopic holes on the surface. Then you use Plastidip to coat it before you paint over it. However, there is a chance that too many coats could stiffen the foam, but that was never the problem for me because I never got beyond 2 coats before I paint.
 
How would you harden EVA foam then? I was gonna try a mix of wood glue and water next. I'd rather not use resin as it stinks and I can't wash the brush...
 
How would you harden EVA foam then? I was gonna try a mix of wood glue and water next. I'd rather not use resin as it stinks and I can't wash the brush...
One of the best qualities of EVA is that it's flexible and malleable while giving off the appearance of a hard surface so this may be more of a material choice question. If you want a hardened finished product I'd suggest taking the Pepakura route over foam. If you still want some flexibility with a harder surface, check out higher densities of EVA. The 90kg foam from Red Moon Cosplay Solutions is heckin' durable but can still be formed like the normal puzzle mats, it also has the benefit of machining nicely through bandsaws, drill presses and other tools.
 
Foam mats are very hard to get where I am. I had to mail order a 2mx1m roll of 5mm EVA from 800 miles away!

I've started my latest helmet attempt now and it seems to be working, at least on the model!. As I cut each piece in heating it up and moulding it round the head so it's going in the right shape from the start. Once glued I'm using needles to position it on the face in the right place and then apply gentle heat so its setting evenly all over.

Assuming the model isn't shrinking the helmet should have a 3mm gap all round on the sides with more on the front. I plan to cut channels in the foam for wiring and have the power pack in the chest with connectors powering each section. If this is too small my 3 year old has called dibs already haha
 

Attachments

  • 20190403_104954.jpg
    20190403_104954.jpg
    1.3 MB · Views: 487
Most of the helmet is complete now. 2 parts left to make. The spacing seem to be right on the mark for the measurement although a few extra mm wouldnt have gone amiss inside :D
 

Attachments

  • 20190403_140048.jpg
    20190403_140048.jpg
    1.9 MB · Views: 318
Most of the helmet is complete now. 2 parts left to make. The spacing seem to be right on the mark for the measurement although a few extra mm wouldnt have gone amiss inside :D
Wow. That looks good! So is that bust made from expansion foam?
 
Yea. I used very cheap tin foil as it bends but doesn't tear well. Crincling it all round various body parts. Then used masking tape to tighten it all over. I then flex a little to stretch it so I can get a blade in and cut a single seam to get out. Then realign the edges and seal again. The cast is easily distorted at first so was a handle with care deal. Then I used builders grade expandung foam as its dirt cheap and expands 250k. I found the trick was layering it as it HAS to have air within 2 inches of the edge else it won't cure. I also mist with water to have it cure in 30 minutes. This process is repeated slowly until its solid. Usually 4 or 5 layers. The torse isn't done. My gun broke before I could smooth it off and add the remaining muscle details.
I do the body parts as small as possible so I can do several at once. Do a hand. Wrist. Forarm. Elbow. Etc then connect them and make sure they are the right overall length. The smooth off joints and such

I've added the frame so far here. He is a long way off done as I lost my tool but its fast to build.

I've also modified the latest helmet. It fit perfectly on the head I made except I didnt take into account comfort as my nose was pressed against the face mast Haha so I elongated it with 1 small strip of foam carefully spliced in and it seems to look good.

I need to experiment with hardening as it needs more rigidity. But I've got spares to experiment with!

I also need to look into the eye electronics and space needed... but there are so many different variations online its hard to get a basic answer!
20190404_102427.jpg
20190404_101256.jpg
 
It looks good so far. Next time get a fabric tape measure and measure around the nose instead of the forehead. The nose is the only part of the face that sticks out other than the tongue. I had to deal with the same issue with this helmet I'm working on.
 
I decided that since I've got to grips with the foam construction and letting out, I should make something small to try hardening it with the intent to metallicly paint it! So I decided to make my 2 year old a 0.5 scale captain America shield!

The foam went great as I expected, the entire construct took 2 hours to build and glue. Initially I used plastidip but it didnt give any strength, so I tried resin. Alass as the foam was sealed, the resin didnt bond and fell off when dry... so I then had to use the head gun to peel it all off and rough up the plasti dip! After an hour I had the foam back with only minor damage (we can call it battle damage!)

I then decided to use a pva glue mache. Just a single layer. That seemed to work very well. I lost no detail but once dry it gave it a crisp surface and also covered up some of the plasti dip scars. From there I used P38 body filler and coated it. This was the first time I ever used It and I'm so glad i wasnt doing my armour first! I'm sure I used far to much trying to remove dents! In hind sight I should have used mache to fill holes first.

Its between 1 and 2mm thick at the moment but awaiting sanding via a dremel as the stuff set like stone! I did a small patch by hand and it came up very smooth so I'm hopeful I'm on to a winner!

Once its sanded comes the final stage.. painting.. which is where I'm struggling for details.

I wanted to use metallic paint but its expensive in bulk ( as iron man being the main project is mainly red)

Im also not sure about the top coat. Some people say a layer of pva... but I'm sure moisture will ruin it..

I'm thinking either a clear plasti dip or a clear gloss spray. Something to mist it with so as to seal the details in without smudging.

What would others do in regards to painting?

Do I need a metallic paint or can one of those top coats simulate the metallic shine..

And also what top coat would be better!

I've ordered another roll of foam and a larger tub of body filler so I'll start fill on fabrication soon. But would like to paint as I go so I can go from building to hardening to painting as each rests.

Any advice would be appreciated!
 
Status
Not open for further replies.
Back
Top