I have been testing for the last three months, trying to find an alternative to the PVA and Plasti-dip method. I am confident enough to say, "I have found the truth!"
First, a bit of backstory!
What is the purpose of PVA?
PVA is used to seal the EVA to allow it to accept external paint. It is sand-able, but sometimes has a tendency to "roll" or "ball" up.
Issues: PVA does seal the EVA, but at a pretty high cost. It tends to crack very easily, and will reconstitute with the most minor amount of moisture. Sometimes it does not adhere to areas of EVA, avoiding patches with voracity. It also tends to kill details by pooling in crevices, detail lines, and corners. This would be okay in some circumstances, but it also tends to be inconsistent in doing this task, often creating air bubbles that are extremely difficult to fill with another coat, or seeping into cracks, leaving what I refer to as "Morse code" areas that have glue, and then no glue.
So, what is the purpose of Plasti-dip then?
Plasti-dip is used to coat over the PVA to give it a paintable surface, and also provides a bit of give in the case that the PVA cracks under light pressure.
Issues: Plasti-dip is EXPENSIVE or not available in some areas! It also is really temperamental with weather conditions when applying. In addition, it is yet another heavy coat that tends to fill in details even more. One more thing is that it is not sandable.
With these cons adding up quickly, I set out to find an alternative.
In order for it to meet my standards for an approved method, it must:
- Be rigid, but also a little flexible, enough to the point that that it does not crack when bumped or bent lightly, but has that "click" sound as a pose to the "thump" sound with flicked with a finger.
- Resemble "hard" armor appearance
- Show full detail and not pool up at all
- Coat the entire surface evenly and consistently
- Be sand-able at all stages (minus the final paint stage)
- Fill small imperfections.
- Be cost effective and a product that is easily obtained!
- NOT AFFECT THE SHAPE OR HARM THE EVA or SUPERGLUE
Now, the process. (Please note - I have not tested this with hot glue yet. This was performed on blank pieces of EVA, and some that had been super-glued together)
Step 1 - Prepare your surface! Make sure that all EVA has been heat "treated" or formed. To heat treat, simply use a heat gun to close the surface cells (this should be performed during construction and not necessarily at the end of your project as it has a tendency to slightly reduce the size of the foam). Be sure it is clean of foreign materials and that all "fuzzies" (the hairy pieces of EVA left from bad cuts or sanding). These can generally be taken care of by brushing on SuperGlue and then sanding it down when dry.
Step 2 - Apply a generous coat of CORN STARCH. Massage it into the EVA, making sure that all surfaces to be treated have this done. Wipe off ALL excess. It will go back to the way it looked before, but if you look really close, you will see that it has filled the smallest of holes .
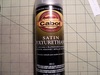
Step 3 - Using a SPRAY can of Satin Polyurethane - apply a generous first coat of this to the surface to be treated. FOLLOW THE DIRECTIONS ON THE LABEL and I stress to use in a well ventilated area. DO NOT BE ALARMED, IT WILL SOAK INTO THE EVA!") Photo below for reference of what I used. FYI, I paid $6.50 for this can at my local overpriced hardware store.
Photo below for reference of what I used. FYI, I paid $6.50 for this can at my local overpriced hardware store.

Allow to dry between coats, but not longer than 1 hour. I set mine in the sun for about 15 minutes between coats.
Apply about 4 coats, each one getting lighter as you progress. Stop just after the surface stays wet looking.
LET CURE for at least 12 hours! If not, the next stage will go horribly wrong. At this point, you can sand down any larger imperfections there may be... you can even add a thin coat of Bondo (not recommended due to higher probability of cracking).
At this point, the surface should be somewhat hard, but still a bit flexible (simply the properties of polyurethane). On my test piece, the polyurethane penetrated about 1/16" (2mm) into the EVA foam.
Step 4 - Wash with a mild dish soap and dry thoroughly. Allow all areas to air dry and make certain no water remains.
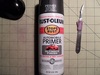
Step 5 - Using a wet/dry sandable auto primer, apply 2-3 coats. Wet sand in-between coats and allow to dry before applying the next coat. Allow to cure for no less than 4 hours on your last coat. Below is a photo of what I used. Approximate cost was $4.

Step 6 - Once the surface is smooth and acceptable, wash one last time with a mild detergent and dry with a no-nap cloth. Allow to fully dry.
Step 7 - Apply the paint of your choosing, following the directions on the label.
Here is a photo of a test piece I did today. On the far right, I have finished the 4th coat of the polyurethane. In the middle, I had applied primer and then paint. On the left most area, I had performed all of the steps listed above.

Please feel free to post questions or comments!!!
Thanks for looking and I hope this helps!
First, a bit of backstory!
What is the purpose of PVA?
PVA is used to seal the EVA to allow it to accept external paint. It is sand-able, but sometimes has a tendency to "roll" or "ball" up.
Issues: PVA does seal the EVA, but at a pretty high cost. It tends to crack very easily, and will reconstitute with the most minor amount of moisture. Sometimes it does not adhere to areas of EVA, avoiding patches with voracity. It also tends to kill details by pooling in crevices, detail lines, and corners. This would be okay in some circumstances, but it also tends to be inconsistent in doing this task, often creating air bubbles that are extremely difficult to fill with another coat, or seeping into cracks, leaving what I refer to as "Morse code" areas that have glue, and then no glue.
So, what is the purpose of Plasti-dip then?
Plasti-dip is used to coat over the PVA to give it a paintable surface, and also provides a bit of give in the case that the PVA cracks under light pressure.
Issues: Plasti-dip is EXPENSIVE or not available in some areas! It also is really temperamental with weather conditions when applying. In addition, it is yet another heavy coat that tends to fill in details even more. One more thing is that it is not sandable.
With these cons adding up quickly, I set out to find an alternative.
In order for it to meet my standards for an approved method, it must:
- Be rigid, but also a little flexible, enough to the point that that it does not crack when bumped or bent lightly, but has that "click" sound as a pose to the "thump" sound with flicked with a finger.
- Resemble "hard" armor appearance
- Show full detail and not pool up at all
- Coat the entire surface evenly and consistently
- Be sand-able at all stages (minus the final paint stage)
- Fill small imperfections.
- Be cost effective and a product that is easily obtained!
- NOT AFFECT THE SHAPE OR HARM THE EVA or SUPERGLUE
Now, the process. (Please note - I have not tested this with hot glue yet. This was performed on blank pieces of EVA, and some that had been super-glued together)
Step 1 - Prepare your surface! Make sure that all EVA has been heat "treated" or formed. To heat treat, simply use a heat gun to close the surface cells (this should be performed during construction and not necessarily at the end of your project as it has a tendency to slightly reduce the size of the foam). Be sure it is clean of foreign materials and that all "fuzzies" (the hairy pieces of EVA left from bad cuts or sanding). These can generally be taken care of by brushing on SuperGlue and then sanding it down when dry.
Step 2 - Apply a generous coat of CORN STARCH. Massage it into the EVA, making sure that all surfaces to be treated have this done. Wipe off ALL excess. It will go back to the way it looked before, but if you look really close, you will see that it has filled the smallest of holes .
Step 3 - Using a SPRAY can of Satin Polyurethane - apply a generous first coat of this to the surface to be treated. FOLLOW THE DIRECTIONS ON THE LABEL and I stress to use in a well ventilated area. DO NOT BE ALARMED, IT WILL SOAK INTO THE EVA!
Photo below for reference of what I used. FYI, I paid $6.50 for this can at my local overpriced hardware store.
Allow to dry between coats, but not longer than 1 hour. I set mine in the sun for about 15 minutes between coats.
Apply about 4 coats, each one getting lighter as you progress. Stop just after the surface stays wet looking.
LET CURE for at least 12 hours! If not, the next stage will go horribly wrong. At this point, you can sand down any larger imperfections there may be... you can even add a thin coat of Bondo (not recommended due to higher probability of cracking).
At this point, the surface should be somewhat hard, but still a bit flexible (simply the properties of polyurethane). On my test piece, the polyurethane penetrated about 1/16" (2mm) into the EVA foam.
Step 4 - Wash with a mild dish soap and dry thoroughly. Allow all areas to air dry and make certain no water remains.
Step 5 - Using a wet/dry sandable auto primer, apply 2-3 coats. Wet sand in-between coats and allow to dry before applying the next coat. Allow to cure for no less than 4 hours on your last coat. Below is a photo of what I used. Approximate cost was $4.

Step 6 - Once the surface is smooth and acceptable, wash one last time with a mild detergent and dry with a no-nap cloth. Allow to fully dry.
Step 7 - Apply the paint of your choosing, following the directions on the label.
Here is a photo of a test piece I did today. On the far right, I have finished the 4th coat of the polyurethane. In the middle, I had applied primer and then paint. On the left most area, I had performed all of the steps listed above.

Please feel free to post questions or comments!!!
Thanks for looking and I hope this helps!