I have been on and off working on this build for a while, but ramping back up. Hoping posting on here and some stuff on social media will keep me moving forward on it. I’ll try to keep it pic heavy. Helmet is 3d printed, rest of the suit will be foam.
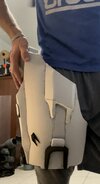
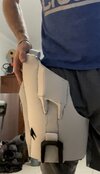
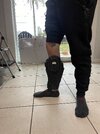
I started with the torso. I made the thruster pack removable and attach with magnets. I have the shins 90% done, boots are started and will be attached to these ridiculous jimmy buffet boat shoes that I found, and I started one of the thighs. This is where I lost steam. Like for 10 months I didn’t do anything. Took a while to find a good printable helmet file, but ended up purchasing a file from Rogue Workshop.
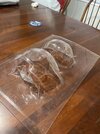
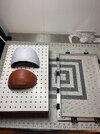
I split the helmet in half in mesh mixer, sliced it, and away we go. Easy peasy right? Nope. First run on the front, I had 2 layer shifts which also caused massive support failure. I figured I would let it play out, and it ended up printing fine. I split it at the shifts and re glued, problem solved. Connect the front and back, and shifts at the last second before the glue cures, so now I have a ridge to deal with. Sand, fill, prime, sand, fill, prime. Got the helmet looking good. Time for some paint! I get my silver base layer on, and forget to move it off my janky pvc stand. The stand blew over and broke it to pieces. New breaks, not on the layer shifts or original seam. I got real frustrated but I added some alignment holes and reprinted it. Everything lined up very nicely and didn’t shift now. I PLA welded it from the inside, then started the sand, prime, fill loop again. I now have my base coat of silver done and the hunt for the best color begins.
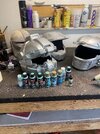
I bought a bunch of blues and teals to test out on the broken helmet. I tried to learn to airbrush, but clogged it and have to figure out how to get it all the way apart to fully clean it. So, I decided to test them ye olde fashioned way with a paint brush. I numbered the paint caps, and the painted spots on the helmet so I can tell them apart. I think 1, 2, or 7 but wouldn’t mind some input.


I started with the torso. I made the thruster pack removable and attach with magnets. I have the shins 90% done, boots are started and will be attached to these ridiculous jimmy buffet boat shoes that I found, and I started one of the thighs. This is where I lost steam. Like for 10 months I didn’t do anything. Took a while to find a good printable helmet file, but ended up purchasing a file from Rogue Workshop.
I split the helmet in half in mesh mixer, sliced it, and away we go. Easy peasy right? Nope. First run on the front, I had 2 layer shifts which also caused massive support failure. I figured I would let it play out, and it ended up printing fine. I split it at the shifts and re glued, problem solved. Connect the front and back, and shifts at the last second before the glue cures, so now I have a ridge to deal with. Sand, fill, prime, sand, fill, prime. Got the helmet looking good. Time for some paint! I get my silver base layer on, and forget to move it off my janky pvc stand. The stand blew over and broke it to pieces. New breaks, not on the layer shifts or original seam. I got real frustrated but I added some alignment holes and reprinted it. Everything lined up very nicely and didn’t shift now. I PLA welded it from the inside, then started the sand, prime, fill loop again. I now have my base coat of silver done and the hunt for the best color begins.
I bought a bunch of blues and teals to test out on the broken helmet. I tried to learn to airbrush, but clogged it and have to figure out how to get it all the way apart to fully clean it. So, I decided to test them ye olde fashioned way with a paint brush. I numbered the paint caps, and the painted spots on the helmet so I can tell them apart. I think 1, 2, or 7 but wouldn’t mind some input.