GEN2 Scout/Palmer 2.0 build - EVA foam

Status
Not open for further replies.
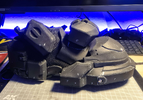
So. Finally have all the pieces for the shoes and now just in the process of making details on the front plates.
I've assembled all the pieces to se how they will look like all together on the shoe.

1661383838886.png


I've also started to work on the templates for the foam pieces for the shoe.
Now I have a dilemma. I had an idea to cover pretty much whole shoe with thin EVA foam. However I fear it wouldn't be practical and as the foam is insulating material it could make the shoe unbreatheable.
And seeing how little of the shoe is actually visible I could settle just for few pieces - mainly to raise the middle section and to break where the shoe ends in a straight line. And I could just paint some lines as illusion to make it more accurate to how it's in the game.
(I'll have to cut and make a nice profile for the middle section of the armor so it looks and sits nicely but that's after the shoe is complete)

1661383851543.png


Did a quick photo earlier today when it still was bright to see how the shoes will look like on the feet.
Excuse the bucket - I was cleaning the flat. It's also so hot outside again here.

1661383927831.png


So. Now is the crazy idea part.
But hear me out!
It's surely not that crazy.
Now. What if I'd cut the zentai suit at the very bottom and glue the shoe to the zentai suit on the inside?
It would make perfect transition! (whether I'll go with it or not I'll cut a hole in the feet anyway so the suit doesn't pull down and it's more comfortable to walk)
I'd just have to make cut a hole in the feet of the suit and glue it on top of the shoe. And the material on the zentai suit makes it perfect for both painting and gluing eva foam on it.
Seems like the perfect solution. Perfect seamless transition. Perfect for painting on the textures and gluing on the foam pieces on the whole suit. Plus it'd be even faster to suit up.
Gotta admit I'm very leaning forward to this option and rather trying to think of arguments against going with it.
:oops:

1661383950606.png
 
They make these waterproof boot covers that you may be able to slip over your boot to cover it up!
Also I remember reading your first thread back in the day when I was debating doing foam or pep for my first ODST cosplay. Crazy to see these legends returning
 
They make these waterproof boot covers that you may be able to slip over your boot to cover it up!
Also I remember reading your first thread back in the day when I was debating doing foam or pep for my first ODST cosplay. Crazy to see these legends returning
Thanks but the issue is those bootcovers end in a straight line as well. Also they aren't cheap either and I'm afraid the material they are made of would make the foot hard to breath.
Haha. I'm glad to be back and I'm even more glad to see those legends return indeed!
 
So. Small update but I've gone with gluing the zentai suit onto the shoe. It's a slow process as I'm using the E6000 glue and it dries much slower than contact cement. But when I tested both on a small piece contact cement didn't seem to hold as well as the E6000.

My first try was a fail. I started gluing from the front and and later found out it would be stretching the fabric so much that the shoe would be bit hard to wear and also I had quite lot of fabric just hanging in the back. So I restarted the process this time from the very back. It turns out it's a success.
First shoe is pretty much finished and I'll just have to cut off part of the fabric and glue it onto the shoe. Slow process so I'm doing it in smaller pieces.
I don't have to be perfect with the gluing as just a little part of the seam will be visible between armor plates and this part is nicely put underneath that rubber. I just need it to hold. Also the back of the shoe isn't covered in fabric - I don't need it to as it'll be covered by armor and I wanted to raise the material a bit so it won't be pulling when I move my legs.
I've also started gluing the second shoe.

Started doing the details on the front armor too but I found I'll have to reprint few parts as I must have thrown them away and I'll need few of those templates again.

And I was in the DIY store and found the perfect screws! Yeah. There are quite many screws on the whole armor (4 on each front part of the shoe alone) and I found them perfect - they seem to be perfect size, are very short, don't have sharp pointy end so I won't have to sand them down. And last but not least - they have hex! I don't think I could get closer to how it's in the game.
I know I could have used some kind of plastic material instead but I like how screws have that natural metallic shine to them so I'd like to put screws instead.

I've also ordered Plastidip but it'll arrive next week. I'd like to test it out and cover the shoes to see how it'll all look after plastidipping.

1661562200973.png
 
Finally finished detailing the front sections. All I have to do is fill few small gaps but that's pretty much it.

1661729186051.png


That means I have finished construction of all armor parts of the shoes.

1661729255043.png


I'm still finishing gluing the fabric onto the shoes. A long process because E6000 dries so long. But I'm almost finished.

Also before I plastidip the shoes I'm debating whether to put on some physical damage onto the armor parts or leave them as they are and later on just paint on. What I mean is some dents in the armor as if it the metal was physically damaged. If I were to do this it'd be rather closer to the underside since Spartans are walking and running on all kinds of terrain.
Just honestly don't know if I want do to this. While I plan to do some physical damage onto the armor (preferably chest piece and shoulder) maybe with some plasma damage I just don't want to overdo it and make overly damaged and beaten up armor. Just one that appears worn with history of service and battles.
But then I don't know if I'd want to ruin all this hard work hah.
 
Yeah thinking of where battle damage should go and where it should not is quite difficult.
 
Weathering is so much fun, but when it comes to physically manipulating your work to do so (instead of just paint), it becomes pretty scary. I know foamsmiths like SKS Props and Punished Props cover that topic from time to time, so they'll have some information on what tools and techniques to do it well.
If you want to plan it out, you can start by using a pen/sharpie to mark where you logically think and scratches, dents, plasma burns, bullet holes etc. would go. Always best to start out with just a little physical weathering, then add more if you want.

Keep in mind things like:
  • Which high points are likely to receive damage
  • Internal corners are not very likely to get dented or scratched, unless it was from a big impact
  • What type of weapon may have hit your armour, using what kind of ammo (if projectile based), from which direction, etc
  • What environments or enemies have you dealt with
The list goes on, but they are just some starters
 
Big mission abort. Do NOT do any of that what I've been trying to do with the shoes and undersuit.
I thought I had a big brain plan. I was laying in bed and thinking while falling asleep.
Turns out if I were to glue the boots to the undersuit - how will I be able to put on shins and thighs? Would be impossible unless you'd have like 2-piece armor piece which I don't plan to.
So. Scratch that completely. I'm not doing that after all. Worst part is - I've wasted time and resources. I can't separate the pieces so I've already ordered new zentai suit. Sadly I also ordered same new shoes as now that they are glued with the fabric at a profile to fit with the suit, now the fabric looks wonky and wrinkled on top. Ugh.
Too much overthinking and overdoing it.
I regret everything.


Yeah thinking of where battle damage should go and where it should not is quite difficult.

Oh yeah. It is. It's easier with paint because you can always repaint or cover up some spots. But some physical damage is much harder to fix, right?

Weathering is so much fun, but when it comes to physically manipulating your work to do so (instead of just paint), it becomes pretty scary. I know foamsmiths like SKS Props and Punished Props cover that topic from time to time, so they'll have some information on what tools and techniques to do it well.
If you want to plan it out, you can start by using a pen/sharpie to mark where you logically think and scratches, dents, plasma burns, bullet holes etc. would go. Always best to start out with just a little physical weathering, then add more if you want.

Keep in mind things like:
  • Which high points are likely to receive damage
  • Internal corners are not very likely to get dented or scratched, unless it was from a big impact
  • What type of weapon may have hit your armour, using what kind of ammo (if projectile based), from which direction, etc
  • What environments or enemies have you dealt with
The list goes on, but they are just some starters

Oh yeah. When I was making it few years ago I completely overdid it with the weathering and it didn't look good (below on left) then I was upgrading and repainting the pieces but the scratches on foam I did werent' looking great either - just as if it sliced through the metal as if it wasn't durable metal.

sfgs.JPG


I'll definitely do majority of the weathering with the paintjob, just scratched/chipped off paint but just wondering about few physical dents and imperfections due to use of the armor.
But don't want to overdo it this time.

I think I'll try do something similar to what they did in Infinite. I think Infinite has best weathering so far - both armor weathering and dirt and dust on the armor (all previous games mainly lacked any dirt on the armor).
Infinite has a lot of just chips of the paint on the armor with metal showing through but also there are quite lot of physical tiny dents on the armor in many places too. I really like that.
Leaning toward something similar tbh.

1661771676782.png
 
Last edited:
"Clamshell" (2 piece) is actually super convenient if you ever wanted to debate going that route. Once you find a good place to split the pieces it makes both storage and suiting up & down super nice! I can see how you could run into a few issues having the boots permanently attached to the undersuit however. Maybe a zipper or snaps to attach/detach?
 
Was thinking about a clam shell method for future projects as well, though I haven't seen it be done
 
Was thinking about a clam shell method for future projects as well, though I haven't seen it be done
Reach chestpieces are commonly done that way for people with big heads. My Reach build (foam) and my Vaz build (kit/print) operate that way incase you're curious
 
"Clamshell" (2 piece) is actually super convenient if you ever wanted to debate going that route. Once you find a good place to split the pieces it makes both storage and suiting up & down super nice! I can see how you could run into a few issues having the boots permanently attached to the undersuit however. Maybe a zipper or snaps to attach/detach?

Yeah I know what you mean. For some armor pieces like ODST where even Weta did it this way when they were doing costumes for Blomkamp's H3 live action trailer. However gen2 Scout does have 2 big solid plates on the sides and only option would be to connect it in the front and back and it's nowhere near ideal as it would be very hard to make them appear seamlessly as one connected piece. Actually I'm already planning possibly to do one seam but on the inner back side and put in there elastic bands so while taking it on and off it could be pulled apart a little.
Honestly no idea - probably you could make the boots attached to undersuit. It wouldn't be very practical for use but it would be possible. Honestly dunno why I was even brainstorming that. However I went back to making undersuit and shoes just separate. Guess it just works best and is most practical.

Was thinking about a clam shell method for future projects as well, though I haven't seen it be done

I've seen this method used pretty much only on the ODST shins. Weta and Legacy both used this while making live action trailers even. But the shins the buckles and straps are on the outside.
Don't recall seeing it on any Spartan armor tbh.
 
Reach chestpieces are commonly done that way for people with big heads. My Reach build (foam) and my Vaz build (kit/print) operate that way incase you're curious
Oh I thought all chest pieces are done as 2 pieces and just connect them with buckles, magnets or whatever one desire. It would be very hard or impossible to take it on and off otherwise.
 
Oh I thought all chest pieces are done as 2 pieces and just connect them with buckles, magnets or whatever one desire. It would be very hard or impossible to take it on and off otherwise.
The main other instance of clamshell is the reach thighs, I've seen the inner gasket and middle piece as a removeable component. The H4/5 ones would be difficult to pull off though. I have seen Spacemeat manage to do it in a pretty creative way! Link to his method here
I'm not too knowledgeable in H4/5 armor though so I'm pretty sure you know the best way to do it here :D
Oh Spacemeat! I remember when he was making that armor and it was so huge because most armor piece connect with magnets!
Yeah. His Spartan cosplay is amazing and he did make one piece out of thighs and just connects it in the back. But his shins are 1 piece and he just puts them on through the foot. He's done a great cosplay with many innovative solutions.

1661807918905.png
 
I'm waiting for shoes, zentai suit and plastidip to arrive this week but in the meantime I've started profiling the foam parts so they'll nicely fit onto the shoe and my foot. Just preparing the shoe parts pretty much. So just slowly doing some small progress while relaxing - I've been working a lot on this cosplay so far and it's been pretty tiring in the long run.
I haven't started to work on any other parts of the armor yet because I just want to finish the shoes as much as I can before I move on to the next part. And also debating if I should start working on shins soon or some other part.

Also initially I've kept the gloves and the helmet from the original build. I've planned to reuse them here on this one.
However seeing them now - I don't like how all the cuts look like on them. I'm not able to remove the armor pieces from the glove either to work on them and repaint them as they are permanently glued on.
By the way just one of these gloves weights more than all of the foam pieces for both shoes.

1661813380549.png


So learning how it is working with foam I'm planning on redoing the gloves as well with foam parts.
I've been looking on the internet for some gloves that would look closest to what I'd like and I decided on these.
I'll dye that gray underside to black so I don't worry about the color. But seeing that the glove is clean and has no stickers or markings and is slim it makes it perfect for what I want - to glue on all those parts and also this time I'm thinking about painting on some lines to make them appear more accurate to in-game model if possible.

1661813748364.png
 
Took some time to get these last boot parts done but I managed to do them.
They might look bit weird on their own but they are exactly what I wanted and needed.
Gotta admit this may be the simplest but having no templates and having to brainstorm these was the hardest part so far.

1662412811938.png


At first I was thinking of another layer in the front on them and also to make a foam piece in the very back of the shoe to cover a small piece of fabric that sticks out. However after testing it out I decided against. It's rather unnecessary and it doesn't move with the leg and shoe so when moving it rather just sticks out in a weird way.

1662412833739.png


This is how that foam part on the shoe will look like with when all is assembled. It'll be halfway covered by front armor anyway.
Mainly I did this piece so the middle section of the armor can sit nicely raised like in-game.
And how I plan to glue it on - just glue it in the middle (I put another piece of foam in the middle so it's raised and I can use it as a base to glue onto shoe) and keep the sides unglued as the shoe is flexible to avoid putting stress on either.

?hash=83660253d5529932db823019fc24fa15.png
 

Attachments

  • 1662412847536.png
    1662412847536.png
    2.1 MB · Views: 74
Finding good gloves has been biggest pain so far. I've bought and returned like 3 pairs of different gloves before I've found the perfect ones.
Roeckl bicycle gloves turned out to be even better than my old ones. Flexible, slim and longer sleeve. Oh and no weird patterns and stuff on them. Perfect for gluing on armor parts on there.

I've also started working on the tiny armor sections that are on the gloves. I've started them as a test but gotta admit I'm happy with how they are turning out so far and will be keeping them. I've scaled them tiny bit down from my old glove but also tried to make them more profiled similar to how they are in-game. Seeing it as big improvement over the old one in how much better they fit the fingers and how better they look as a whole.

1662751439918.png


Old glove for comparison.

1662751549520.png
 
Finding good gloves has been biggest pain so far. I've bought and returned like 3 pairs of different gloves before I've found the perfect ones.
Roeckl bicycle gloves turned out to be even better than my old ones. Flexible, slim and longer sleeve. Oh and no weird patterns and stuff on them. Perfect for gluing on armor parts on there.

I've also started working on the tiny armor sections that are on the gloves. I've started them as a test but gotta admit I'm happy with how they are turning out so far and will be keeping them. I've scaled them tiny bit down from my old glove but also tried to make them more profiled similar to how they are in-game. Seeing it as big improvement over the old one in how much better they fit the fingers and how better they look as a whole.

View attachment 323069

Old glove for comparison.

View attachment 323070
You may have already answered this but do you plan on having this one battle worn or a newer armor look, cant wait to see more, and its nice to see the small details posted its what really makes the armor detailed and stand out.
 
Gotta admit these pieces might be tiny but they take quite some time to finish.
Now will have to test how to do fingertips and the big middle piece.

1662845399983.png


You may have already answered this but do you plan on having this one battle worn or a newer armor look, cant wait to see more, and its nice to see the small details posted its what really makes the armor detailed and stand out.

Oh yeah. I'll 100% do weathering and battle damage. I can't imagine myself doing a brand new fresh out of factory armor. I prefer one with history of use and battles with some weathering and dirt.
I'll just try to do the weathering better now than last time I was doing it.
 
Status
Not open for further replies.
Back
Top