You are using an out of date browser. It may not display this or other websites correctly.
You should upgrade or use an alternative browser.
You should upgrade or use an alternative browser.
Halo 4 Hayabusa Build - Hyperballistik & Demogorgon Collaboration
- Thread starter Demogorgon
- Start date
- Status
- Not open for further replies.
sweet build!!!!
Thanks!
hey guys , any updates?? are you all ok??
I apologize for the absence of any updates on this project. It seems that every time I get any free time to work on it something comes up. I haven't heard from Hyper in a while so I'm not sure how he is doing with his build or the progress with the 3D printed helmet. I'll be pepping out my helmet, which is now uploaded to 4shared and on my modeling thread, so I'll have update pictures on that as I go. It's going to be a pain to pep it but the end result should be something amazing. I've been really eager to get this build back up and going so hopefully life will slow down a bit and let me have some time to work on this haha.
Great job so far! I wish this armor was in game...
Please don't reply about necro posting because it's only a month old not 2 or 3
No worries about necro posting, this is still a somewhat alive thread haha. I'll be pepping out my helmet file so you'll start to see some progress pictures in the next few days (hopefully by tomorrow).
Finally an actual update for this build haha. I started pepping out my helmet file and so far it's going better than I had anticipated. It's a tricky file to pep out but I'm taking my time with it. The helmet file is up on the modeling thread if anyone wants it.


I'll have more for you guys later.
I'll have more for you guys later.
Attachments
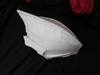
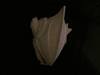
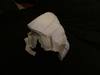
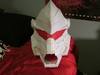
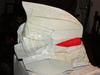
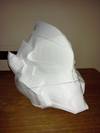
I'm about half of the way completed with the helmet pep. The face part is definitely the hardest and I'm saving that for last haha. The little slot detail under the visor that goes from the nose around to the end of the visor was pretty tricky and turned out a little on the messy side but much better than I had anticipated. Should be pretty easy to clean up with a Dremel after hardening and smoothing. Also colored the visor because I got bored haha.


-update-
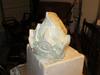
A couple more photos, Nearly done pepping!


-update-
A couple more photos, Nearly done pepping!
Attachments
-
 IMG_1422_zpsb4651ebd.jpg36 KB · Views: 321
 -
 IMG_1420_zps0a5ee636.jpg34.9 KB · Views: 335
 -
 IMG_1419_zps6588798f.jpg39.6 KB · Views: 332
 -
 IMG_1417_zps9394ea28.jpg45.2 KB · Views: 347
 -
 IMG_1430_zps3cd79f49.jpg49.2 KB · Views: 337
 -
 IMG_1429_zpsfca6985c.jpg43.7 KB · Views: 316
 -
 IMG_1428_zps3a24ea36.jpg41.1 KB · Views: 349
 -
 IMG_1427_zps29512410.jpg45.1 KB · Views: 372
Charlie117
Member
YYYYYYYYYYYYYYYYYYYYESSSSSSSSSSSSSSSSSSSSSSSSSSSSSSSSSSSSSSSS YOU ARE AAAAAAAAAAAAAAAAAALIVEEEEEEEEEEEEEEEEEEEEEEEEEEEEEEEEEEEEEEEEEEEEEEEEEEEEEEEEEEEEEEE ammmmmmmmmmmm so glad that you came back wow what a nice helmet!!!!! yes yes am exitedddddddd ")
YYYYYYYYYYYYYYYYYYYYESSSSSSSSSSSSSSSSSSSSSSSSSSSSSSSSSSSSSSSS YOU ARE AAAAAAAAAAAAAAAAAALIVEEEEEEEEEEEEEEEEEEEEEEEEEEEEEEEEEEEEEEEEEEEEEEEEEEEEEEEEEEEEEEE ammmmmmmmmmmm so glad that you came back wow what a nice helmet!!!!! yes yes am exitedddddddd
I'm excited to be back on this build! I'm hoping that the helmet will be finished by tonight (which is a good possibility) and I can begin hardening tomorrow.
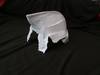
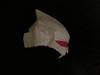
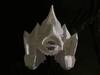
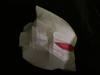
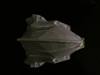
So I was putting the chin area together and when I sat it down this was staring at me...
It reminded me of those fish with little teeth with it's mouth gaping open and now I can't stop laughing haha...
Anyways the pep should be done in an hour or so and I'll start hardening tonight.
Attachments
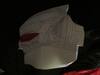
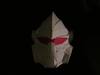
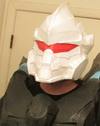
Helmet is done with the pep stage! It only took a few days haha. Tomorrow I'll be starting the hardening process as long as the weather here in Florida is nice and it doesn't decide to rain.


Here's a picture with the helmet on and the chest piece on so you can get a sense of the scale. I think the scale is pretty near perfect.

Here's a picture with the helmet on and the chest piece on so you can get a sense of the scale. I think the scale is pretty near perfect.
Attachments
Charlie117
Member
beautifulllllllllllllllllllllllllll, so you used the default scale ?? such a lovely helmet. perfection at its finest!
beautifulllllllllllllllllllllllllll, so you used the default scale ?? such a lovely helmet. perfection at its finest!
Thanks! I made about 3 of the low def ones to get the scaling correct a while back in like December-ish so that I would only have to pep the HD file once and know it would fit properly. The scale ended up being the same height as the H3 'Busa helmet (360mm tall). Just my luck it has been raining here the past few days so the hardening is on hold
. I've also been thinking about the forearms. Originally I planned on using the Mk6 forearms (unlocked by beating campaign on Legendary) but lately I've been thinking of modeling a custom pair or just using the recruit forearms. As for my paint scheme, I think I'm going to settle on Red as a primary and Black as secondary. I wanted black as my primary but when I sprayed on the base coat of plasti-dip, of which was black, some of the details weren't coming through. I'm not too keen on doing any battle damage, although I may do a black wash just to dirty it up a touch, but other than that I want the armor almost newer-looking. I think the helmet will look pretty intimidating with Red primary and a black visor. I'm not too sure how the painting will go as there is no reference to a paint scheme for this armor. I'll try some different ideas in photoshop and upload them sometime and people can vote on which one they like better haha.- Member DIN
- S613
ITs been storming down here too.. Can't wait to see more.
ITs been storming down here too.. Can't wait to see more.
Thanks! I should be posting updates more frequently as my motivation for the build is on full steam and it's coming together very well.
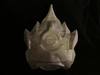
Today was a good day! The weather was awesome, sunny and low 70's, although it was really windy. I managed to get a couple coats of resin done on the outside. I'll be doing a couple more coats on the inside, or maybe just one more, and then I'll be using the rondo method to finish up the hardening.
Attachments
Exciting update for tonight!
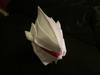
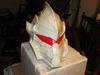
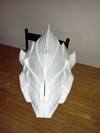
Hyper was able to get the helmet printed:


Hyper will be working on this helmet and I believe he will be molding it and selling casts in the future. As for the pep version I'm working on, I got the rest of the hardening done tonight and will start the smoothing and detailing process in a couple days. I want to make sure the rondo has time to completely cure before I start smoothing and detail work.
Hyper was able to get the helmet printed:
Hyper will be working on this helmet and I believe he will be molding it and selling casts in the future. As for the pep version I'm working on, I got the rest of the hardening done tonight and will start the smoothing and detailing process in a couple days. I want to make sure the rondo has time to completely cure before I start smoothing and detail work.
Attachments
So nice! Are you going to do details with bondo?
Thanks. I'm really thrilled with how they both turned out (pep and print). Hyper and I will both be doing detail work and I will be using bondo, I think Hyper will also.
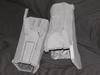
It's been raining all day so I haven't had a chance to start smoothing and detailing the helmet. I was able to knock out the recruit forearms though and I'll continue to add detail to them. Here's what they look like at the moment:

As it stands tonight, the chest piece and the shoulders are pretty much finished with the detail work and are ready to prep for paint, the shins are about 95% of the way detailed, the knee pads are ready to paint, the thighs still need to be detailed as well as the helmet, and yet to be made are the hand plates, boots, butt plate and abdomen/groin section. I will also be making a duct tape dummy tonight so that will be fun. More updates will come soon.
As it stands tonight, the chest piece and the shoulders are pretty much finished with the detail work and are ready to prep for paint, the shins are about 95% of the way detailed, the knee pads are ready to paint, the thighs still need to be detailed as well as the helmet, and yet to be made are the hand plates, boots, butt plate and abdomen/groin section. I will also be making a duct tape dummy tonight so that will be fun. More updates will come soon.
Attachments
glasscutter
Jr Member
If you haven't bought the tape yet, I would recommend doing each layer in a different color. It's pretty hard trying to get a full second layer or more when its the same color as the first.
If you haven't bought the tape yet, I would recommend doing each layer in a different color. It's pretty hard trying to get a full second layer or more when its the same color as the first.
I had a few rolls of plain silver duct tape in the garage so I just used them up. I will say it was very awkward to make but it will be well worth it. I plan on stuffing it with shredded news paper but if anyone has a better suggestion I'm all ears haha. For now I'll leave it just stuffed but eventually I'll build a skeleton from PVC piping and a base for it to stand upright. I would also like to build a display case similar to the one HERE, it would be a pretty cool display for the armor.
glasscutter
Jr Member
I ended up using waded up packing paper. It worked pretty good. For a full dummy I used 3 1/2 packs of packing paper at 70 sheets a pack from Home Depot.
- Member DIN
- S613
I tried to make a Duct tape dummy before it didn't turn out to well. Between an impatient girlfriend helping me. lol Not enough layers the whole thing fell apart quickly.
- Status
- Not open for further replies.