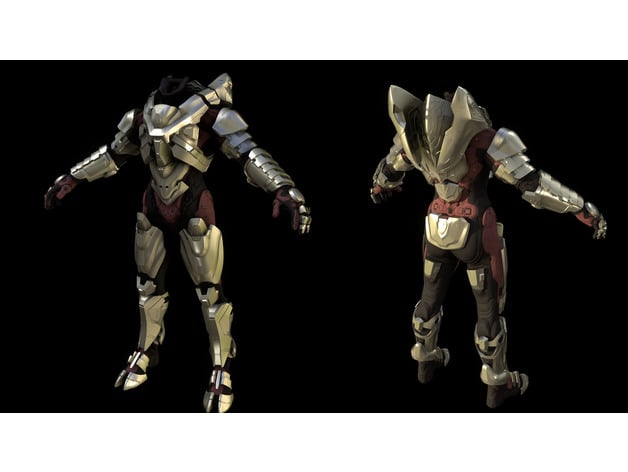
Update 3/18/2021: Armor released
 www.thingiverse.com
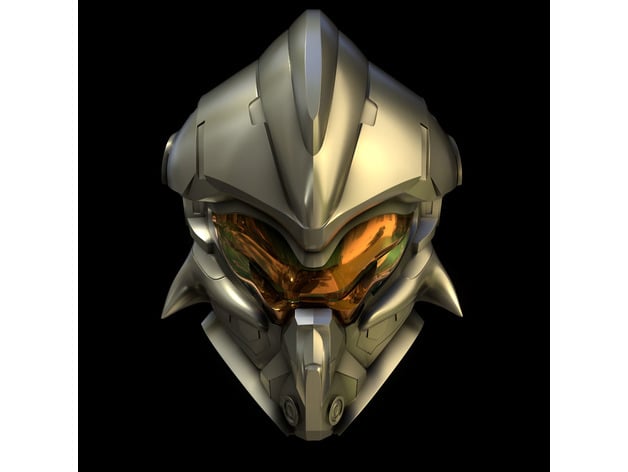
Update 3/2/2021: Helmet released
 www.thingiverse.com
So I've been through a lot these last few weeks and situation in Austin right doesn't help. I Decided that I was going to back off for a bit so I can process and deal with things, while still working on smaller, simpler projects. Well, for some reason I felt guilty about it?
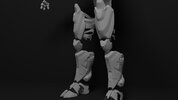
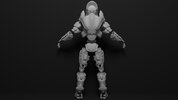
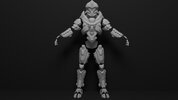
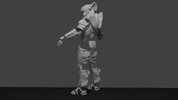
So hear I am, back at it again, working on a new 3D printable armor set. Requested by ReClaimer8015 I am doing the Halo 5: Guardians Helioskrill Armor set. Now due to some other projects I working before this and the that my Zbrush sub ran out, it will be awhile before I actually get it finished. It was just driving me crazy in the back of my head thinking about how I was going to approach it, so I thought I'd get a head start and go ahead and break it down now for when I do get to working. This will possibly be the more challenging of my armors so far as this set has some kinky kinks and a lot of more complex detail compared to my others. Due to this will be taking some creative liberty and remake some pieces to make it simpler and easier to print and assemble.

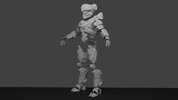
First thing is to import the model cut it in half and get rid of all the "padding" and inside faces. first thing that draws me is the monster of a torso.


Unlike the Hellcat armor where I was trying to condense and merge all pieces in this case I need to break it up into more pieces. The chest plate was just one big piece connected to the side and back so I need to separate it into smaller manageable pieces. I separate the back piece and combine it with "jetpack" module. Then I sperate and combine the bottom side piece with the sternum and separate the Top of the chest plate. the 2 ab plates and spine plate are fin as they are. Like the Hellcat the back module will attach separate with pegs to the rest of the back.
You can kind a see it but the back Module has and Elite head on it whisk I will need to sculpt. Unfortunately I am not a character or organic artist so it's going to take me some time to do it.
I kinda go carried away and already started a little bit as I was going.


Now to the kinks. A good portion of the armor is is what i could only perceive as "leather" straps and braces. I Decided not to bother with them as I just don't think they will look good printed over just making the straps out of what every fabric you prefer. AS you can see on the arms and calf parts there is what seems to be a woven bracer texture. Again I do not intend on sculpting in this detail. While I will still make them, it will just be a receded flat surface. You can always glue leather straps onto to get the exact same effect and it will look cooler than printed geo. I will also serrate the plating from the braces as well incase you would like sew your own and attach it. I'm also not going to bother with the heel of the boot either, the way its shaped it just won't look good on a boot or running shoe


That the gist of it for now. The most time consuming part of this will be adding back in all the detail. I have 2 other projects before this, 2 RWBY weapons Sun Wukongs Gun-Chucks and Pyrrha Nikos Gun-Spear (mechanical) so it will probalby be about few weeks to a month before I come back to this.
Halo 5: Guardians Hellioskrill Armor by BreakerboxCosplay
It has been a rough couple of weeks, everything seems to domino and when it rains it pours. Despite all that though, I have finally complete the full Helioskrill Armor Set!Creating this set required some improv on the design and may require additional work post print to get the full effect of...
www.thingiverse.com
Update 3/2/2021: Helmet released
Halo 5: Guardians Helioskrill Helmet by BreakerboxCosplay
Update 1/22/2022: based on feed back I have remade the helmet and visor as well as created a visor buck for vac forming.Dropping the HelioSkrill Helmet early as a teaser for for the rest of the armor. Should fit average head sizes. Wasn't able to renew my Zbrush license so I had to do...
www.thingiverse.com
So I've been through a lot these last few weeks and situation in Austin right doesn't help. I Decided that I was going to back off for a bit so I can process and deal with things, while still working on smaller, simpler projects. Well, for some reason I felt guilty about it?
So hear I am, back at it again, working on a new 3D printable armor set. Requested by ReClaimer8015 I am doing the Halo 5: Guardians Helioskrill Armor set. Now due to some other projects I working before this and the that my Zbrush sub ran out, it will be awhile before I actually get it finished. It was just driving me crazy in the back of my head thinking about how I was going to approach it, so I thought I'd get a head start and go ahead and break it down now for when I do get to working. This will possibly be the more challenging of my armors so far as this set has some kinky kinks and a lot of more complex detail compared to my others. Due to this will be taking some creative liberty and remake some pieces to make it simpler and easier to print and assemble.
First thing is to import the model cut it in half and get rid of all the "padding" and inside faces. first thing that draws me is the monster of a torso.
Unlike the Hellcat armor where I was trying to condense and merge all pieces in this case I need to break it up into more pieces. The chest plate was just one big piece connected to the side and back so I need to separate it into smaller manageable pieces. I separate the back piece and combine it with "jetpack" module. Then I sperate and combine the bottom side piece with the sternum and separate the Top of the chest plate. the 2 ab plates and spine plate are fin as they are. Like the Hellcat the back module will attach separate with pegs to the rest of the back.
You can kind a see it but the back Module has and Elite head on it whisk I will need to sculpt. Unfortunately I am not a character or organic artist so it's going to take me some time to do it.
I kinda go carried away and already started a little bit as I was going.
Now to the kinks. A good portion of the armor is is what i could only perceive as "leather" straps and braces. I Decided not to bother with them as I just don't think they will look good printed over just making the straps out of what every fabric you prefer. AS you can see on the arms and calf parts there is what seems to be a woven bracer texture. Again I do not intend on sculpting in this detail. While I will still make them, it will just be a receded flat surface. You can always glue leather straps onto to get the exact same effect and it will look cooler than printed geo. I will also serrate the plating from the braces as well incase you would like sew your own and attach it. I'm also not going to bother with the heel of the boot either, the way its shaped it just won't look good on a boot or running shoe
That the gist of it for now. The most time consuming part of this will be adding back in all the detail. I have 2 other projects before this, 2 RWBY weapons Sun Wukongs Gun-Chucks and Pyrrha Nikos Gun-Spear (mechanical) so it will probalby be about few weeks to a month before I come back to this.
Last edited:
 !!!
!!!