Foam Halo Reach, Recon build (no longer apartment style)

Status
Not open for further replies.

OttyrCosplay

Member
After a long break from costuming, I'm back BBY.

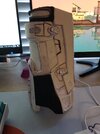
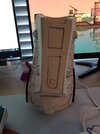
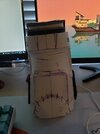
I decided to go with a Halo Reach foam build, APARTMENT EDITION. edit as of March 2023:....well...I have a house now...sooooo. WE GONNA GET TOXIC, FOLKS. So stay tuned. Gonna do cosplay soon TM.

What does Apartment style mean? It means no spray paint, no spray sealant, no barge, no power tools (mostly).

I do still have my heat gun and will be traveling the long trek a whole 10 minutes down the road to my parents house to Dremel the big pieces.

I'm also using superglue and hotglue reinforcement for assembling.

Currently planning on mod podge and handpainting for sealing and painting.


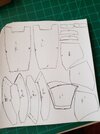
The first pieces I built were the hand armor, which was pretty dang easy.

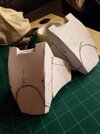
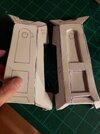
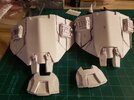
The next were the recon shoulders...which were less easy. There's a lot of detail missing from the foam files in the armory. Thankfully I used the Spartan blender files to get good references. I built the foam shoulders as is from the armory and then freehand the detail bits.

The part I am not super happy are the little coffin details at the bottom of the shoulder. Idk how to build them to proportion while still making sense. I think I did okay but I might try again in the future.
 

Attachments

  • 20220403_211236.jpg
    20220403_211236.jpg
    3.5 MB · Views: 130
Last edited:
IT'S 8 AM, GET UP AND DO COSPLAY!

I have 1.5 hours between I wake up and start getting ready to walk to work. So that gives some time to do a little bit of cosplay (or other stuff) before I have to put on regular human clothes.

Downside is that be precoffee/as I am drinking coffee....is not mentally awake and as I sit here looking at the the foam sheet I just marked up....I realize that A, I didn't need to label things left and right and B, that I labeled left and right the wrong things. So usually all R would be on a piece and all L would be on the other....no I labeled the side the piece should be ON that piece. So for the little banana pieces, one set should be R and the other L but instead I have R1 and L1 as a set.

Also I messed up when I did the letters anyways because the pattern pieces I had printed out were the LEFT SIDE so I had to relabel them

Basically the TL;DR is don't craft when you first get up in the AM and maybe let your coffee start working
 

Attachments

  • 20220405_080257.jpg
    20220405_080257.jpg
    897.7 KB · Views: 97
Finished the knee pads last night! I was planning to do an order of operations things where I finished the arms first and then the legs.....and then I remembered the bicep piece....sooooo....I'll probably save that bit for last, lol!

I'm working on the forearm next!

And then the shin and boot.

I already have the shin and forearm pep pattern printed (say that 5 times fast!) and cut out. So I estimate to be done with them by Friday. And I can work on the thigh, boot, and waist over the weekend.
 

Attachments

  • 20220405_201427.jpg
    20220405_201427.jpg
    1.2 MB · Views: 113
That moment that got you crying in the club at 8 am (aka, my apartment). Don't be like me. Make sure you save OFTEN when you're arranging your Armorsmith pieces. I did not. And literally got done doing the entire thing and it crashed. 30 minutes of work DOWN THE DRAIN.
Cry Reaction GIF by iQiyi
 
That foamwork looks so well done! Looking forward towards your build!
Thanks!

I did hit a conundrum last night that I am hoping for some feedback on from everyone in the peanut gallery

Making the forearms, in picture attached:

Cause left looks wonky but right can't fit the top trapezoid.

Left only has the attaching pieces cut at 45 degree (so the center has all straight edges). Right has all connecting edges at 45 (so anything getting glued together is at a 45 degree cut).
 

Attachments

  • 20220408_224758.jpg
    20220408_224758.jpg
    1.2 MB · Views: 114
Overall right looks better at the connection points. To get an idea I opened the file I have for the Reach forearms in Armorsmith and checked angles. It's estimating 50 degrees for the connection between the "top" and "sides" there.

1649688438223.png


You can always connect the right one at the edges and then backfill any gap with hot glue, shoe goo, scrap foam, or whatever else you have on hand rather than pressing the whole edge together.
 
I ended doing the 45 degree on all edges. You were right, Fallen. As well as several others I consulted with.

But the forearm is finally done! Other than clean up and some final details like rivets and dremeling.

And I'll have to use armoramith to check angles in the future! Cause I didn't know it did that!! The more you know!!!l

Up next is the shoe! Cause it's apparently what past me had printed out at work, lol!
 

Attachments

  • 20220423_161819.jpg
    20220423_161819.jpg
    1.1 MB · Views: 99
  • 20220423_161824.jpg
    20220423_161824.jpg
    1.1 MB · Views: 103
  • 20220423_161833.jpg
    20220423_161833.jpg
    948.6 KB · Views: 101
Very pretty foam work! Keep it up! Apartment-style would raise the stakes a lot, i personally tend to be a "oops ill fix that by sanding it all later!" Kinda foam builder, and that really wouldn't go down so well for this challenge! Looks like its not slowing you down too much!

Great work so far, keep it up!
 
Status
Not open for further replies.
Back
Top